Utilizzare Cilium Gateway API
Introduzione
L'API Gateway è il nuovo standard Kubernetes per la gestione del traffico in entrata. Sostituisce la tradizionale risorsa Ingress offrendo maggiore flessibilità, funzionalità (routing avanzato, bilanciamento del carico, ecc.) e una migliore separazione delle responsabilità.
Nel tuo cluster Managed Kubernetes Cloud Temple, Cilium è utilizzato come CNI e implementa nativamente il supporto per la Gateway API.
:::info[Versioni supportate ] Questa documentazione si applica ai cluster che utilizzano Cilium 1.8.4 o superiore. I CRD della Gateway API versione 1.4 sono preinstallati nel tuo cluster. :::
Obiettivi
Questo tutorial vi guiderà per:
- Comprendere le risorse di base di Gateway API (GatewayClass, Gateway, HTTPRoute).
- Distribuire un'applicazione di test.
- Esporre questa applicazione tramite una Gateway Cilium.
- Testare l'accesso.
Prerequisiti
- Un cluster Kubernetes gestito Cloud Temple operativo.
- Lo strumento
kubectlconfigurato per accedere al tuo cluster. - Lo strumento
cilium.
Concetti Chiave
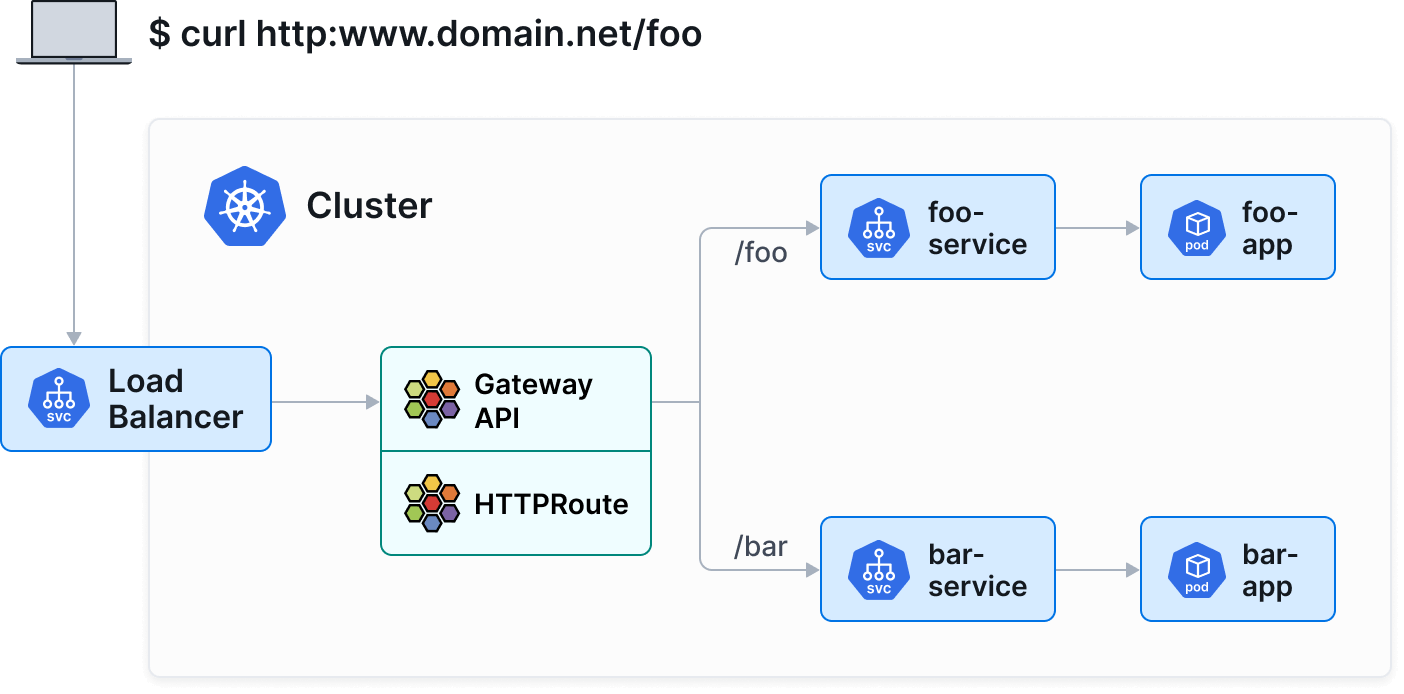
Gateway API scompone la configurazione di rete in tre risorse principali:
- GatewayClass : Definisce il tipo di controller (qui,
io.cilium/gateway). - Gateway : Istanzia un punto di ingresso di rete (load balancer).
- HTTPRoute : Definisce le regole di routing (percorsi, header) verso i Servizi Kubernetes.
Fase 1: Verificare la versione e la GatewayClass
È possibile verificare che il cluster utilizzi una versione compatibile di Cilium (1.8.4+) utilizzando i comandi:
cilium status
cilium config view | grep -w "enable-gateway-api"
Assicurarsi quindi che la GatewayClass di Cilium sia disponibile sul cluster:
kubectl get gatewayclass
Si dovrebbe ottenere un output simile al seguente:
NAME      CONTROLLER           ACCEPTED   AGE
cilium    io.cilium/gateway    True       2d
:::info[Nota ] Se non viene elencata alcuna GatewayClass, assicurarsi che la funzionalità Gateway API sia abilitata nell'installazione di Cilium. :::
Fase 2 : Distribuire un'applicazione di dimostrazione
Distribuiremo un'applicazione semplice che restituisce informazioni sul pod (echo-server).
Crea un file apps.yaml :
apiVersion: apps/v1
kind: Deployment
metadata:
  name: echo-server
  labels:
    app: echo-server
spec:
  replicas: 2
  selector:
    matchLabels:
      app: echo-server
  template:
    metadata:
      labels:
        app: echo-server
    spec:
      containers:
      - name: echo-server
        image: ealen/echo-server:latest
        ports:
        - containerPort: 80
---
apiVersion: v1
kind: Service
metadata:
  name: echo-service
  labels:
    app: echo-server
spec:
  selector:
    app: echo-server
  ports:
  - port: 80
    targetPort: 80
Applica la configurazione :
kubectl apply -f apps.yaml
Passo 3 : Creare il Gateway
Il Gateway richiederà la creazione di un LoadBalancer per ricevere il traffico.
Crea un file gateway.yaml :
apiVersion: gateway.networking.k8s.io/v1
kind: Gateway
metadata:
  name: my-gateway
spec:
  gatewayClassName: cilium
  listeners:
  - protocol: HTTP
    port: 80
    name: web-gw
    allowedRoutes:
      namespaces:
        from: Same
Applica la configurazione :
kubectl apply -f gateway.yaml
Verifica che il Gateway abbia ottenuto un indirizzo IP (potrebbero volerci alcuni istanti affinché il LoadBalancer venga provisionato dall'infrastruttura Cloud Temple) :
kubectl get gateway my-gateway
Attendi che il campo PROGRAMMED sia True e che ADDRESS mostri un IP.
Passo 4 : Creare una HTTPRoute
Ora che disponiamo di un "gateway" (Gateway), dobbiamo instradare il traffico verso il nostro servizio.
Crea un file httproute.yaml :
apiVersion: gateway.networking.k8s.io/v1
kind: HTTPRoute
metadata:
  name: echo-route
spec:
  parentRefs:
  - name: my-gateway
  rules:
  - matches:
    - path:
        type: PathPrefix
        value: /
    backendRefs:
    - name: echo-service
      port: 80
Applica la configurazione :
kubectl apply -f httproute.yaml
Fase 5: Testare l'accesso
Recuperare l'indirizzo IP del Gateway:
kubectl get gateway my-gateway -o jsonpath='{.status.addresses[0].value}'
Inviare una richiesta a questo IP per testare:
curl http://10.200.205.2
Dovresti ricevere una risposta JSON dall'applicazione echo-server che indica i dettagli del pod che ha risposto.
Funzionalità avanzate (Esempio : Canary Release)
Gateway API facilita notevolmente gli scenari di deployment avanzati, come il Canary Release (distribuzione ponderata del traffico).
Supponiamo di avere una v2 della nostra applicazione. Possiamo distribuire il traffico al 90% verso v1 e al 10% verso v2 semplicemente regolando i pesi in backendRefs :
apiVersion: gateway.networking.k8s.io/v1
kind: HTTPRoute
metadata:
  name: echo-route-canary
spec:
  parentRefs:
  - name: my-gateway
  rules:
  - backendRefs:
    - name: echo-service
      port: 80
      weight: 90
    - name: echo-service-v2
      port: 80
      weight: 10
Conclusione
Avete implementato un'infrastruttura moderna per l'esposizione dei servizi con Cilium Gateway API. Questo approccio standardizzato, semanticamente più ricco rispetto agli Ingress, è consigliato per sfruttare le funzionalità avanzate della rete Kubernetes.