Using Cilium Gateway API
Introduction
The Gateway API is the new Kubernetes standard for managing inbound traffic. It succeeds the traditional Ingress resource by offering more flexibility, features (advanced routing, load balancing, etc.), and better separation of responsibilities.
In your Managed Kubernetes Cloud Temple cluster, Cilium is used as the CNI and natively implements Gateway API support.
:::info[Supported Versions ] This documentation applies to clusters using Cilium 1.8.4 or later. The Gateway API CRDs version 1.4 are preinstalled on your cluster. :::
Objectives
This tutorial will guide you through:
- Understand the core Gateway API resources (GatewayClass, Gateway, HTTPRoute).
- Deploy a test application.
- Expose this application via a Cilium Gateway.
- Test access.
Prerequisites
- An operational Managed Kubernetes Cloud Temple cluster.
- The
kubectltool configured to access your cluster. - The
ciliumtool.
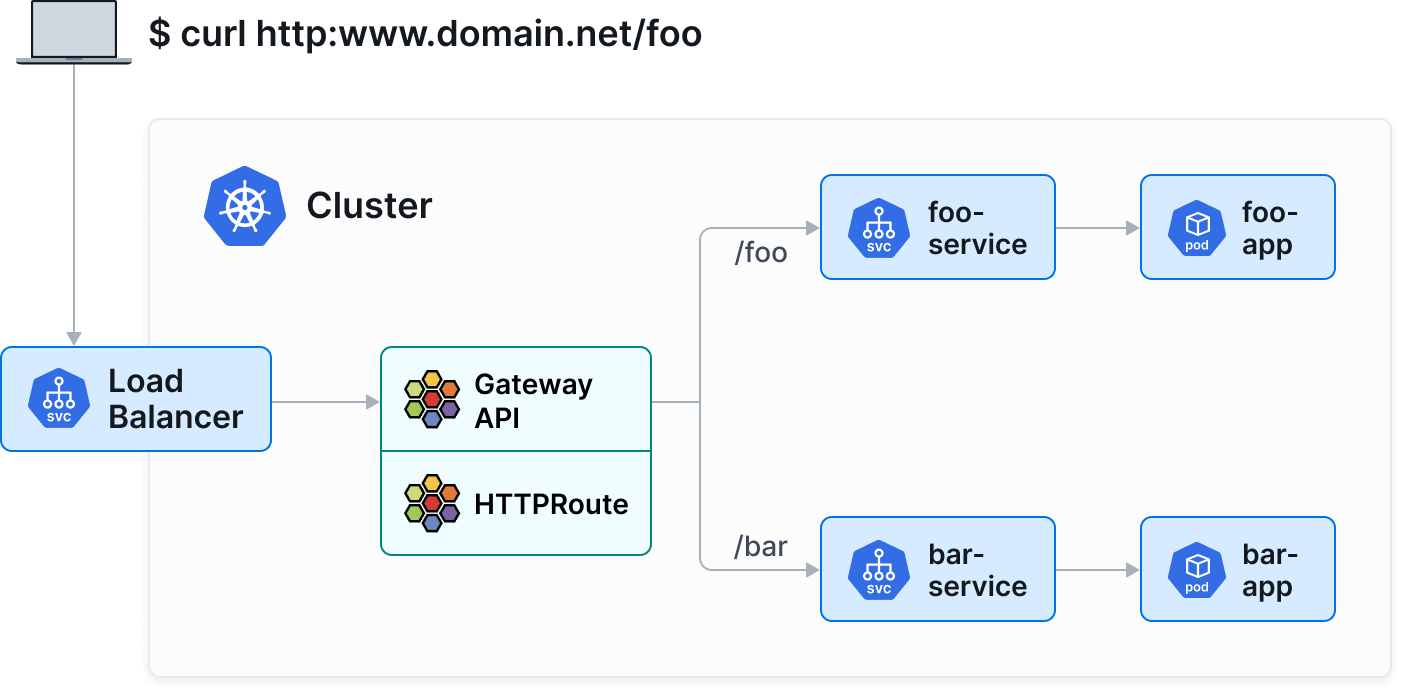
Key Concepts
The Gateway API decomposes network configuration into three main resources:
- GatewayClass : Defines the type of controller (here,
io.cilium/gateway). - Gateway : Instantiates a network entry point (load balancer).
- HTTPRoute : Defines routing rules (paths, headers) to Kubernetes Services.
Step 1: Check the version and GatewayClass
You can verify that your cluster is using a compatible version of Cilium (1.8.4+) using the following commands:
cilium status
cilium config view | grep -w "enable-gateway-api"
Then, ensure that Cilium's GatewayClass is available on your cluster:
kubectl get gatewayclass
You should see output similar to:
NAME      CONTROLLER           ACCEPTED   AGE
cilium    io.cilium/gateway    True       2d
:::info[Note ] If no GatewayClass is listed, ensure that the Gateway API feature is enabled in your Cilium installation. :::
Step 2: Deploy a demo application
We will deploy a simple application that returns information about the pod (echo-server).
Create a file apps.yaml:
apiVersion: apps/v1
kind: Deployment
metadata:
  name: echo-server
  labels:
    app: echo-server
spec:
  replicas: 2
  selector:
    matchLabels:
      app: echo-server
  template:
    metadata:
      labels:
        app: echo-server
    spec:
      containers:
      - name: echo-server
        image: ealen/echo-server:latest
        ports:
        - containerPort: 80
---
apiVersion: v1
kind: Service
metadata:
  name: echo-service
  labels:
    app: echo-server
spec:
  selector:
    app: echo-server
  ports:
  - port: 80
    targetPort: 80
Apply the configuration:
kubectl apply -f apps.yaml
Step 3: Create the Gateway
The Gateway will request the creation of a LoadBalancer to receive traffic.
Create a gateway.yaml file:
apiVersion: gateway.networking.k8s.io/v1
kind: Gateway
metadata:
  name: my-gateway
spec:
  gatewayClassName: cilium
  listeners:
  - protocol: HTTP
    port: 80
    name: web-gw
    allowedRoutes:
      namespaces:
        from: Same
Apply the configuration:
kubectl apply -f gateway.yaml
Verify that the Gateway has obtained an IP address (it may take a few moments for the LoadBalancer to be provisioned by the Cloud Temple infrastructure):
kubectl get gateway my-gateway
Wait for the PROGRAMMED field to be True and for ADDRESS to display an IP.
Step 4: Create an HTTPRoute
Now that we have a "gateway" (Gateway), we need to route traffic to our service.
Create a httproute.yaml file:
apiVersion: gateway.networking.k8s.io/v1
kind: HTTPRoute
metadata:
  name: echo-route
spec:
  parentRefs:
  - name: my-gateway
  rules:
  - matches:
    - path:
        type: PathPrefix
        value: /
    backendRefs:
    - name: echo-service
      port: 80
Apply the configuration:
kubectl apply -f httproute.yaml
Step 5: Test Access
Retrieve the IP address of your Gateway:
kubectl get gateway my-gateway -o jsonpath='{.status.addresses[0].value}'
Send a request to this IP to test:
curl http://10.200.205.2
You should receive a JSON response from the echo-server application indicating the details of the pod that responded.
Advanced Features (Example: Canary Release)
The Gateway API greatly facilitates advanced deployment scenarios, such as Canary Release (weighted traffic distribution).
Assume we have a v2 of our application. We can distribute 90% of the traffic to v1 and 10% to v2 simply by adjusting the weights in backendRefs :
apiVersion: gateway.networking.k8s.io/v1
kind: HTTPRoute
metadata:
  name: echo-route-canary
spec:
  parentRefs:
  - name: my-gateway
  rules:
  - backendRefs:
    - name: echo-service
      port: 80
      weight: 90
    - name: echo-service-v2
      port: 80
      weight: 10
Conclusion
You have set up a modern service exposure infrastructure with the Cilium Gateway API. This standardized approach, which is more semantically rich than Ingress, is recommended to leverage the advanced capabilities of Kubernetes networking.