Use ArgoCD for your GitOps deployments
Objectives
This tutorial explains how to use ArgoCD, the GitOps continuous deployment tool integrated into your Managed Kubernetes cluster. By the end of this guide, you will know how to:
- What the GitOps approach is.
- How to access the ArgoCD interface.
- How to deploy an application using ArgoCD to synchronize a Git repository.
The GitOps principle with ArgoCD
GitOps is a practice that involves using a Git repository as the single source of truth to declare the desired state of your infrastructure and applications.
ArgoCD is the tool that implements this principle. It continuously monitors a Git repository and compares the state defined there (via des manifestes Kubernetes) with the actual state of your cluster. If it detects a difference, it automatically applies the changes so that the cluster matches what is declared in Git.
The benefits are numerous:
- Reliable and reproducible deployments.
- Complete traceability of all changes via the Git history.
- Fast recovery after an incident by reverting to a previous commit.
- Enhanced security by limiting direct access to the cluster.
Accessing the ArgoCD Interface
The ArgoCD web interface is exposed via an internal URL within your cluster. To access it, you must be connected to the cluster's internal network (for example, via a bastion host or VPN).
The URL to use is as follows, replacing <votre-identifiant-de-cluster> :
http://argocd.internal.<votre-identifiant-de-cluster>.mk.ms-cloud-temple.com
You can retrieve the internal IP address of the ArgoCD Ingress using the following command :
kubectl get ingress argocd-server -n argocd
The password for the admin account is provided by the Cloud Temple teams upon cluster delivery.
Deploy an application with ArgoCD
We will now deploy a test application using the GitOps approach.
1. The Git Repository
ArgoCD requires a Git repository containing the Kubernetes manifests for the application to be deployed. For this tutorial, we will use the ArgoCD example repository: https://github.com/argoproj/argocd-example-apps. We will deploy the guestbook application located in this repository.
2. Prepare the Destination Namespace
To enable the application to be deployed in a namespace managed by Capsule, we must first create this namespace and apply the appropriate tenant label to it.
Run the following commands:
# Crée le namespace
kubectl create namespace guestbook

# Applique le label pour l'associer au tenant "default" de Capsule (si besoin, car le namespace a surement déjà été associé avec votre tenant lors de sa création)
kubectl label namespace guestbook capsule.clastix.io/tenant=default
3. Create the application in ArgoCD
Now that the namespace is ready, we can register the application with ArgoCD.
-
Create a file named
app-guestbook.yamlwith the following content:apiVersion: argoproj.io/v1alpha1kind: Applicationmetadata:name: guestbooknamespace: argocdspec:project: defaultsource:repoURL: https://github.com/argoproj/argocd-example-apps.gittargetRevision: HEADpath: guestbookdestination:server: https://kubernetes.default.svcnamespace: guestbooksyncPolicy:automated:prune: trueselfHeal: trueThis manifest instructs ArgoCD to:
- Create an application named
guestbook. - Monitor the
argocd-example-appsrepository. - Focus on the
guestbookfolder in this repository. - Deploy the manifests found in the
guestbooknamespace of the local cluster. - Maintain automatic synchronization (
automated).
- Create an application named
-
You have two options to create the application in ArgoCD:
Option A: Via
kubectl(GitOps Approach)Apply this manifest directly to your cluster. This is the recommended method as it follows the GitOps principle of declarative management.
kubectl apply -f app-guestbook.yamlOption B: Via the ArgoCD web interface
You can also create the application directly from the graphical interface:
- In the ArgoCD UI, click "+ NEW APP".
- In the top right corner of the creation screen, click "EDIT AS YAML".
- Paste the content of your
app-guestbook.yamlfile into the editor. - Click "CREATE".
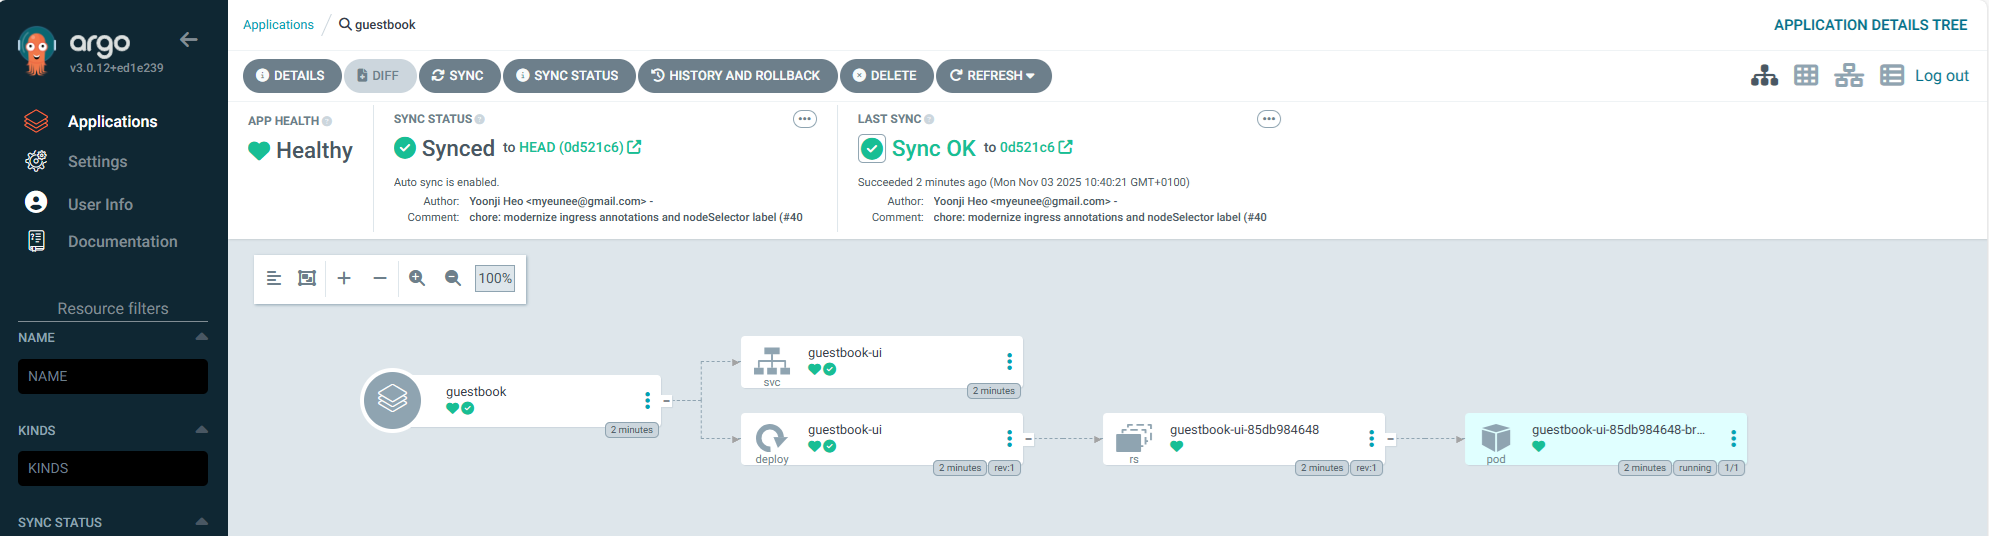
4. Verify Synchronization
Once you apply the manifest, ArgoCD detects this new Application resource and begins its work.
- Via the web interface:
- Log in to the ArgoCD interface.
- You should see a new card for the
guestbookapplication. - After a few moments, its status should change to
HealthyandSynced. - By clicking on the card, you can view all Kubernetes resources (Deployment, Service, etc.) that have been created.
- Via the command line:
-
Verify that the
guestbooknamespace has been created:kubectl get ns guestbook -
Verify that the application resources are properly deployed in this namespace:
kubectl get all -n guestbookNAME READY STATUS RESTARTS AGEpod/guestbook-ui-85db984648-br6r2 1/1 Running 0 19mNAME TYPE CLUSTER-IP EXTERNAL-IP PORT(S) AGEservice/guestbook-ui ClusterIP 10.111.160.90 <none> 80/TCP 19mNAME READY UP-TO-DATE AVAILABLE AGEdeployment.apps/guestbook-ui 1/1 1 1 19mNAME DESIRED CURRENT READY AGEreplicaset.apps/guestbook-ui-85db984648 1 1 1 19m
-
5. The GitOps Cycle
Now, if you modify a manifest in the Git repository, ArgoCD will detect the change and automatically update the application in the cluster. That's the magic of GitOps!
Cleanup
To remove the application and all associated resources, you can simply delete the Application resource in ArgoCD.
- Via the web UI :
- In the ArgoCD UI, locate the
guestbookapplication. - Click the three dots (...) to open the menu and select "Delete".
- Check the "Foreground" option to ensure that all managed resources (pods, services, etc.) are also deleted in cascade.
- In the ArgoCD UI, locate the
- Via
kubectl:-
Delete the
app-guestbook.yamlfile you created :kubectl delete -f app-guestbook.yaml
-
ArgoCD will now delete all components of the guestbook application. Once the deletion sync is complete, the guestbook namespace will be empty. You can then delete it with the following command :
kubectl delete namespace guestbook
:::info[Going further: secrets management ] This tutorial uses a public repository without sensitive data. For your production applications, it is crucial to never store secrets (passwords, API keys) in plaintext in your Git repository. Solutions such as Sealed Secrets or HashiCorp Vault integrate with ArgoCD to manage your secrets securely. A future tutorial will detail this approach. :::
Conclusion
You have deployed your first application with ArgoCD following GitOps principles. This powerful approach allows you to manage your deployments declaratively, reliably, and securely. We encourage you to adopt it for all your applications on Managed Kubernetes.