Getting Started Guide
Calculation
Virtual Machine Management
The management interface for your virtual machines is available in the Console under the 'OpenIaaS' menu located on the green bar to the left of the screen.
List of Virtual Machines
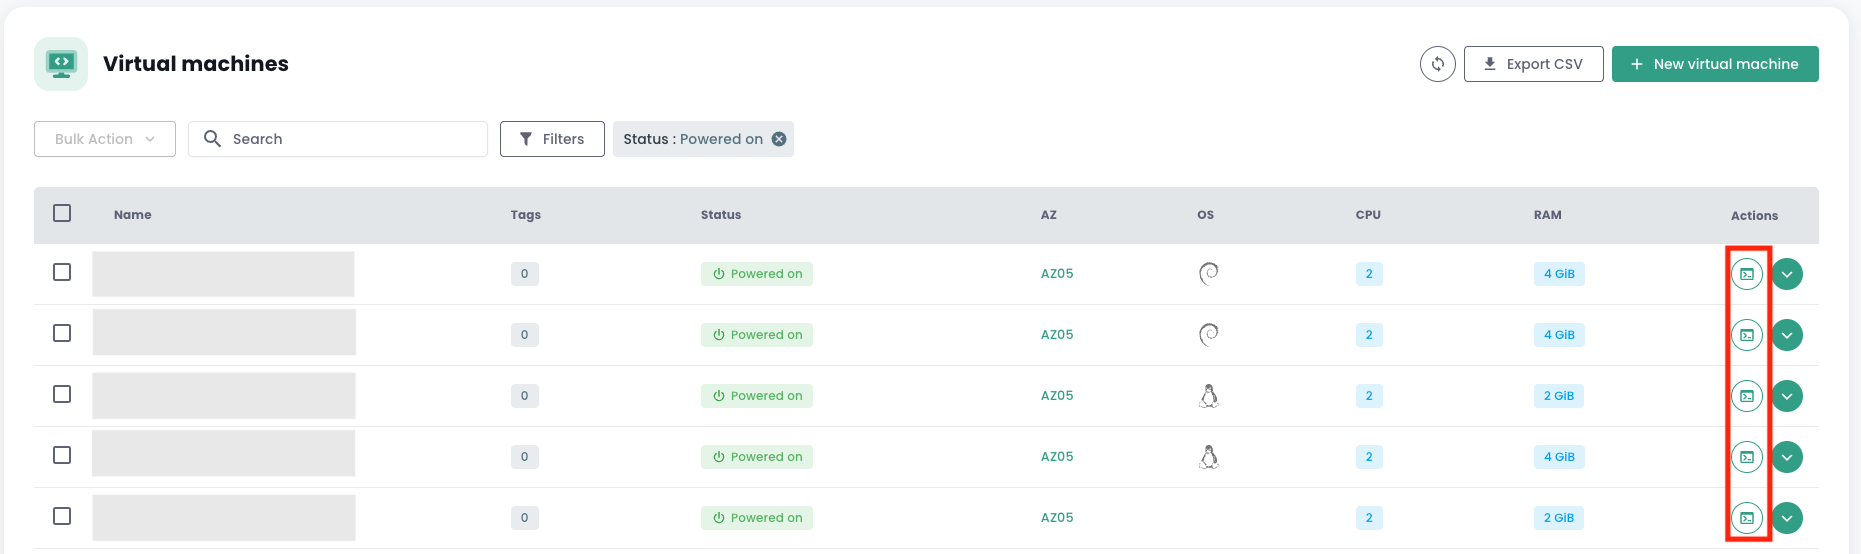
In the 'Virtual Machines' section, you have access to the list of your virtual machines hosted on your trusted Cloud.
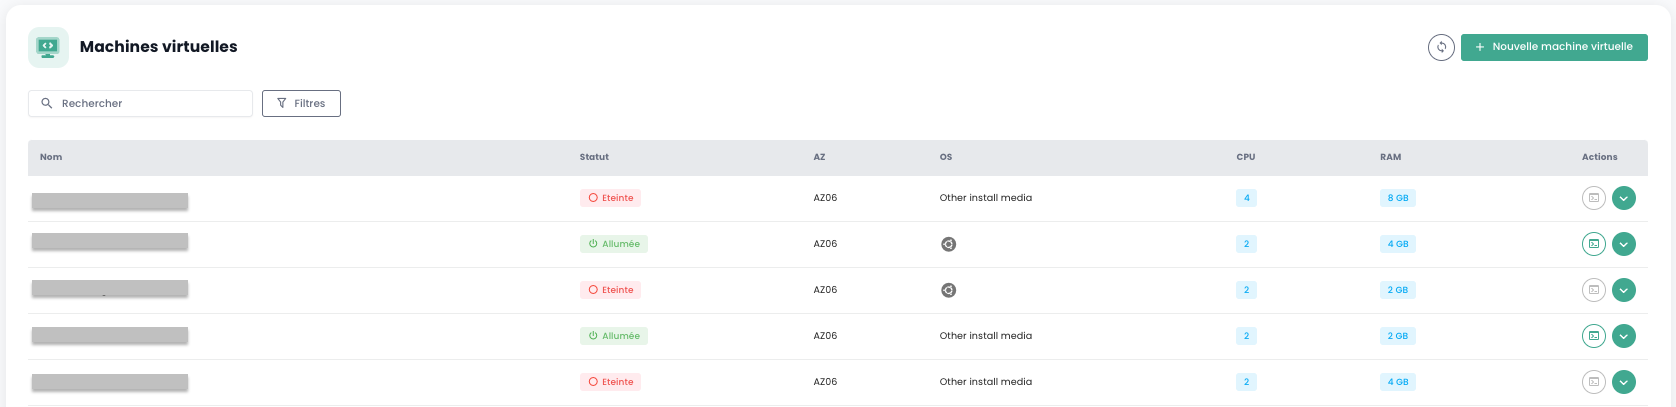
You have access to the following information for each virtual machine:
- Its name.
- Its status (off, on).
- Its availability zone (AZ).
- Its operating system.
- The number of virtual CPUs (vCPU).
- The amount of virtual memory (vRAM).
Virtual Machine Actions
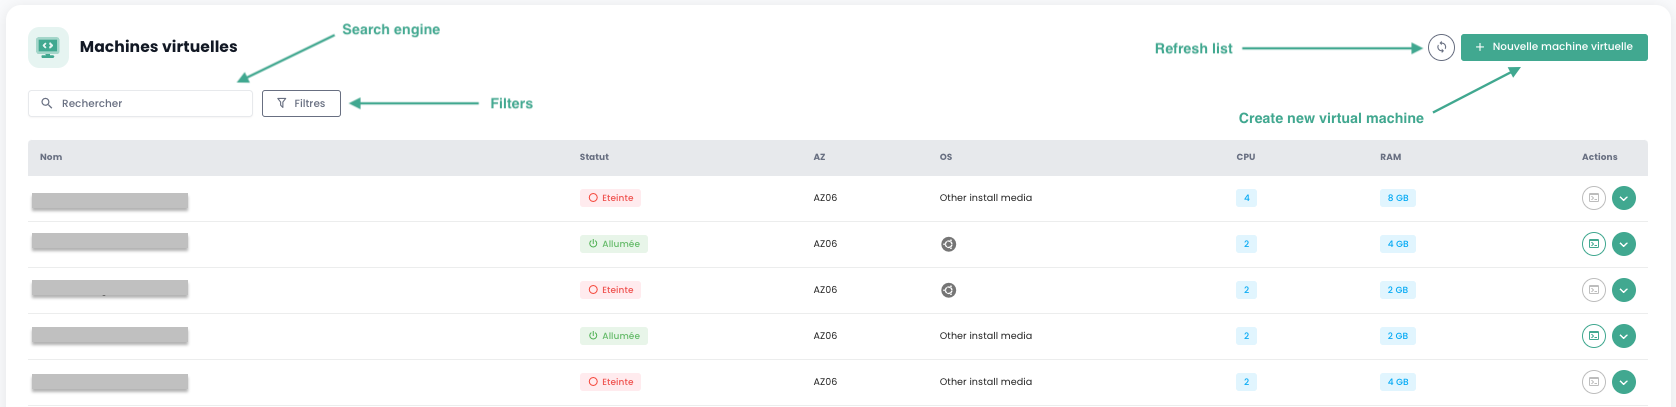
The following actions are available from this interface:
- Refresh the list of virtual machines.
- Filter the list.
- Search for a virtual machine by name.
- Create a new virtual machine.
When you click the green dropdown arrow on the right side of the list for a virtual machine, you access all information regarding it.
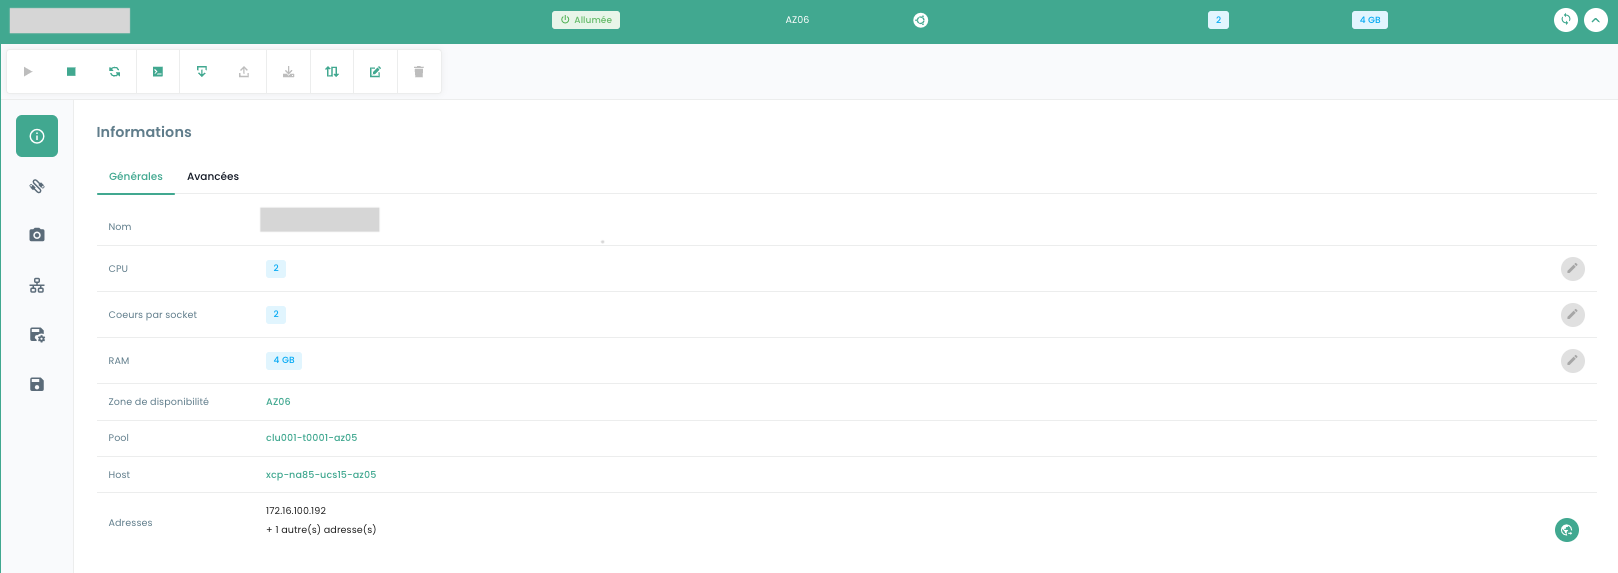
A quick action bar allows you to perform the following actions:

- Power on the virtual machine.
- Power it off.
- Restart it.
- Open the console.
- Mount an ISO.
- Unmount an ISO.
- Convert the virtual machine to a template.
- Move it.
- Rename it.
- Delete it.
In the 'General' information tab, you will find detailed information about your virtual machine, such as its physical location (AZ, Pool, Host), RAM, CPU, IP addresses, and more.
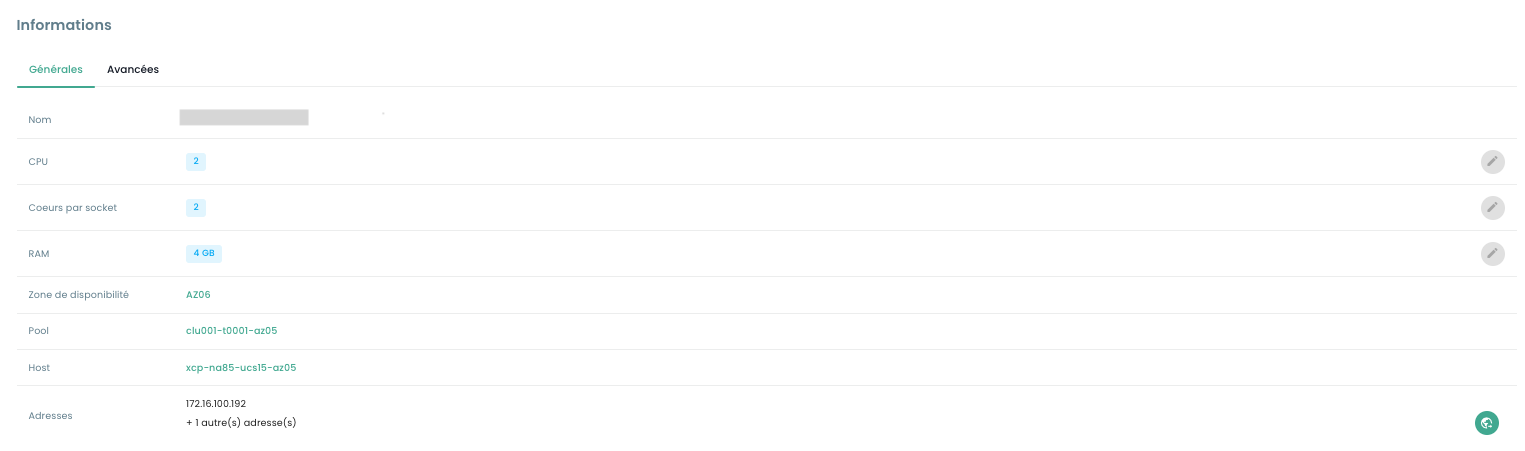
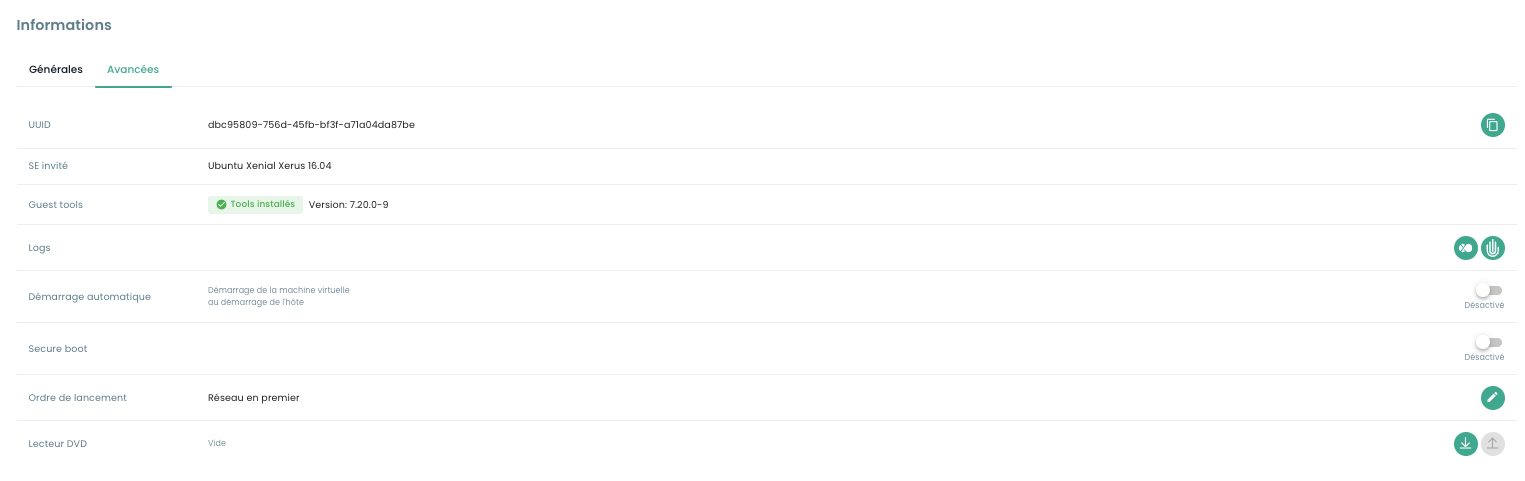
An 'Advanced' tab allows you to view more specific information:
- Virtual machine UUID
- Guest tools
- Guest OS
- DVD drive
As well as modify certain options such as:
- Boot order
- Secure Boot
- Auto-start (impossible si aucune politique de sauvegarde n'est associée à la VM)
Virtual Machine Console
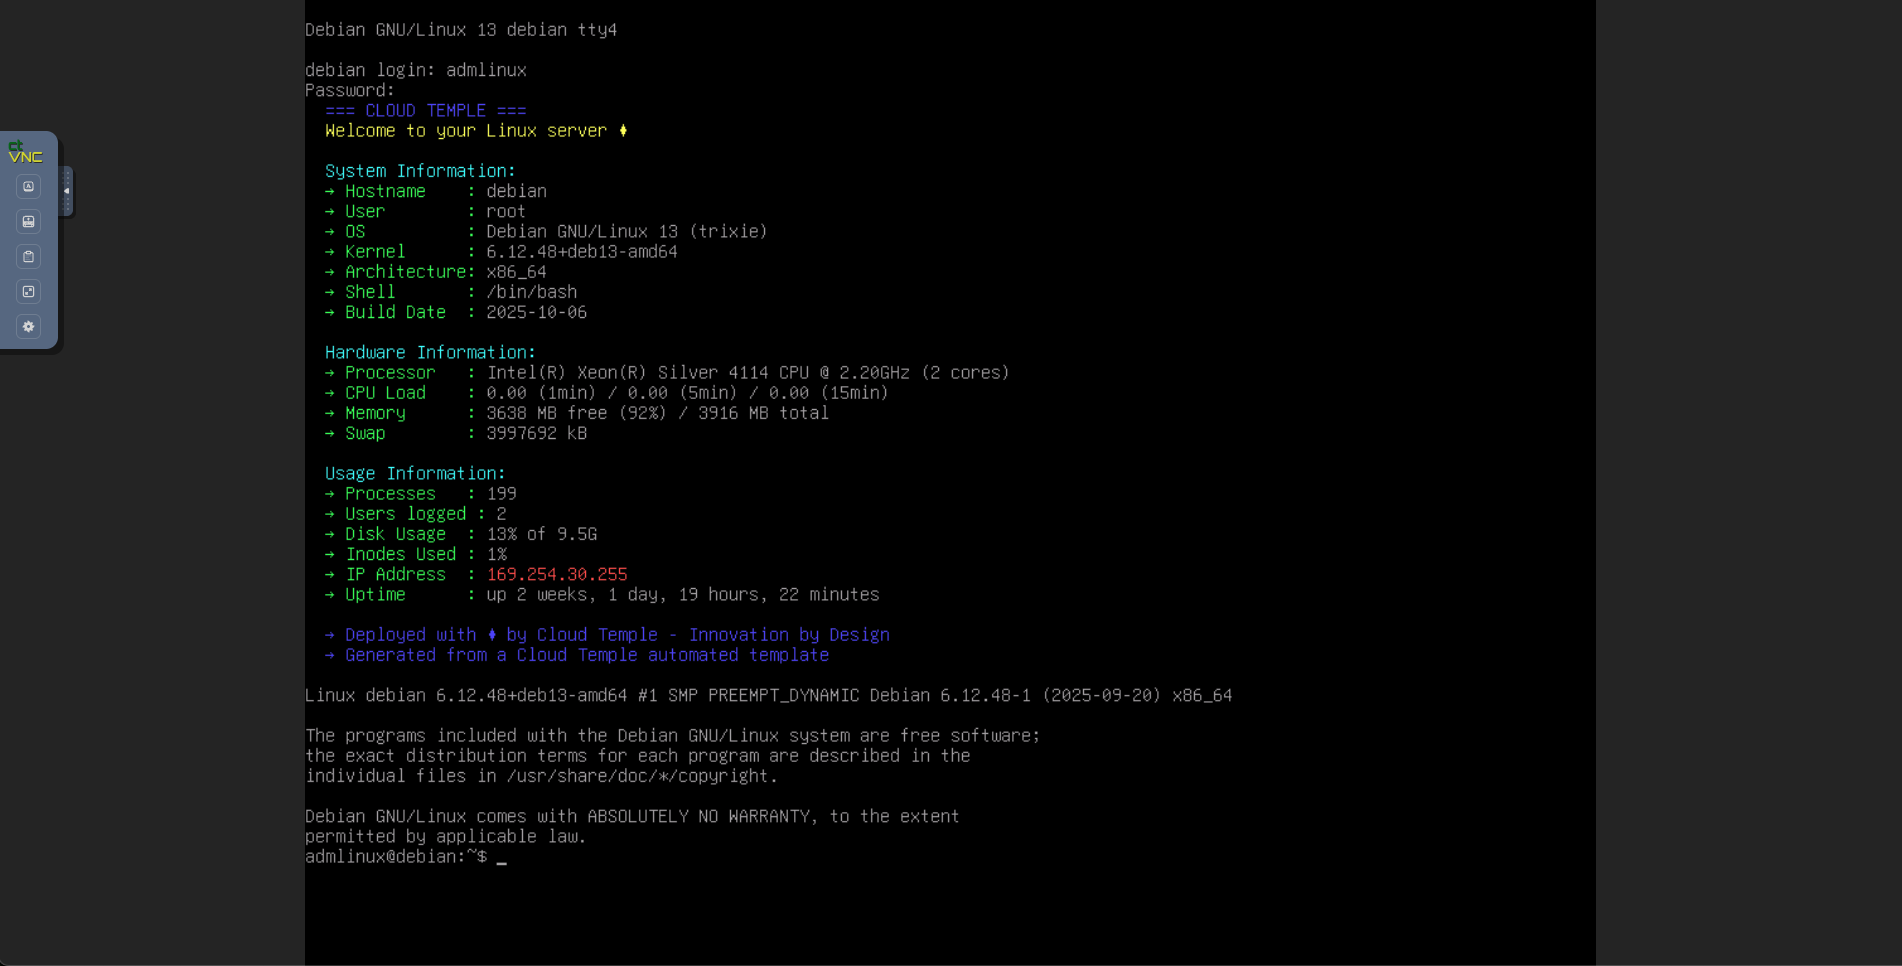
The virtual machine console is accessible from the virtual machines list by clicking the 'Console' icon:
A new browser tab opens and displays your machine's console, based on a VNC client:
The VNC menu allows you to:
- send specific keys,
- force a keyboard mapping (in case your virtual machine does not have the same keyboard layout as your web browser),
- open a text field that can be sent to the machine. This method replaces the old non-functional clipboard,
- switch to full-screen mode,
- change the window size (scaling).
Keyboard Layout Support
Input entered in the console depends on the keyboard language of your web browser, the keyboard language of the virtual machine and whether the 'enforce keyboard' option on the left side of the screen is enabled or not. Below is a summary of possible scenarios:
| Physical machine keyboard language (input) | Virtual machine keyboard language | 'enforce keyboard' option selected | Result (output) |
|---|---|---|---|
| French | French | No | ✅ |
| French | French | Yes | Not recommended |
| French | English | No | English |
| French | English | Yes | ✅ |
| English | French | No | French |
| English | French | Yes | ✅ |
| English | English | No | ✅ |
| English | English | Yes | Not recommended |
Note :
- If certain characters do not pass during manual input, you can try using the clipboard.
How the clipboard works
This feature allows you to send an entire string of characters to your virtual machine. It is important to note that the "enforce keyboard" key affects how this string of characters
will be transmitted to your virtual machine. If you notice during console input that the "enforce keyboard" option is necessary, remember to enable it before using the clipboard.
This feature can be used to send a password, a command, or configuration file content, for example:
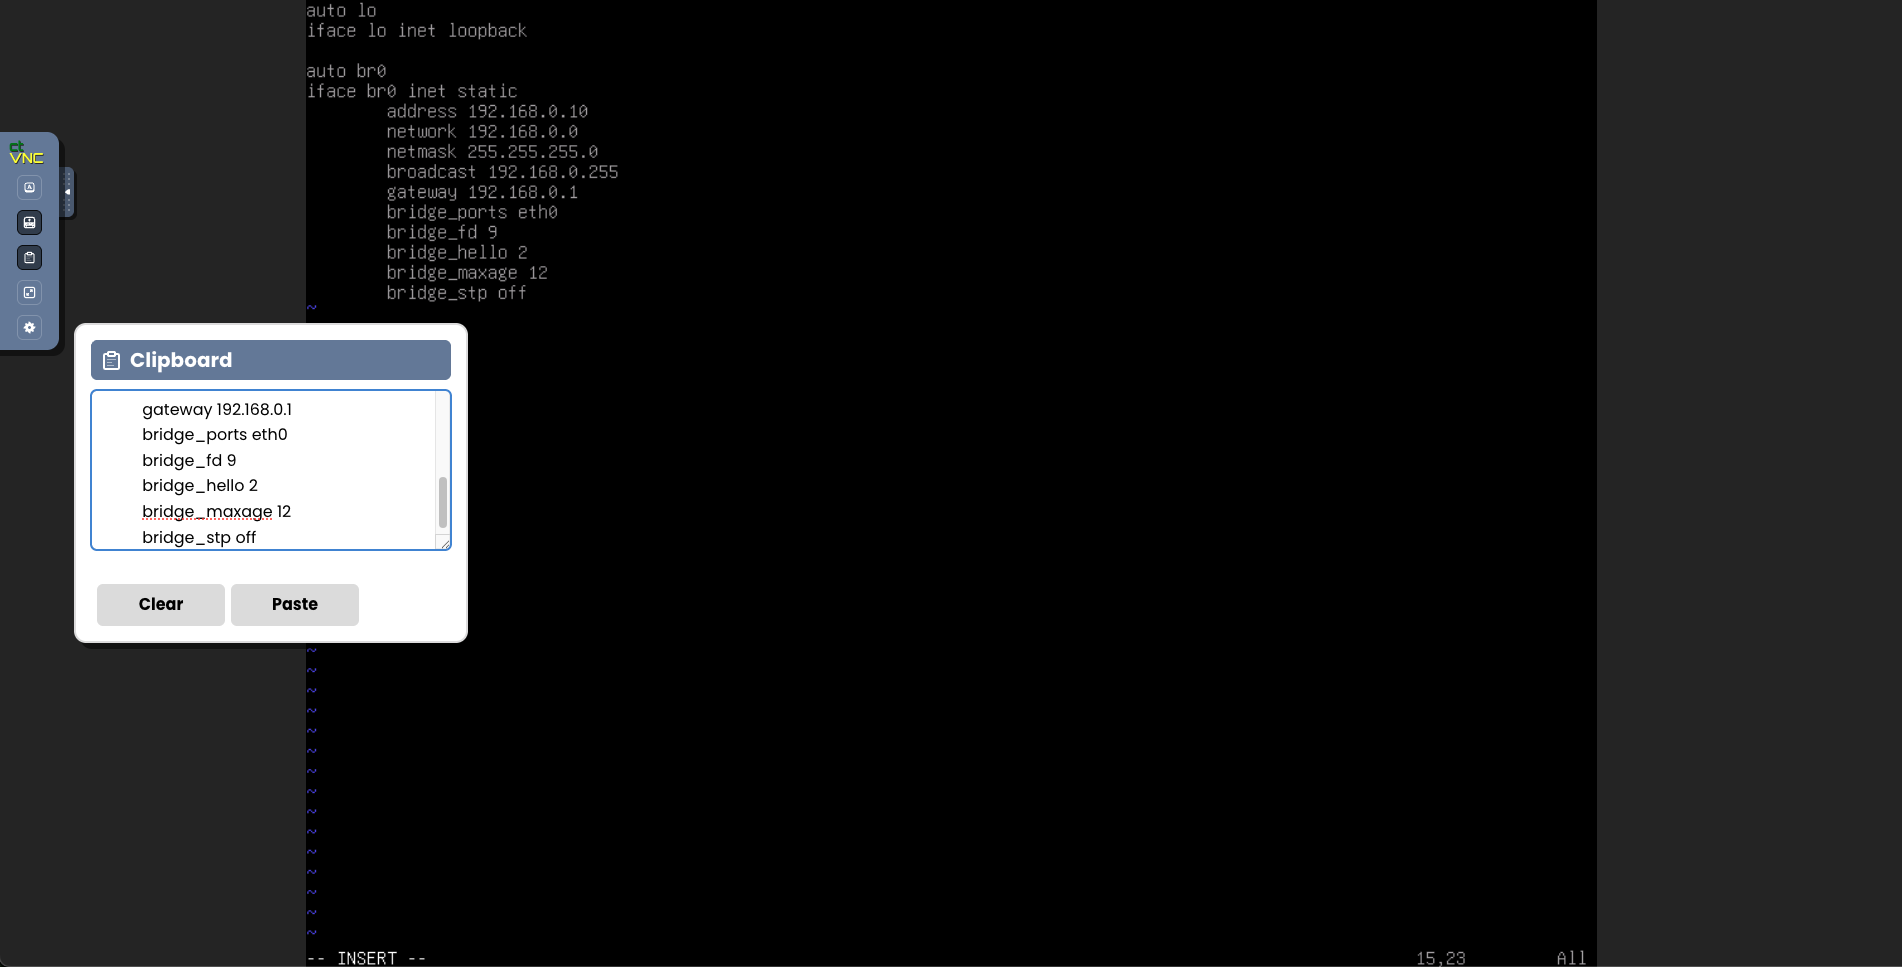
When clicking the "Paste" button, the content of your text field is sent to your virtual machine.
Replication
Access to Replication Management
The replication management interface is available in the Console in the 'OpenIaaS' > 'Replication' menu located on the green bar on the left side of the screen.

Creating a Replication Policy
In the 'Replication' section, you can create policies defining the protection settings for your virtual machines.

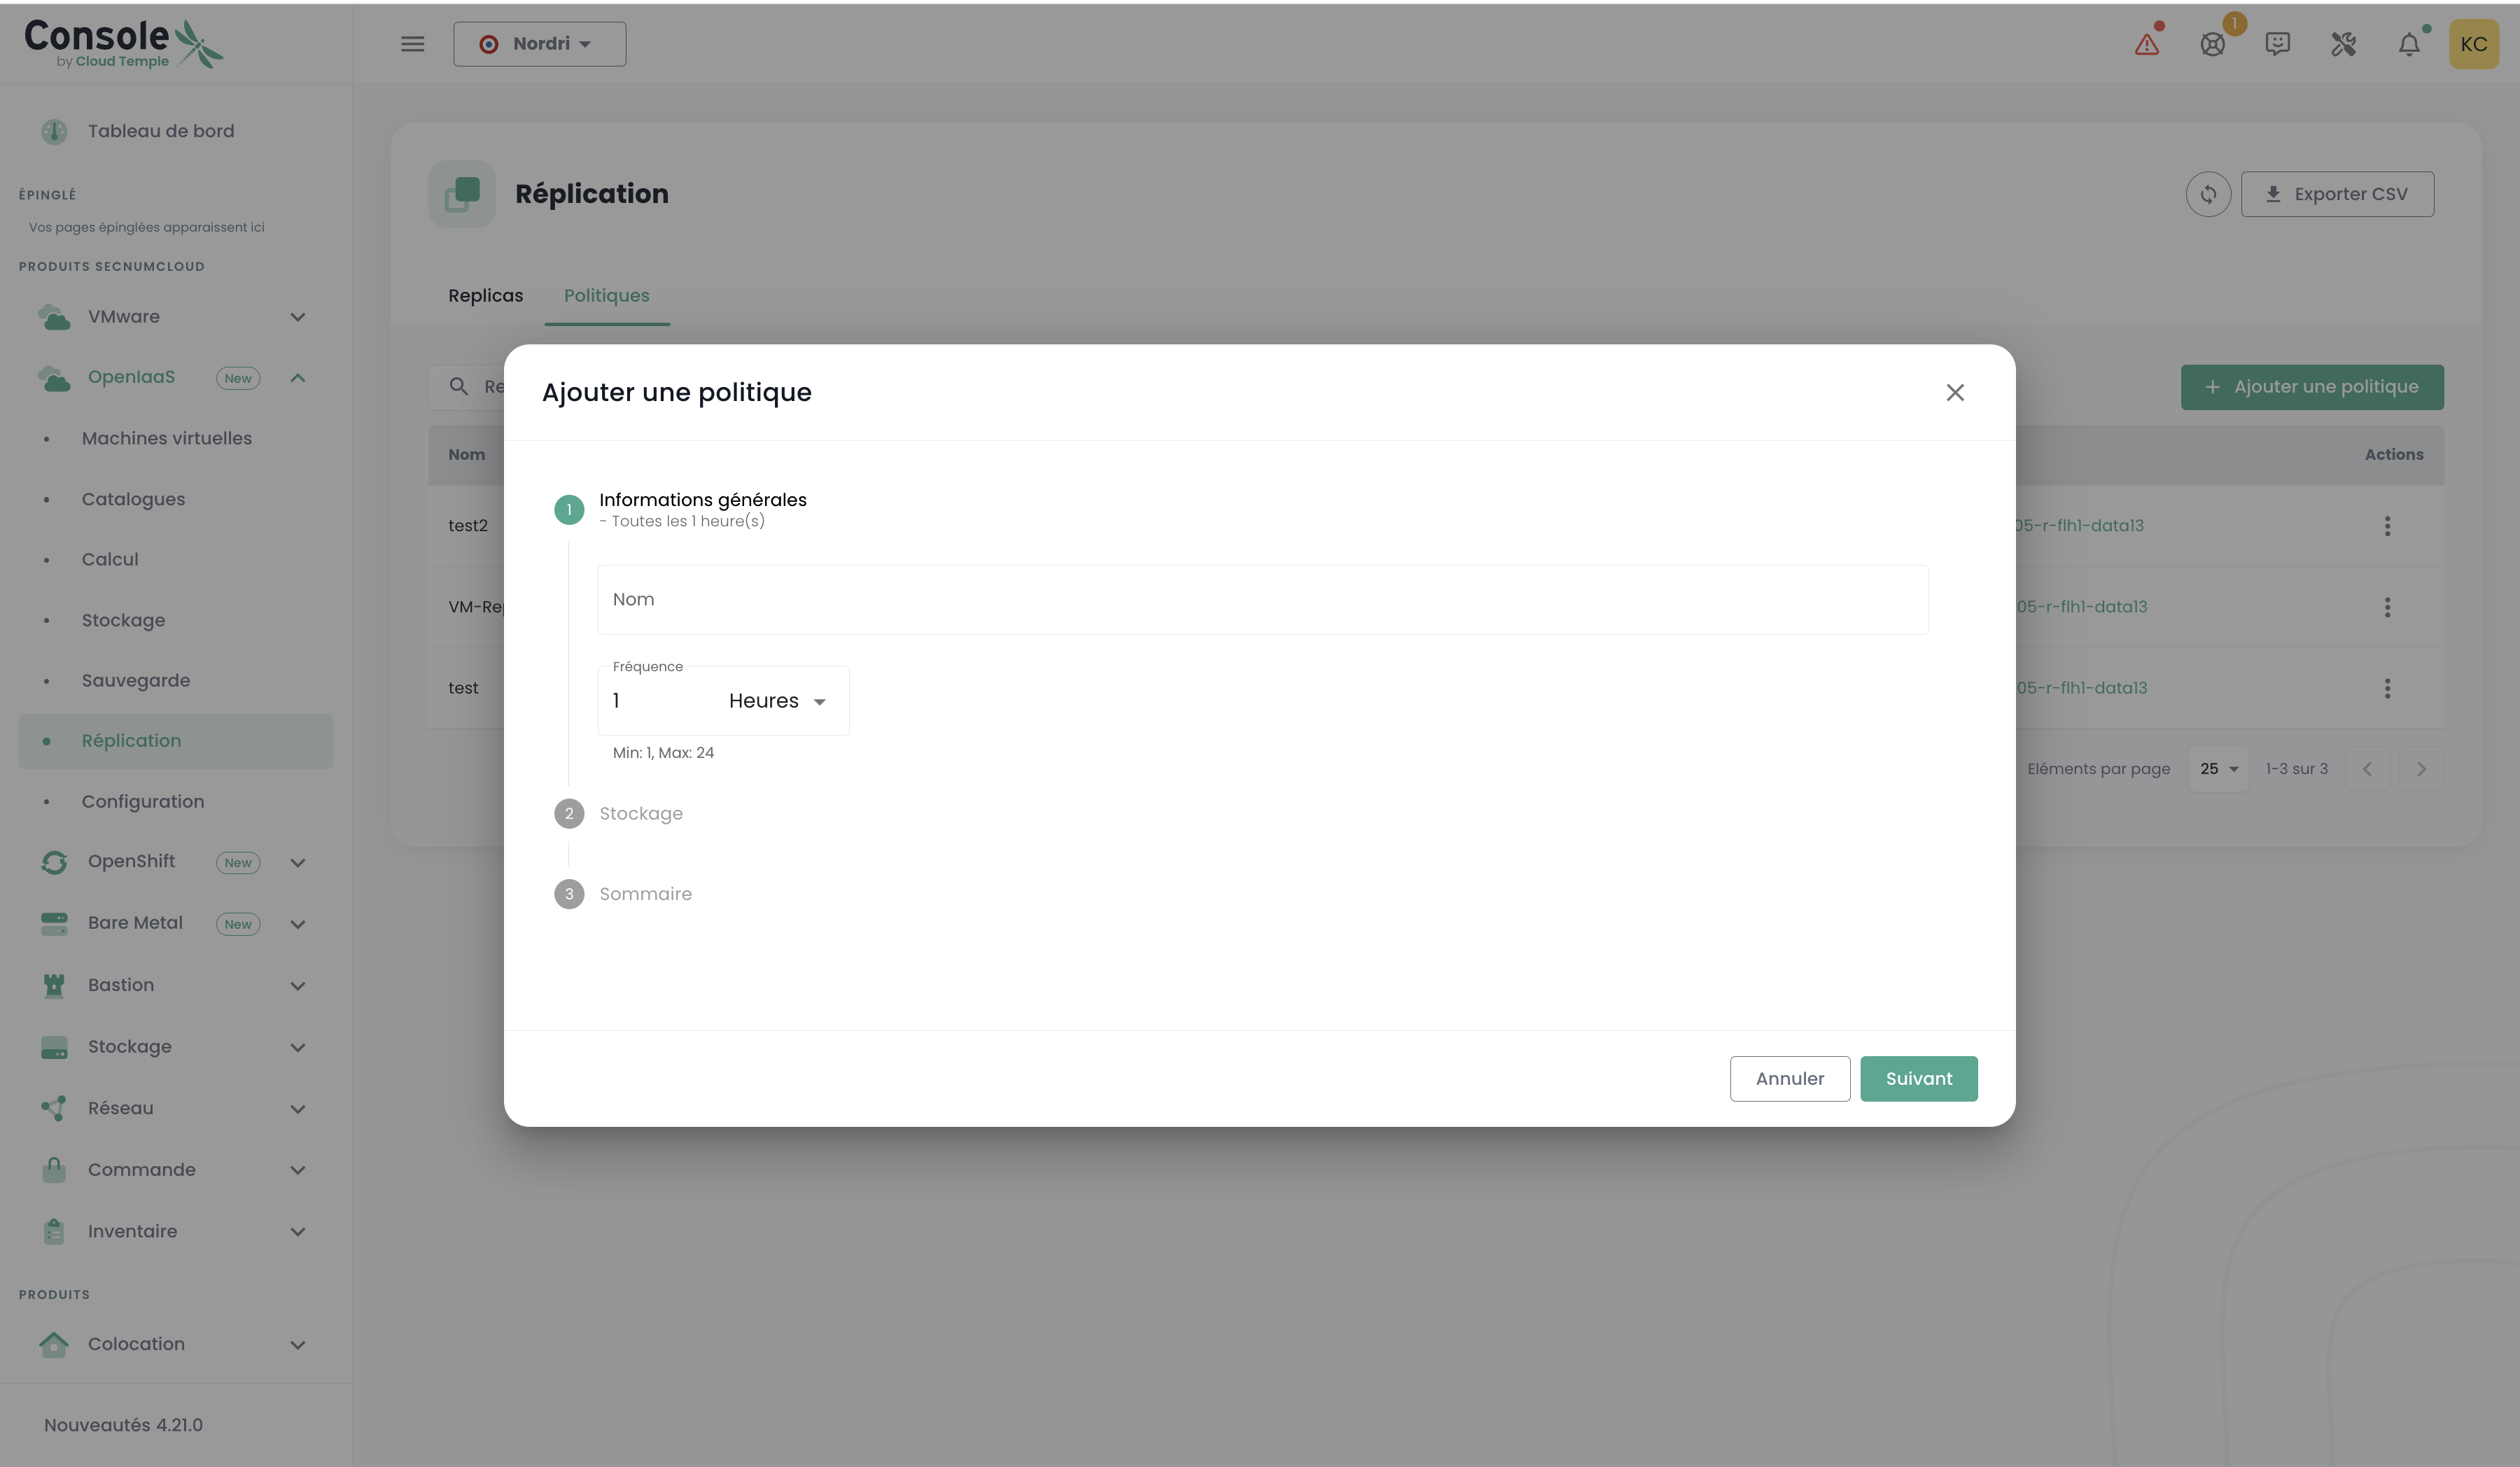
To create a new policy, click the 'Add Policy' button. A form opens with the following steps:
Step 1: General Information
- Name : Provide an explicit name for your policy
- Frequency : Choose the replication interval (1-59 minutes or 1-24 hours)
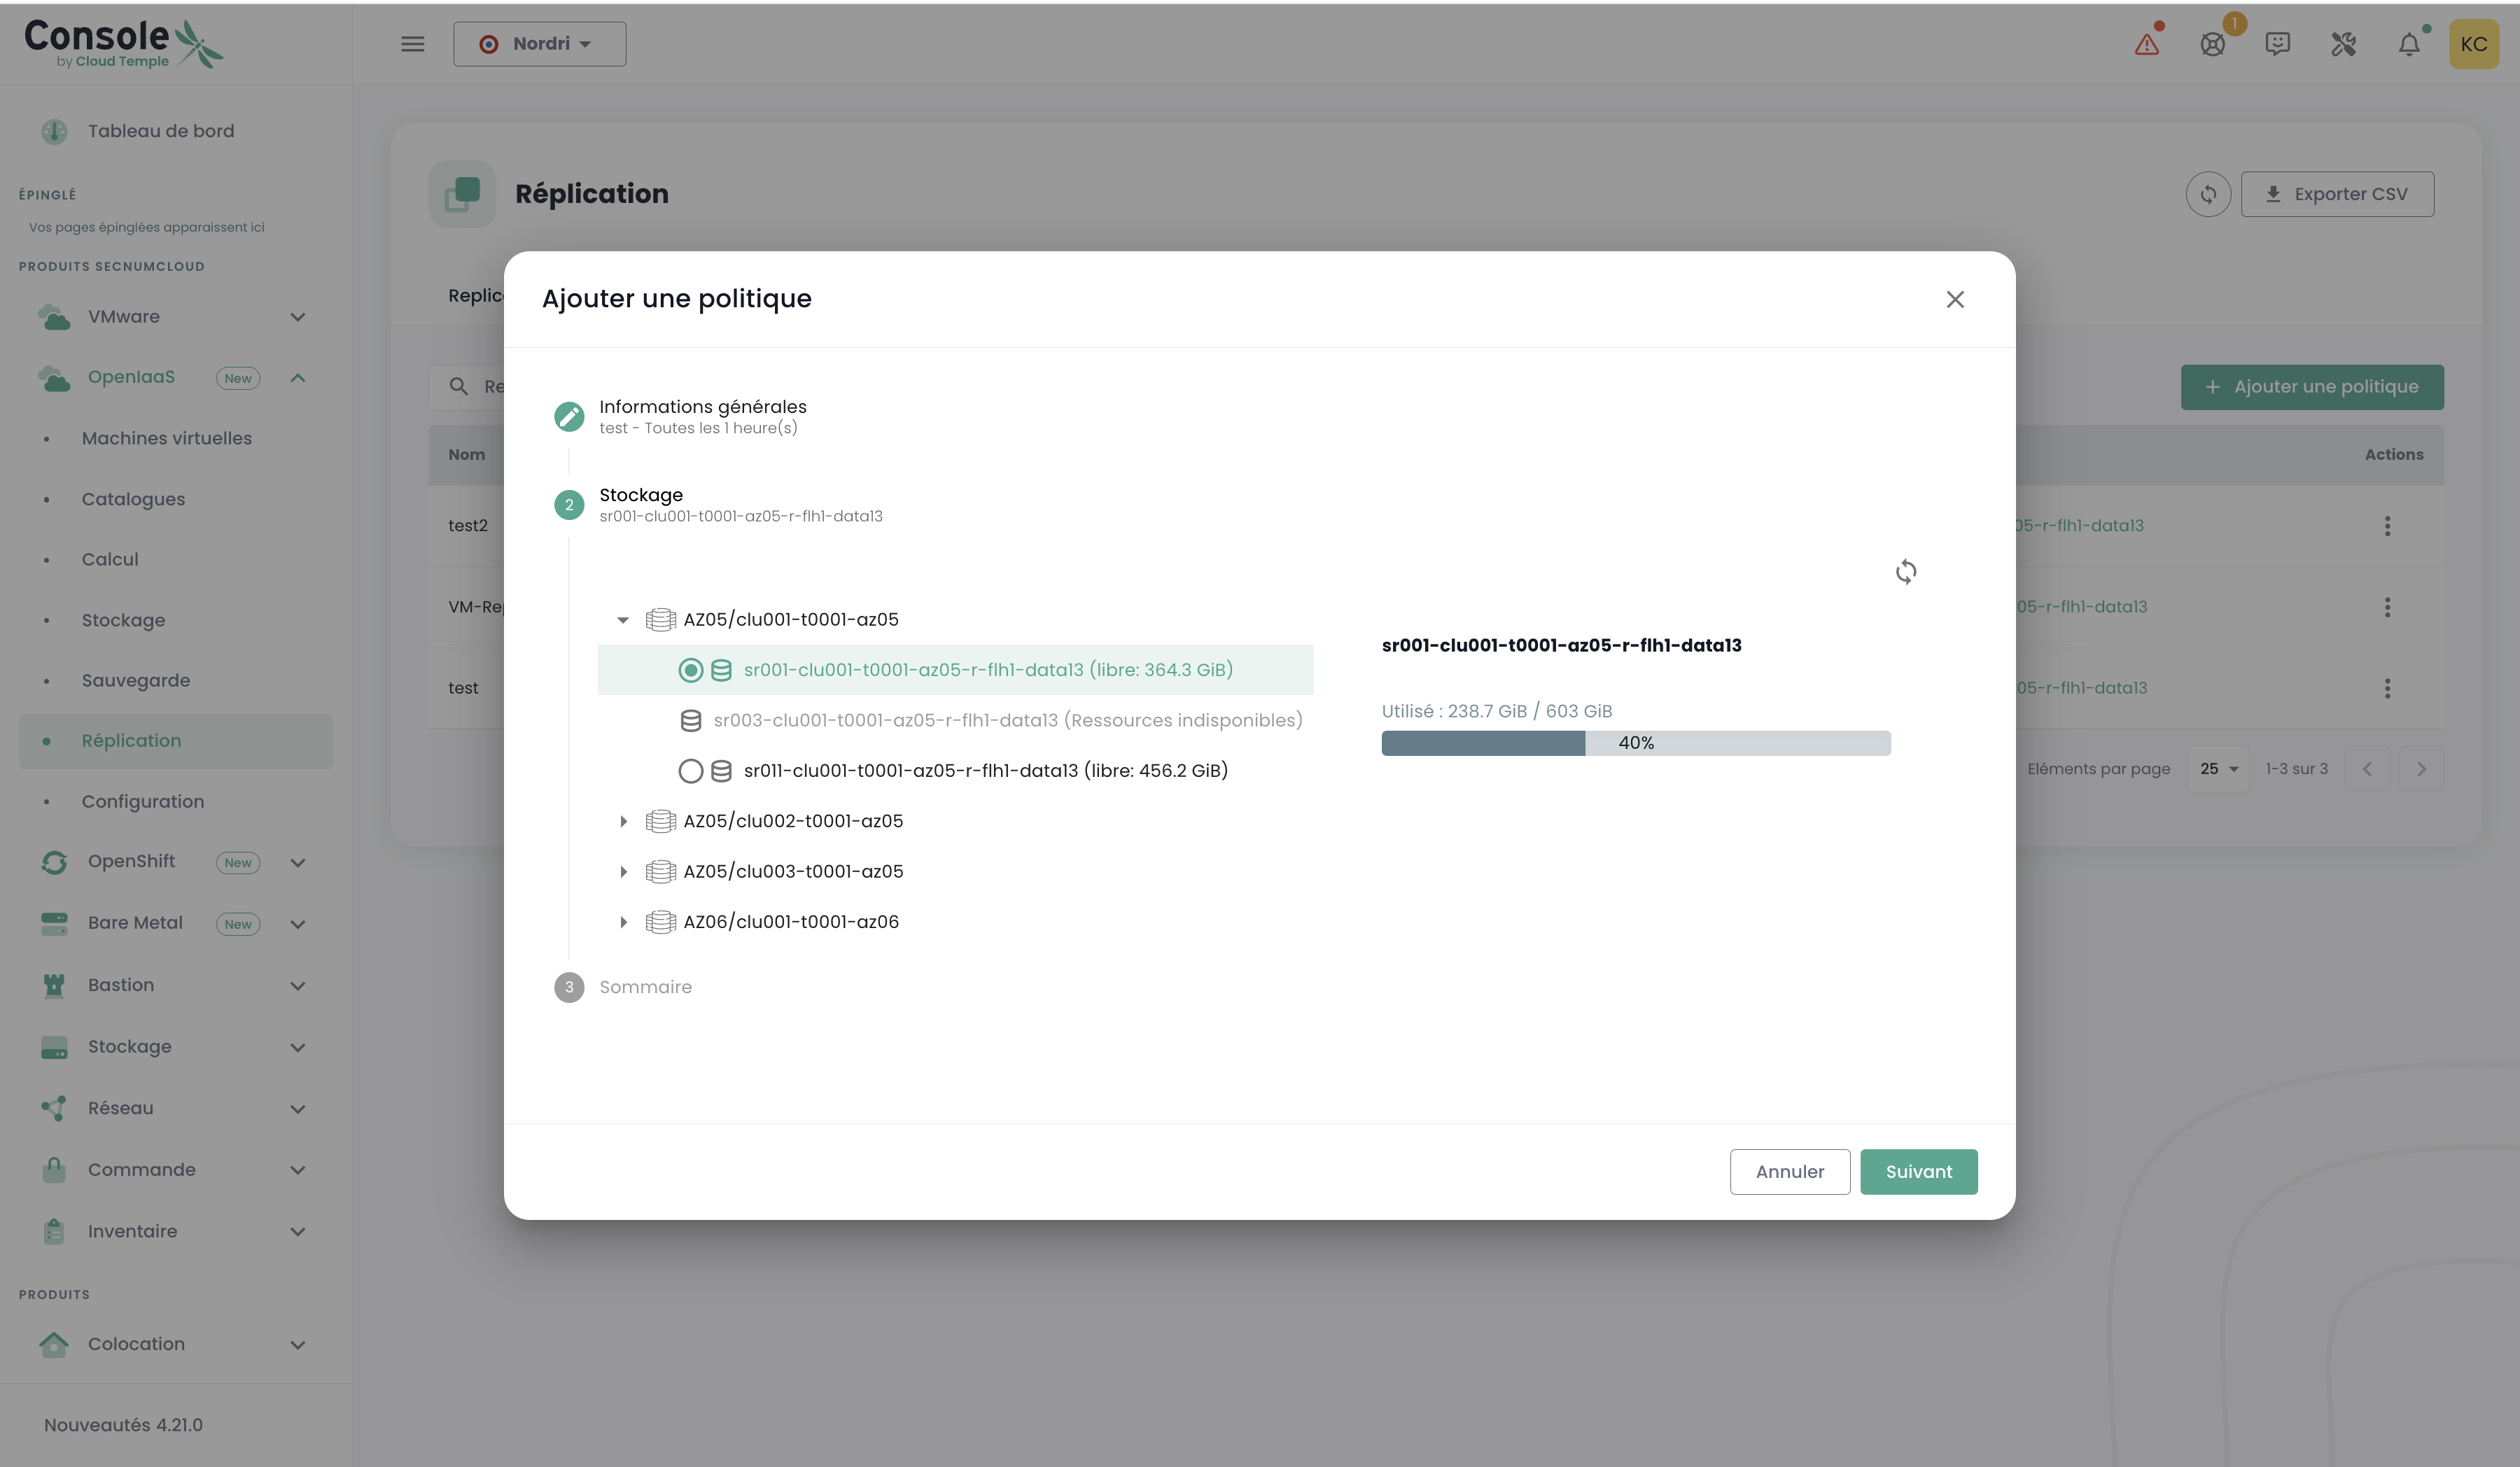
Step 2: Storage Selection
- Availability Zone: Select the destination zone
- Pool: Choose the resource pool
- Block Storage: Select the destination storage
Step 3: Validation
Verify the settings and click 'Add' to create the policy.
Associating a VM with Replication
To protect a virtual machine, access your VM details from the virtual machines list.
In the VM detailed view, you will find a 'Replication' section:
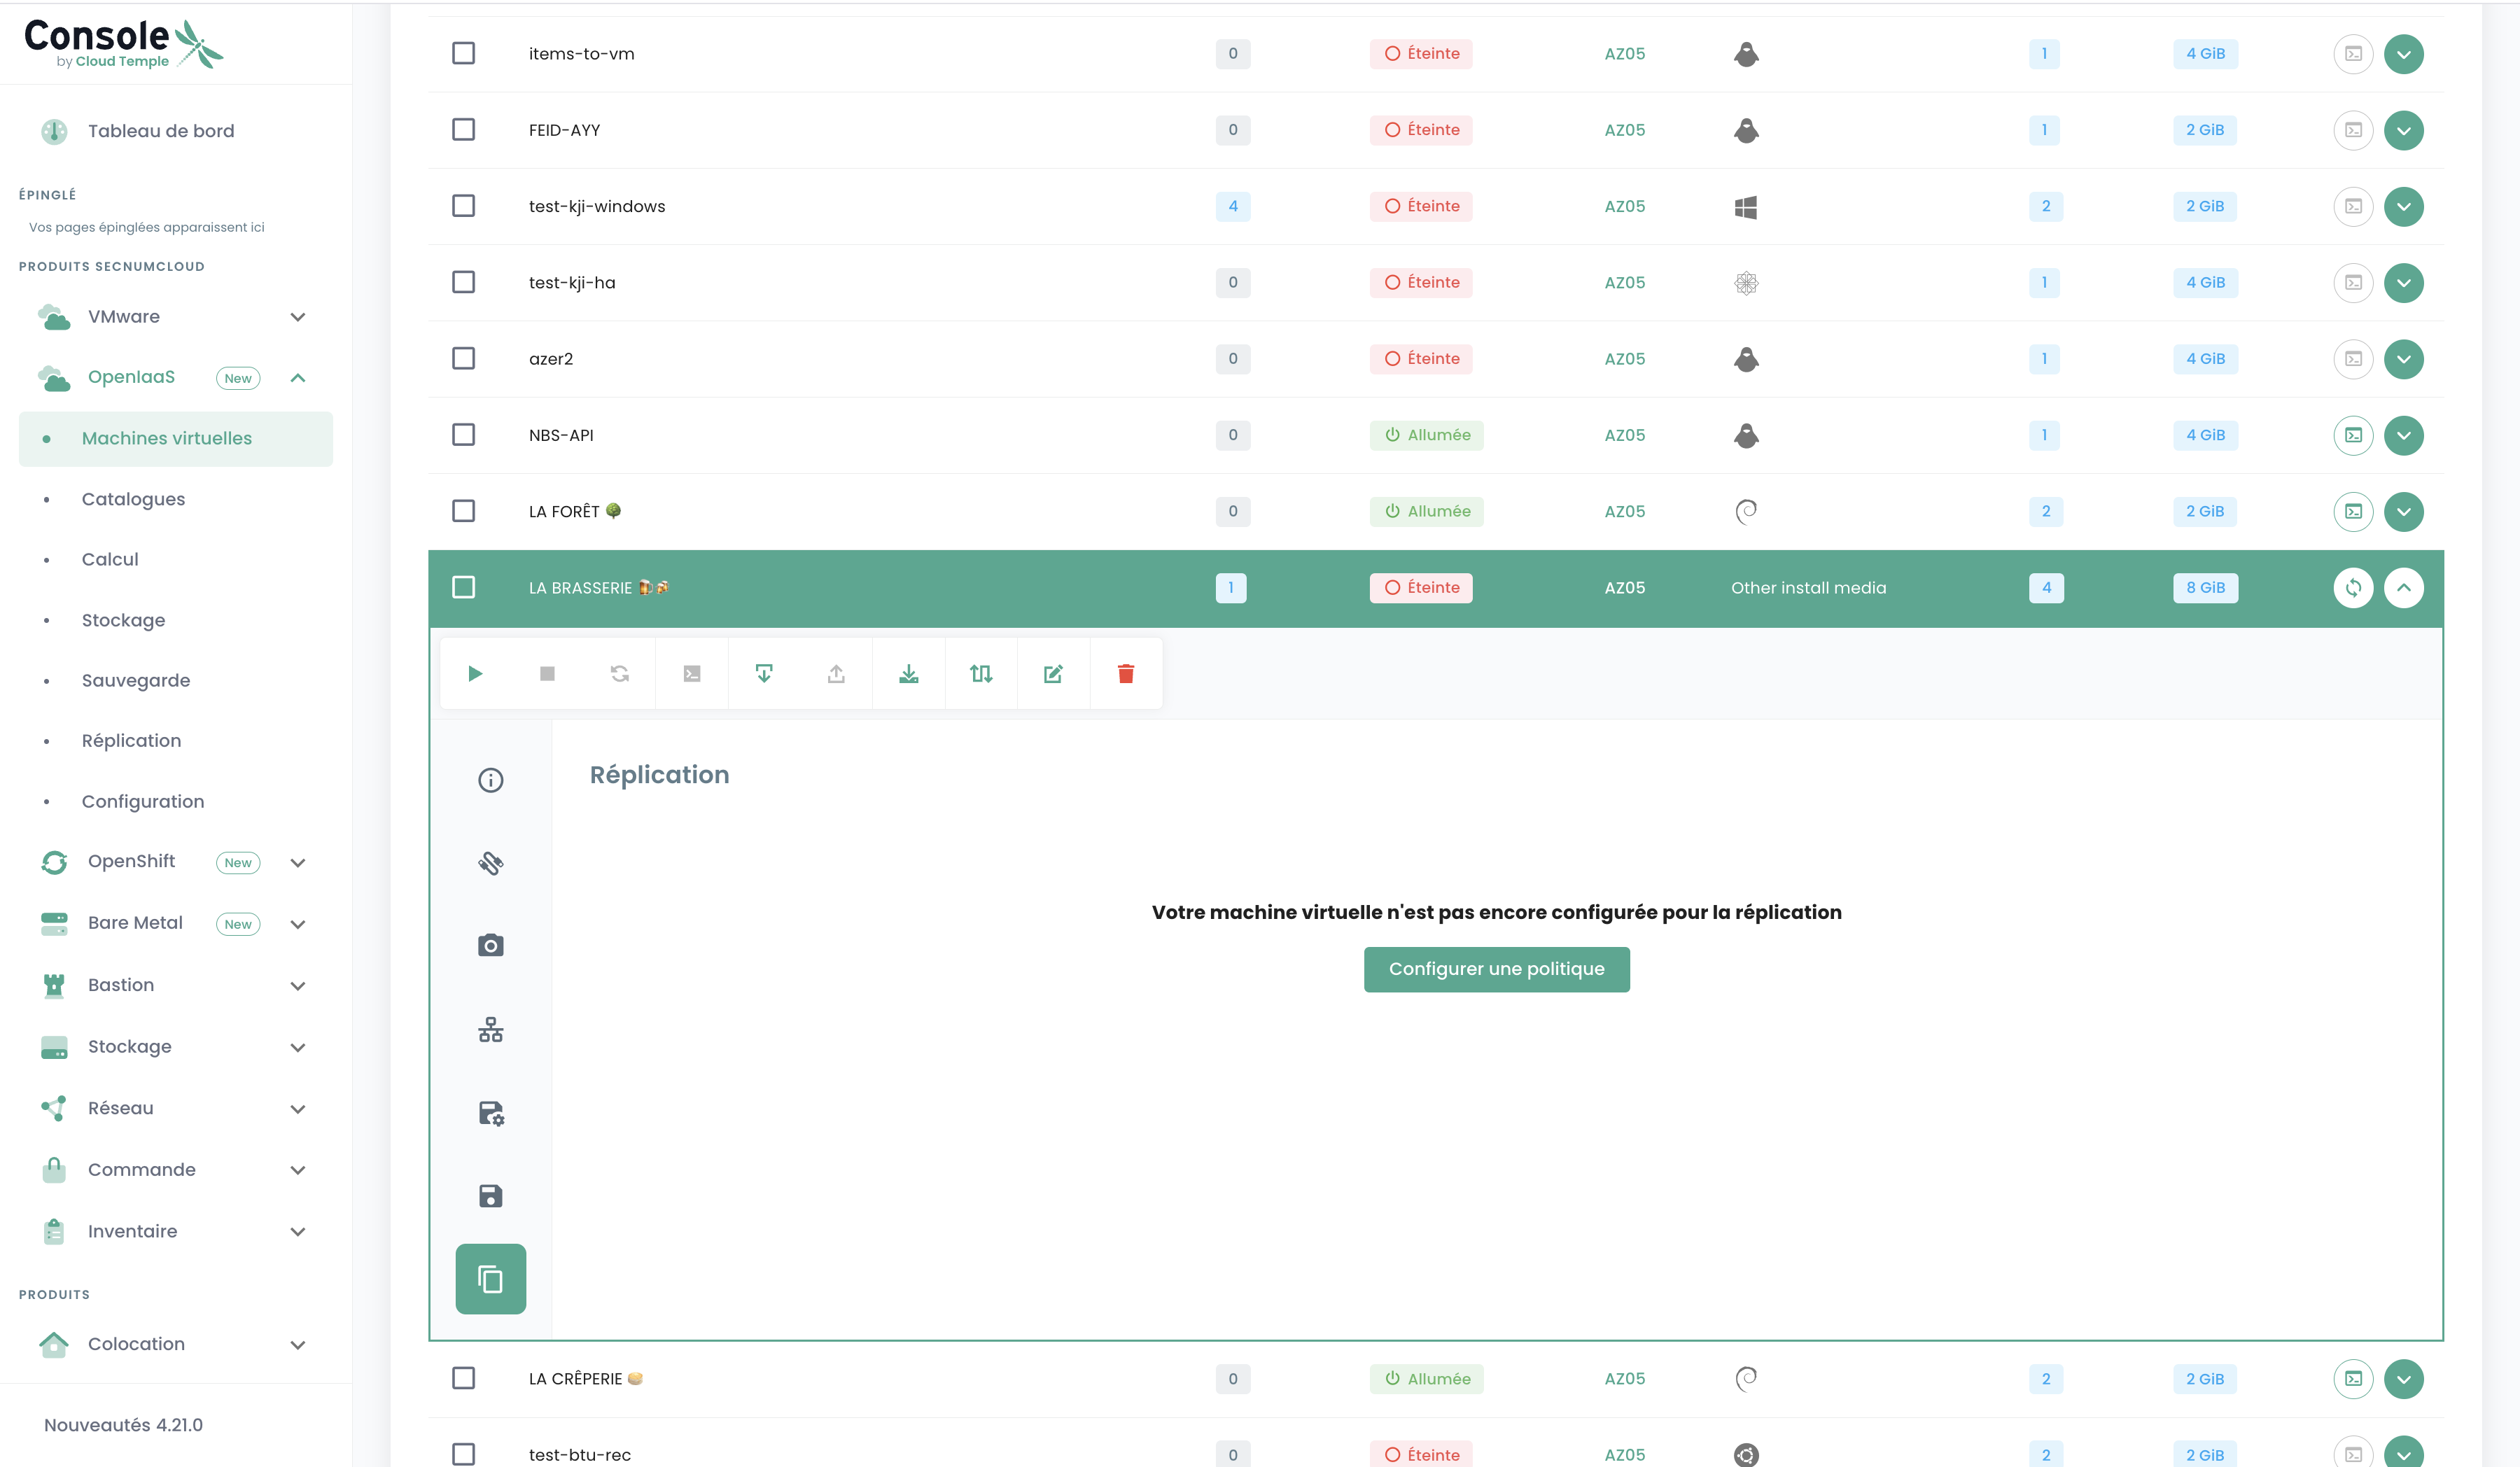
The steps to associate a VM with replication:
- Click on 'Configure a policy'
- Select the desired replication policy from the drop-down list
- Confirm your selection
Replication starts automatically after confirmation.
Policy and Replica Management
Policies View
The 'Policies' tab allows you to view all your replication policies:
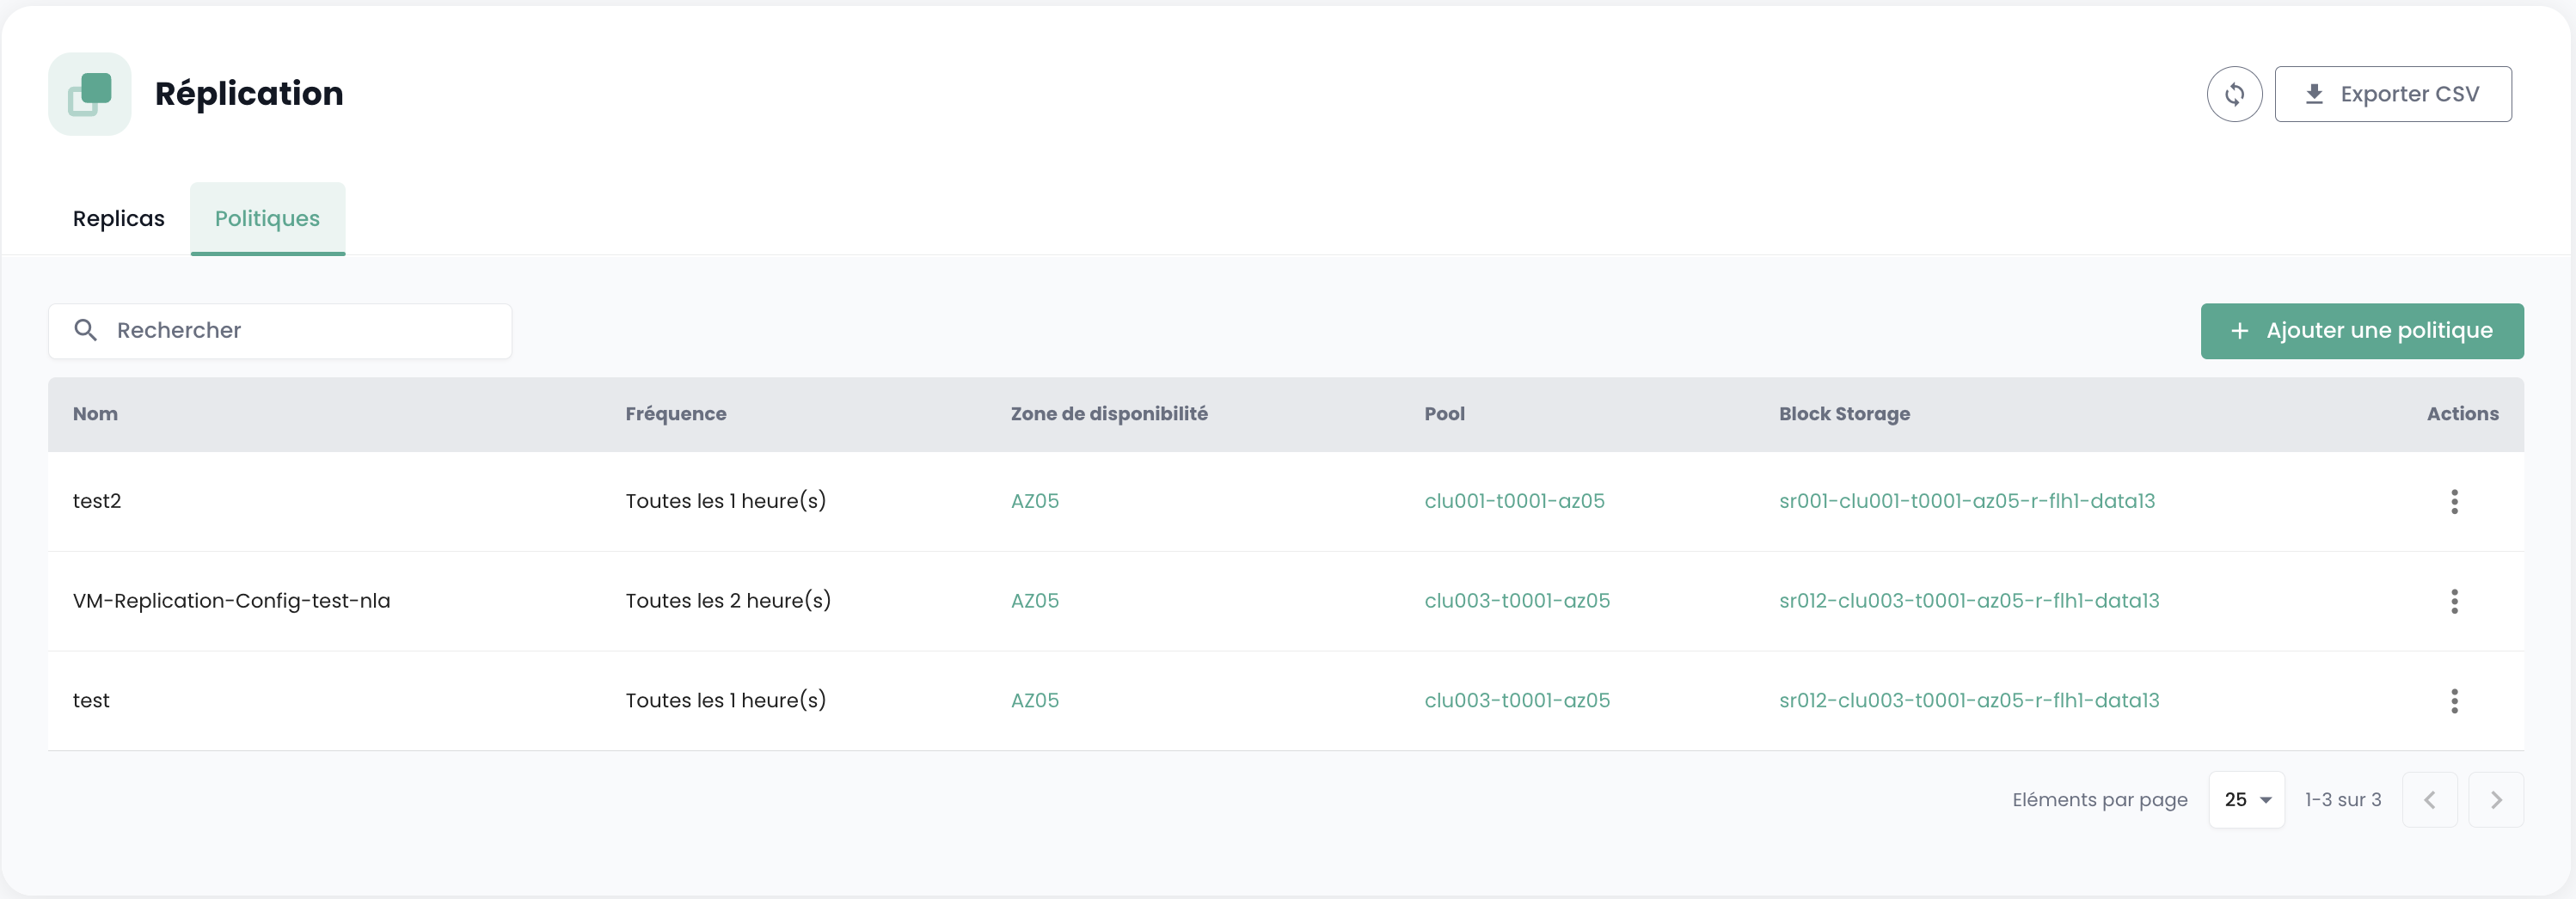
You have access to the following information for each policy:
- Its name
- Its replication frequency
- The destination availability zone
- The associated pool
- The block storage used
Available actions include:
- View details for each policy
- Modify settings
- Delete an unused policy
Replicas View
The 'Replicas' tab displays all virtual machines currently being replicated:
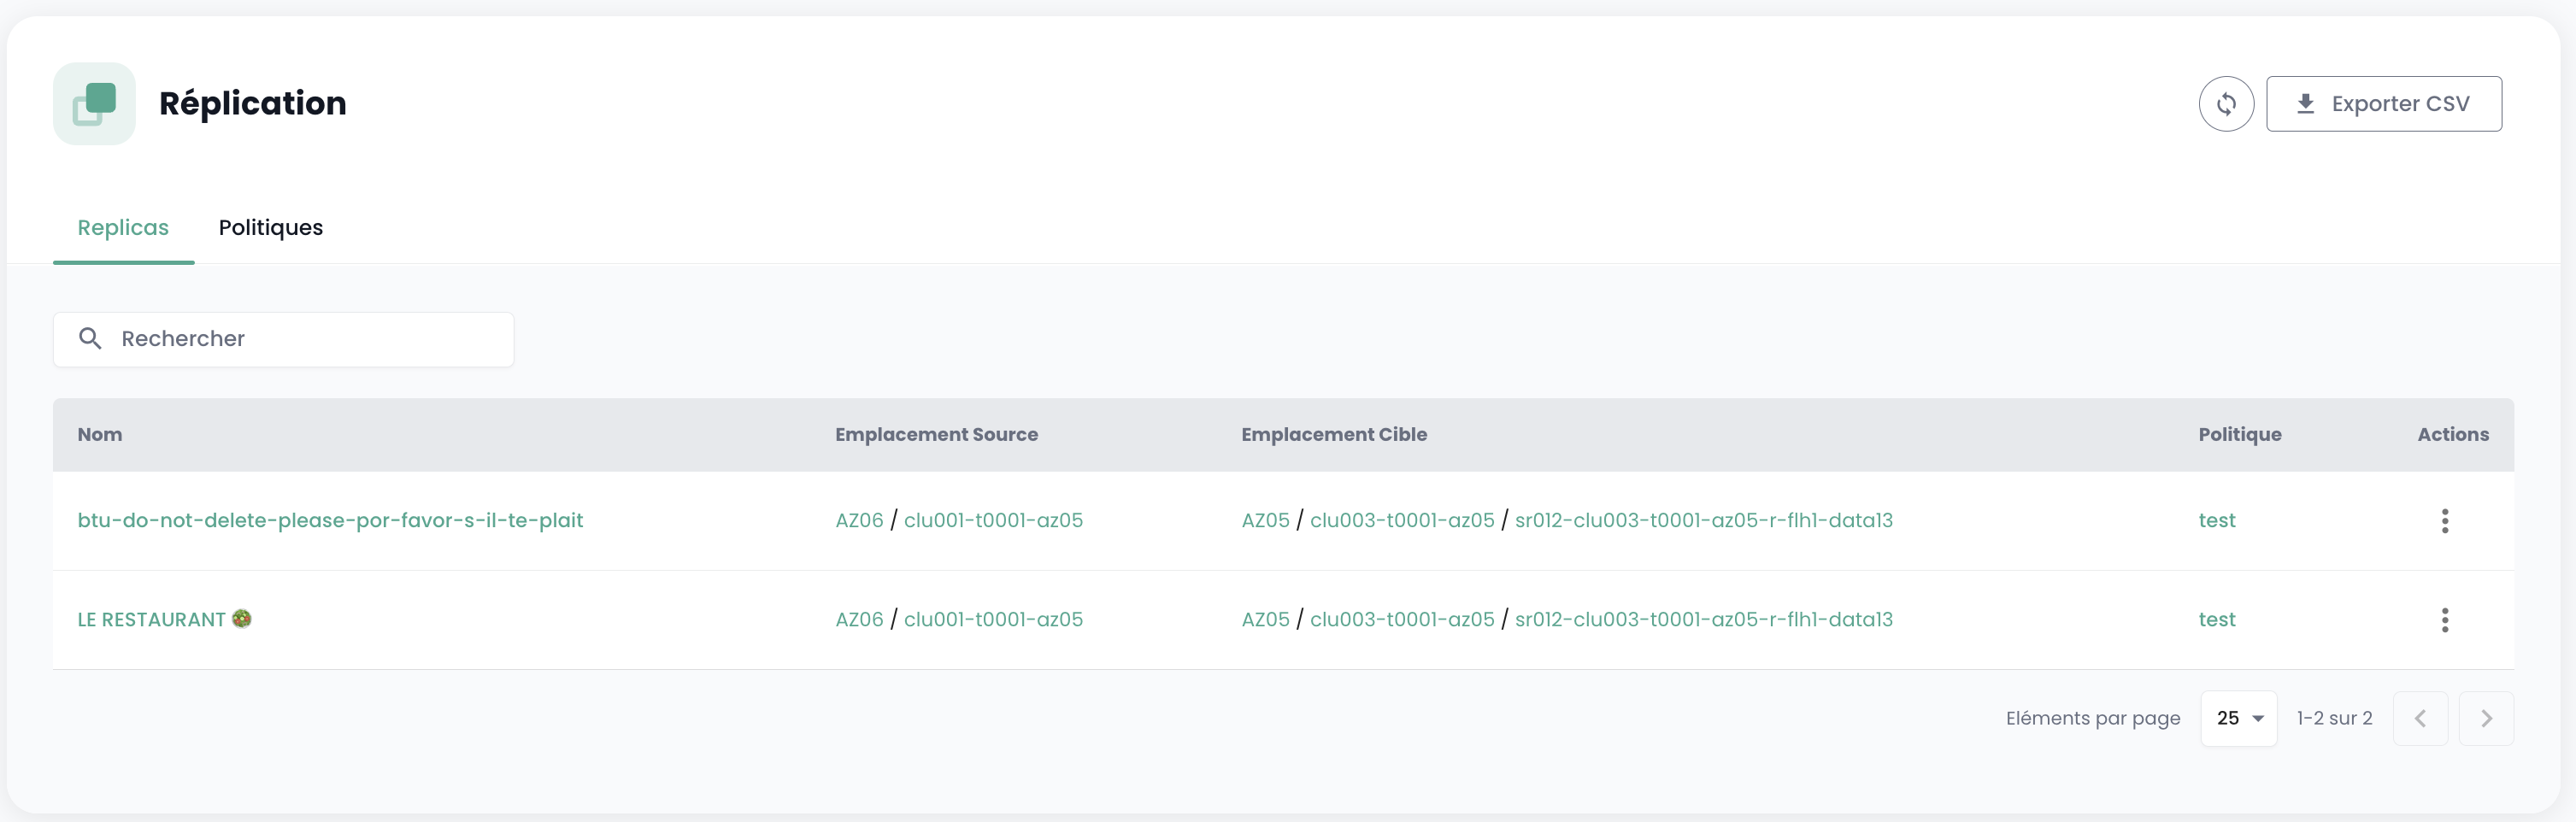
You can view:
- The name of the replicated virtual machines
- The source and target locations
- The associated replication policy
Available actions include:
- Export data in CSV format
- View replication details
- Manage replicas by policy