Cilium Gateway API verwenden
Einführung
Die Gateway API ist der neue Kubernetes-Standard für das Management des eingehenden Datenverkehrs. Sie löst die traditionelle Ingress-Ressource ab und bietet mehr Flexibilität, Funktionen (erweitertes Routing, Lastverteilung usw.) sowie eine klarere Trennung der Verantwortlichkeiten.
In Ihrem Managed Kubernetes Cloud Temple-Cluster wird Cilium als CNI verwendet und unterstützt die Gateway API nativ.
:::info[Unterstützte Versionen ] Diese Dokumentation gilt für Cluster, die Cilium 1.8.4 oder höher verwenden. Die Gateway API CRDs in Version 1.4 sind auf Ihrem Cluster vorinstalliert. :::
Ziele
Dieses Tutorial führt Sie durch:
- Die grundlegenden Gateway API-Ressourcen verstehen (GatewayClass, Gateway, HTTPRoute).
- Eine Testanwendung bereitstellen.
- Diese Anwendung über ein Cilium-Gateway exponieren.
- Den Zugriff testen.
Voraussetzungen
- Ein betriebsbereiter Managed Kubernetes Cloud Temple-Cluster.
- Das Tool
kubectl, das für den Zugriff auf Ihren Cluster konfiguriert ist. - Das Tool
cilium.
Schlüsselkonzepte
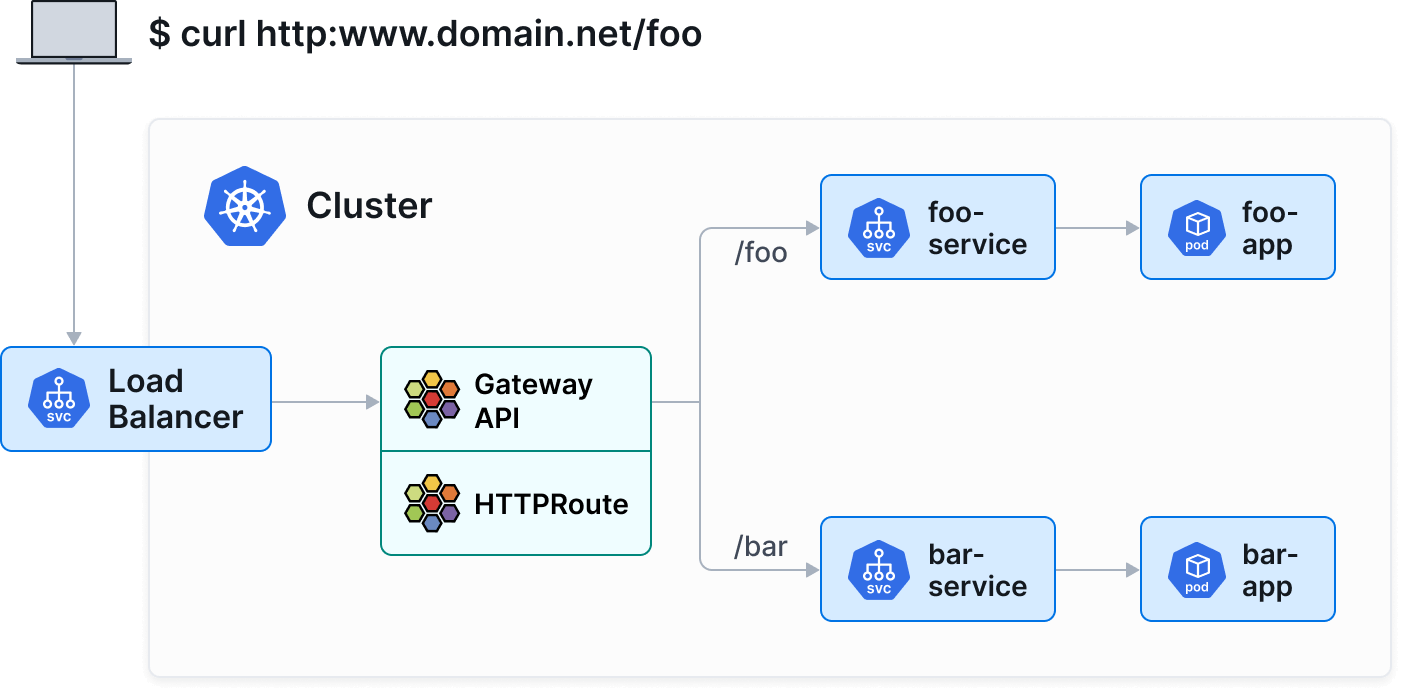
Die Gateway API unterteilt die Netzwerkkonfiguration in drei Hauptressourcen:
- GatewayClass : Definiert den Typ des Controllers (ici,
io.cilium/gateway). - Gateway : Instanziiert einen Netzwerk-Eingangspunkt (load balancer).
- HTTPRoute : Definiert die Routingregeln (chemins, headers) zu Kubernetes-Services.
Schritt 1: Version und GatewayClass überprüfen
Sie können mit den folgenden Befehlen überprüfen, ob Ihr Cluster eine kompatible Version von Cilium (1.8.4+) verwendet:
cilium status
cilium config view | grep -w "enable-gateway-api"
Stellen Sie anschließend sicher, dass die GatewayClass von Cilium in Ihrem Cluster verfügbar ist:
kubectl get gatewayclass
Sie sollten eine Ausgabe ähnlich der folgenden sehen:
NAME      CONTROLLER           ACCEPTED   AGE
cilium    io.cilium/gateway    True       2d
:::info[Hinweis ] Wenn keine GatewayClass aufgelistet ist, stellen Sie sicher, dass die Gateway-API-Funktion in Ihrer Cilium-Installation aktiviert ist. :::
Schritt 2 : Eine Demo-Anwendung bereitstellen
Wir stellen eine einfache Anwendung bereit, die Informationen über den Pod zurückgibt (echo-server).
Erstellen Sie eine Datei apps.yaml :
apiVersion: apps/v1
kind: Deployment
metadata:
  name: echo-server
  labels:
    app: echo-server
spec:
  replicas: 2
  selector:
    matchLabels:
      app: echo-server
  template:
    metadata:
      labels:
        app: echo-server
    spec:
      containers:
      - name: echo-server
        image: ealen/echo-server:latest
        ports:
        - containerPort: 80
---
apiVersion: v1
kind: Service
metadata:
  name: echo-service
  labels:
    app: echo-server
spec:
  selector:
    app: echo-server
  ports:
  - port: 80
    targetPort: 80
Wenden Sie die Konfiguration an :
kubectl apply -f apps.yaml
Schritt 3: Gateway erstellen
Die Gateway wird die Erstellung eines LoadBalancers anfordern, um den Datenverkehr zu empfangen.
Erstellen Sie eine Datei gateway.yaml :
apiVersion: gateway.networking.k8s.io/v1
kind: Gateway
metadata:
  name: my-gateway
spec:
  gatewayClassName: cilium
  listeners:
  - protocol: HTTP
    port: 80
    name: web-gw
    allowedRoutes:
      namespaces:
        from: Same
Wenden Sie die Konfiguration an :
kubectl apply -f gateway.yaml
Überprüfen Sie, ob die Gateway eine IP-Adresse erhalten hat (das Provisioning des LoadBalancers durch die Cloud-Temple-Infrastruktur kann einige Augenblicke dauern) :
kubectl get gateway my-gateway
Warten Sie, bis das Feld PROGRAMMED den Wert True aufweist und ADDRESS eine IP-Adresse anzeigt.
Schritt 4 : Eine HTTPRoute erstellen
Da wir nun ein "Gateway" haben, müssen wir den Datenverkehr zu unserem Dienst weiterleiten.
Erstellen Sie eine Datei httproute.yaml :
apiVersion: gateway.networking.k8s.io/v1
kind: HTTPRoute
metadata:
  name: echo-route
spec:
  parentRefs:
  - name: my-gateway
  rules:
  - matches:
    - path:
        type: PathPrefix
        value: /
    backendRefs:
    - name: echo-service
      port: 80
Übernehmen Sie die Konfiguration :
kubectl apply -f httproute.yaml
Schritt 5: Zugriff testen
Ermitteln Sie die IP-Adresse Ihres Gateways:
kubectl get gateway my-gateway -o jsonpath='{.status.addresses[0].value}'
Senden Sie eine Anfrage an diese IP-Adresse, um zu testen:
curl http://10.200.205.2
Sie sollten eine JSON-Antwort der Anwendung echo-server erhalten, die die Details des Pods enthält, der geantwortet hat.
Erweiterte Funktionen (Beispiel: Canary Release)
Die Gateway API erleichtert fortgeschrittene Deployment-Szenarien erheblich, wie z. B. Canary Releases (gewichtete Traffic-Verteilung).
Nehmen wir an, wir haben eine v2 unserer Anwendung. Wir können den Traffic zu 90% auf v1 und zu 10% auf v2 aufteilen, indem wir einfach die Gewichte in backendRefs anpassen:
apiVersion: gateway.networking.k8s.io/v1
kind: HTTPRoute
metadata:
  name: echo-route-canary
spec:
  parentRefs:
  - name: my-gateway
  rules:
  - backendRefs:
    - name: echo-service
      port: 80
      weight: 90
    - name: echo-service-v2
      port: 80
      weight: 10
Fazit
Sie haben eine moderne Infrastruktur zur Dienstexposition mit der Cilium Gateway API eingerichtet. Dieser standardisierte Ansatz, der semantisch reichhaltiger ist als Ingress, wird empfohlen, um die erweiterten Funktionen des Kubernetes-Netzwerks zu nutzen.