Schnellstartanleitung
Berechnung
Verwaltung virtueller Maschinen
Die Verwaltungsoberfläche für Ihre virtuellen Maschinen ist in der Konsole im Menü 'IaaS' verfügbar, das sich auf dem grünen Banner links auf dem Bildschirm befindet.
Liste der virtuellen Maschinen
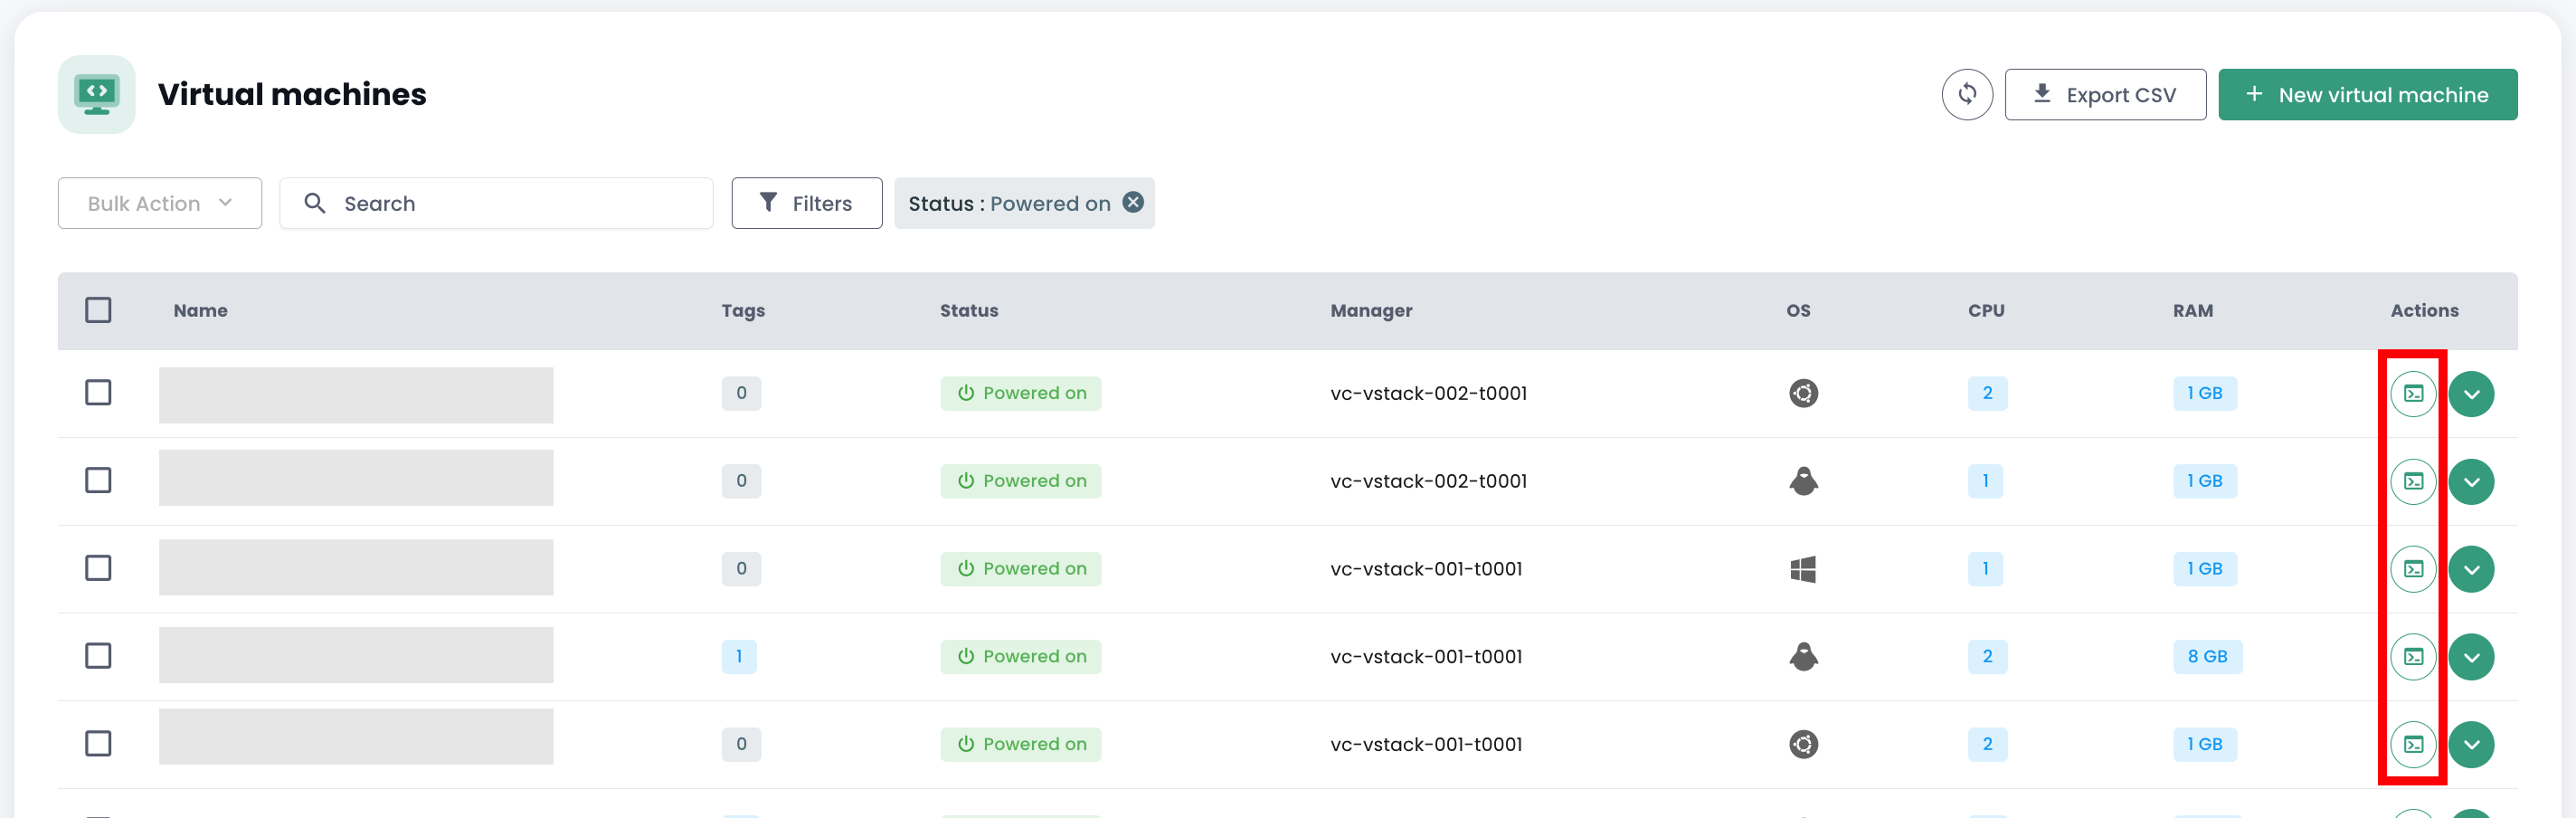
Im Bereich 'Virtuelle Maschinen' haben Sie Zugriff auf die Liste Ihrer virtuellen Maschinen, die in Ihrer vertrauenswürdigen Cloud gehostet werden.
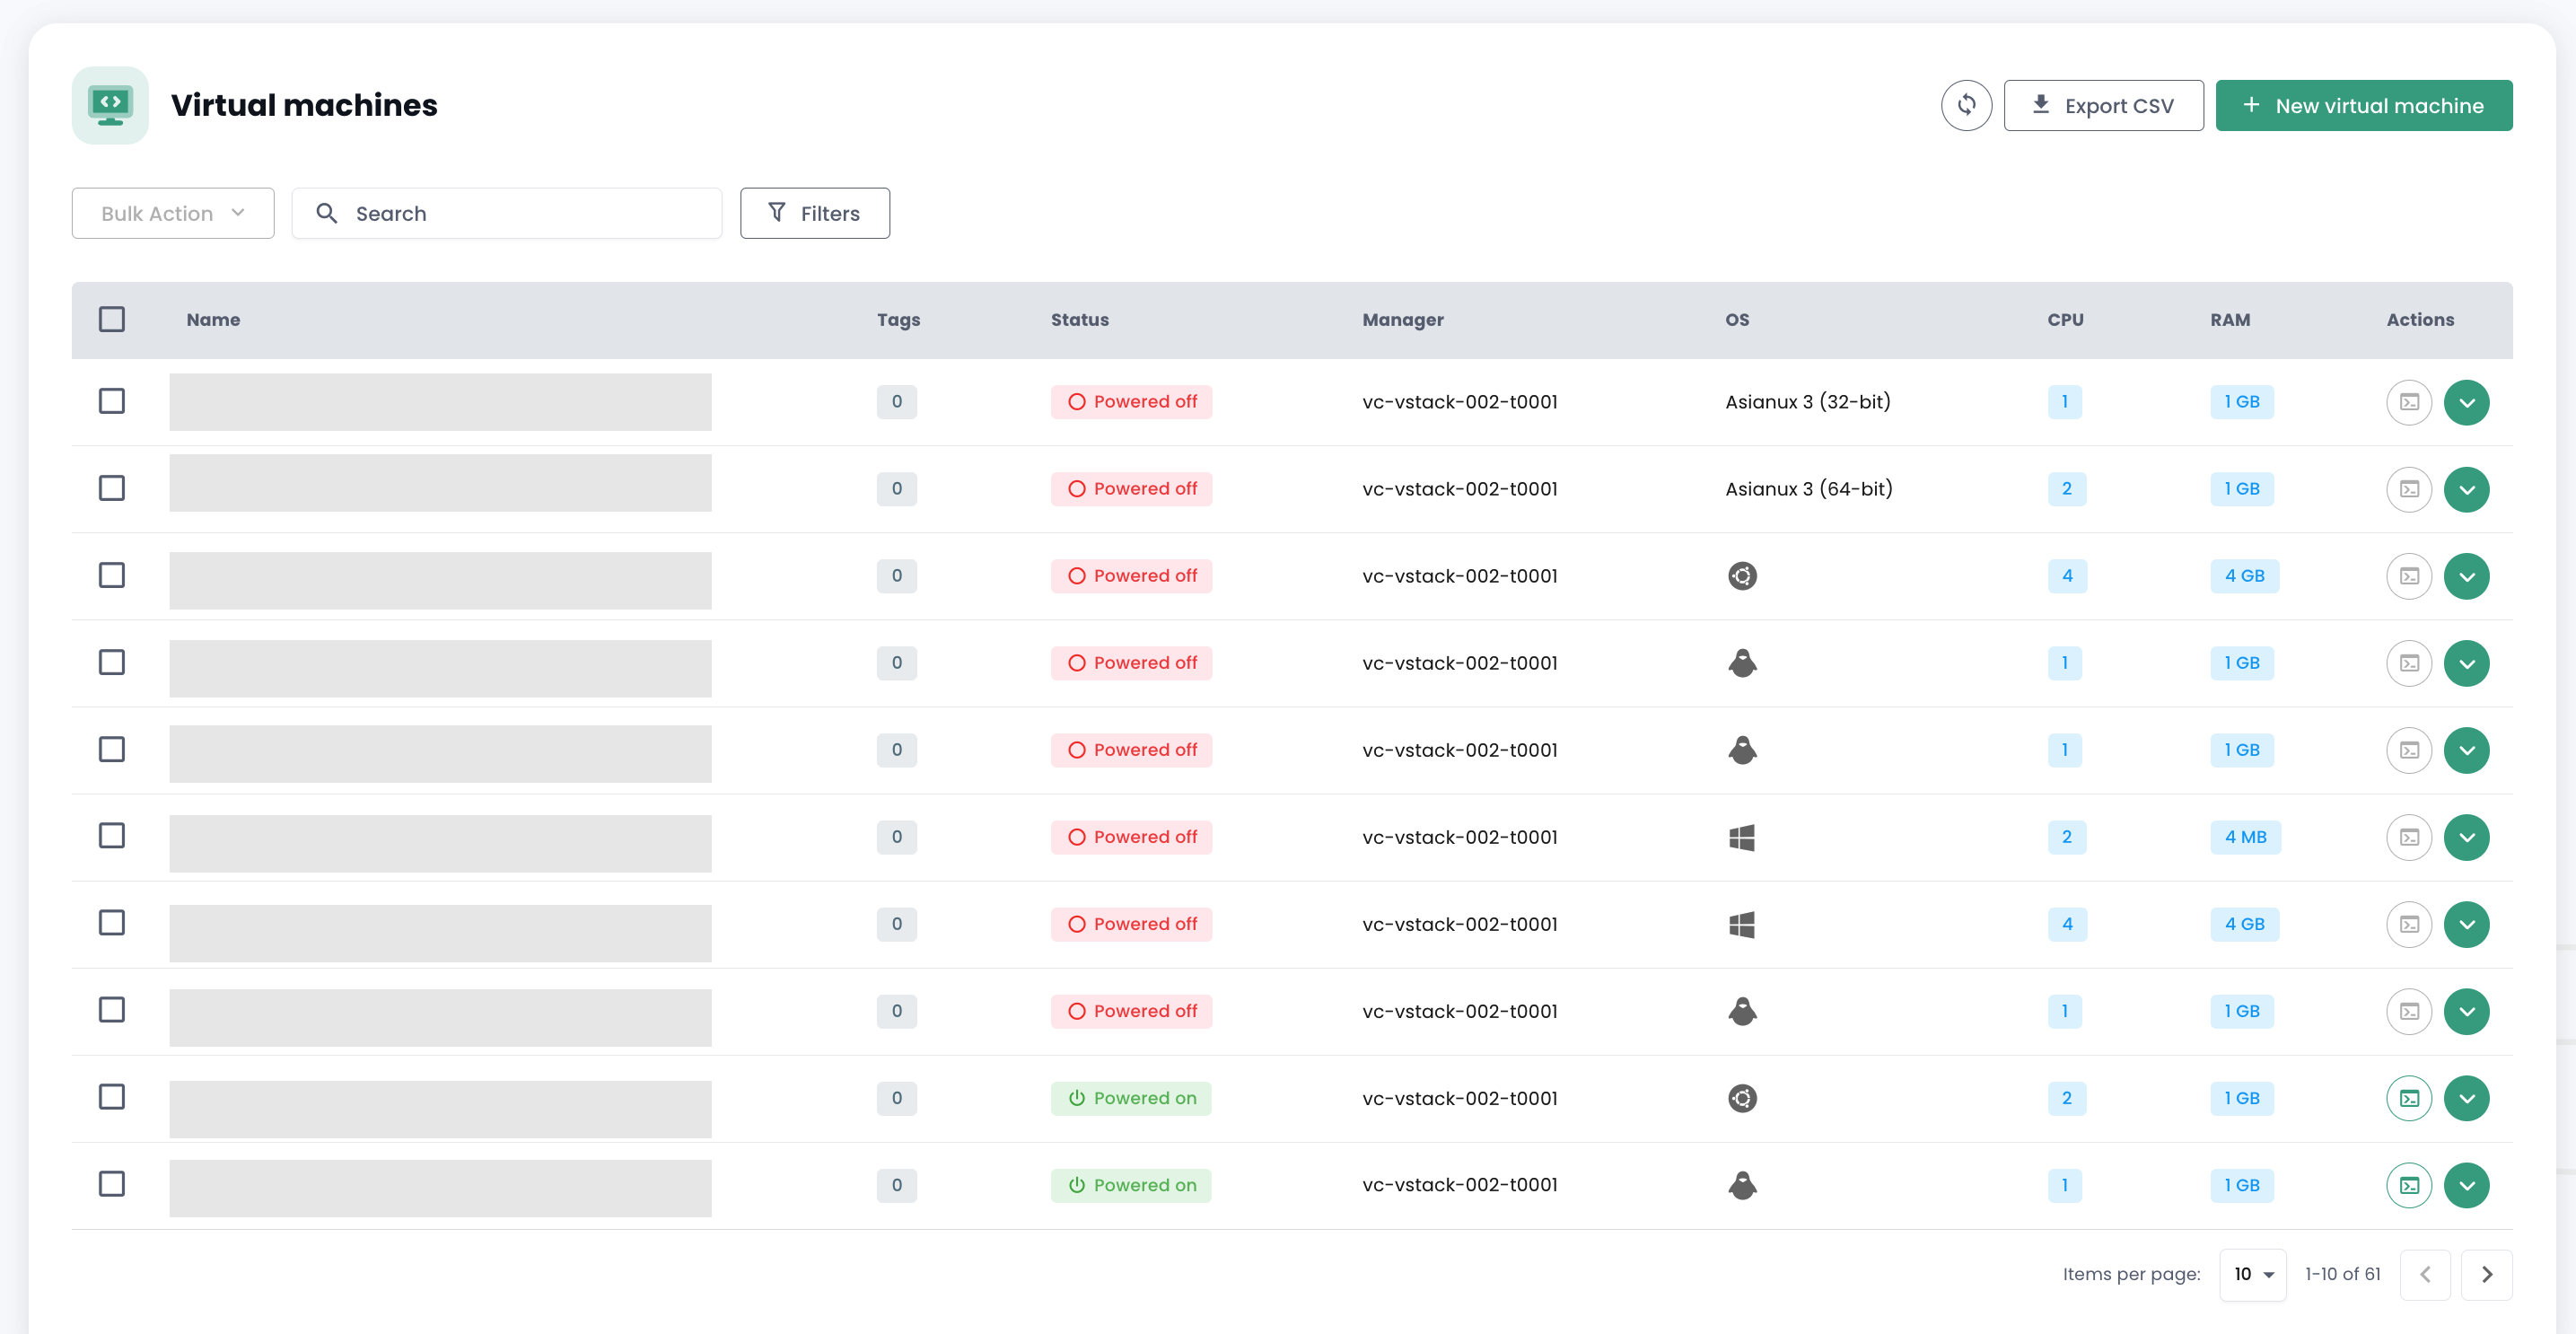
Für jede virtuelle Maschine haben Sie Zugriff auf die folgenden Informationen:
- ihr Name,
- die zugewiesenen Tags,
- ihr Status (éteinte, allumée, en traitement, host déconnecté ou invalid),
- ihr Manager (en environnement VMware, le Vcenter associé),
- ihr Betriebssystem,
- die Anzahl der virtuellen CPUs (vCPU),
- die Menge des virtuellen Arbeitsspeichers (vRAM).
Aktionen für virtuelle Maschinen
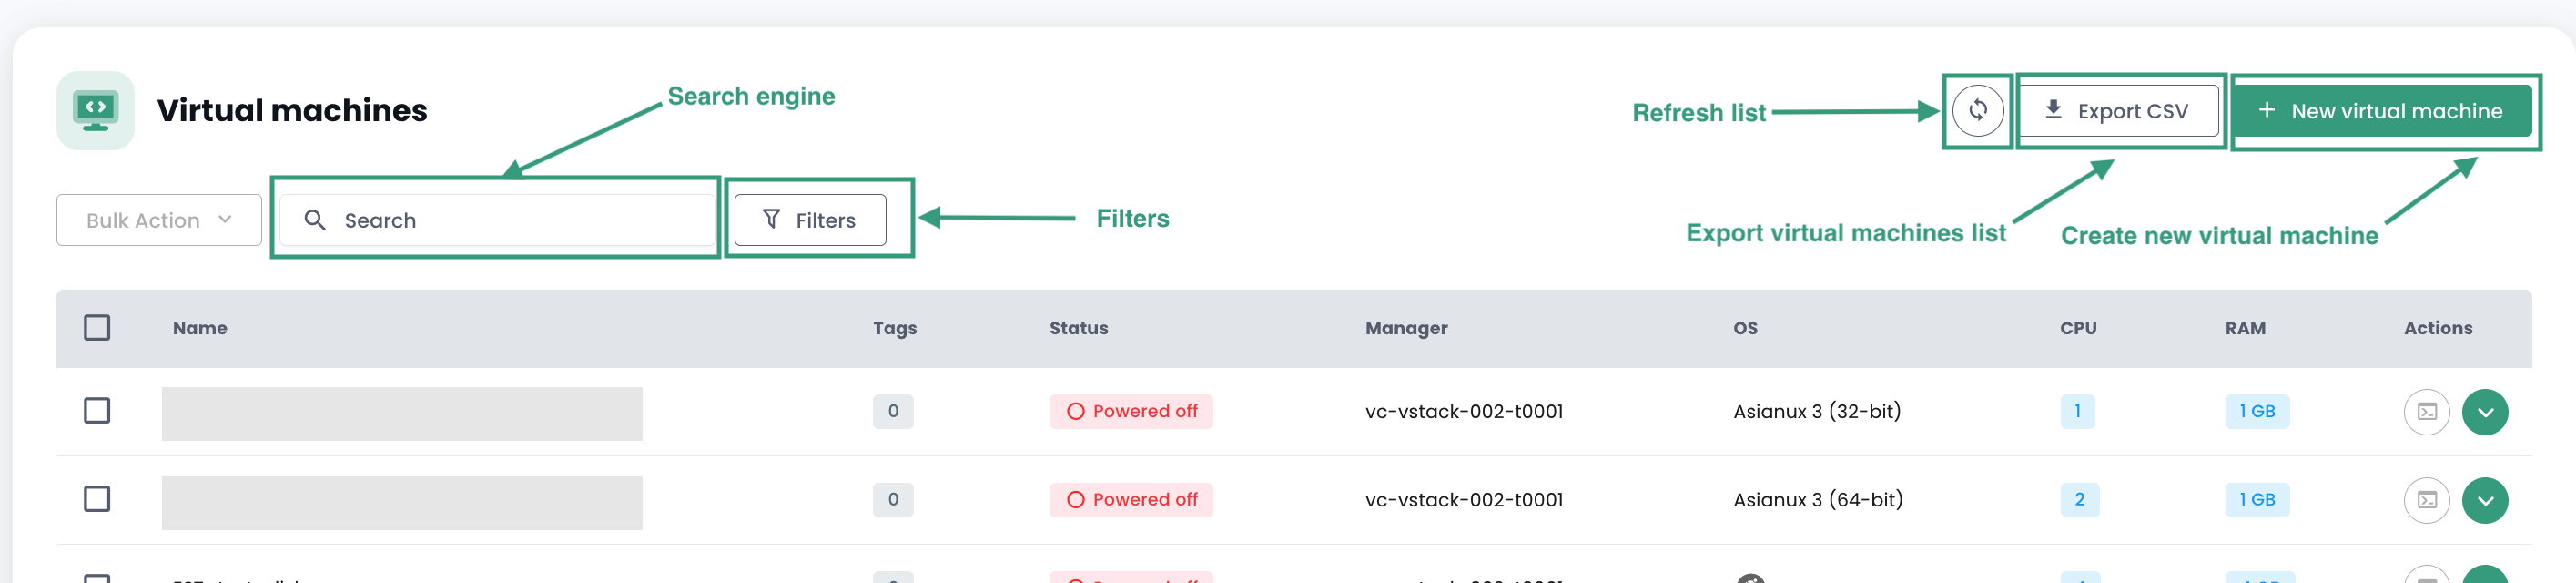
Aus dieser Schnittstelle sind die folgenden Aktionen möglich:
- Die Liste der virtuellen Maschinen aktualisieren;
- Die Liste im CSV-Format exportieren;
- Die Liste filtern;
- Eine virtuelle Maschine nach ihrem Namen suchen;
- Eine neue virtuelle Maschine erstellen.
Ein Warnbalken kann oben in der Liste angezeigt werden: Er zeigt an, dass kritische Alarme für eine oder mehrere Ihrer virtuellen Maschinen ausgelöst wurden. Die Schaltfläche 'Anzeigen' ermöglicht es, die virtuellen Maschinen einzusehen, die von dieser Benachrichtigung betroffen sind.

Wenn Sie auf den grünen Dropdown-Pfeil rechts in der Liste für eine virtuelle Maschine klicken:

Sie erhalten Zugriff auf alle Informationen dazu:
Ein Schnellmenü ermöglicht die folgenden Aktionen:

- Die virtuelle Maschine einschalten;
- Sie ausschalten;
- Sie neu starten;
- Die Stromversorgungsoptionen des Gast-Betriebssystems ändern;
- Die Konsole öffnen;
- Ein ISO-Image einbinden;
- Ein ISO-Image aushängen;
- Die virtuelle Maschine klonen;
- Sie verschieben (vMotion);
- Sie umbenennen;
- Sie löschen.
Eine Schnellansicht bietet eine Visualisierung des Speichers, der CPU und des RAMs der virtuellen Maschine.

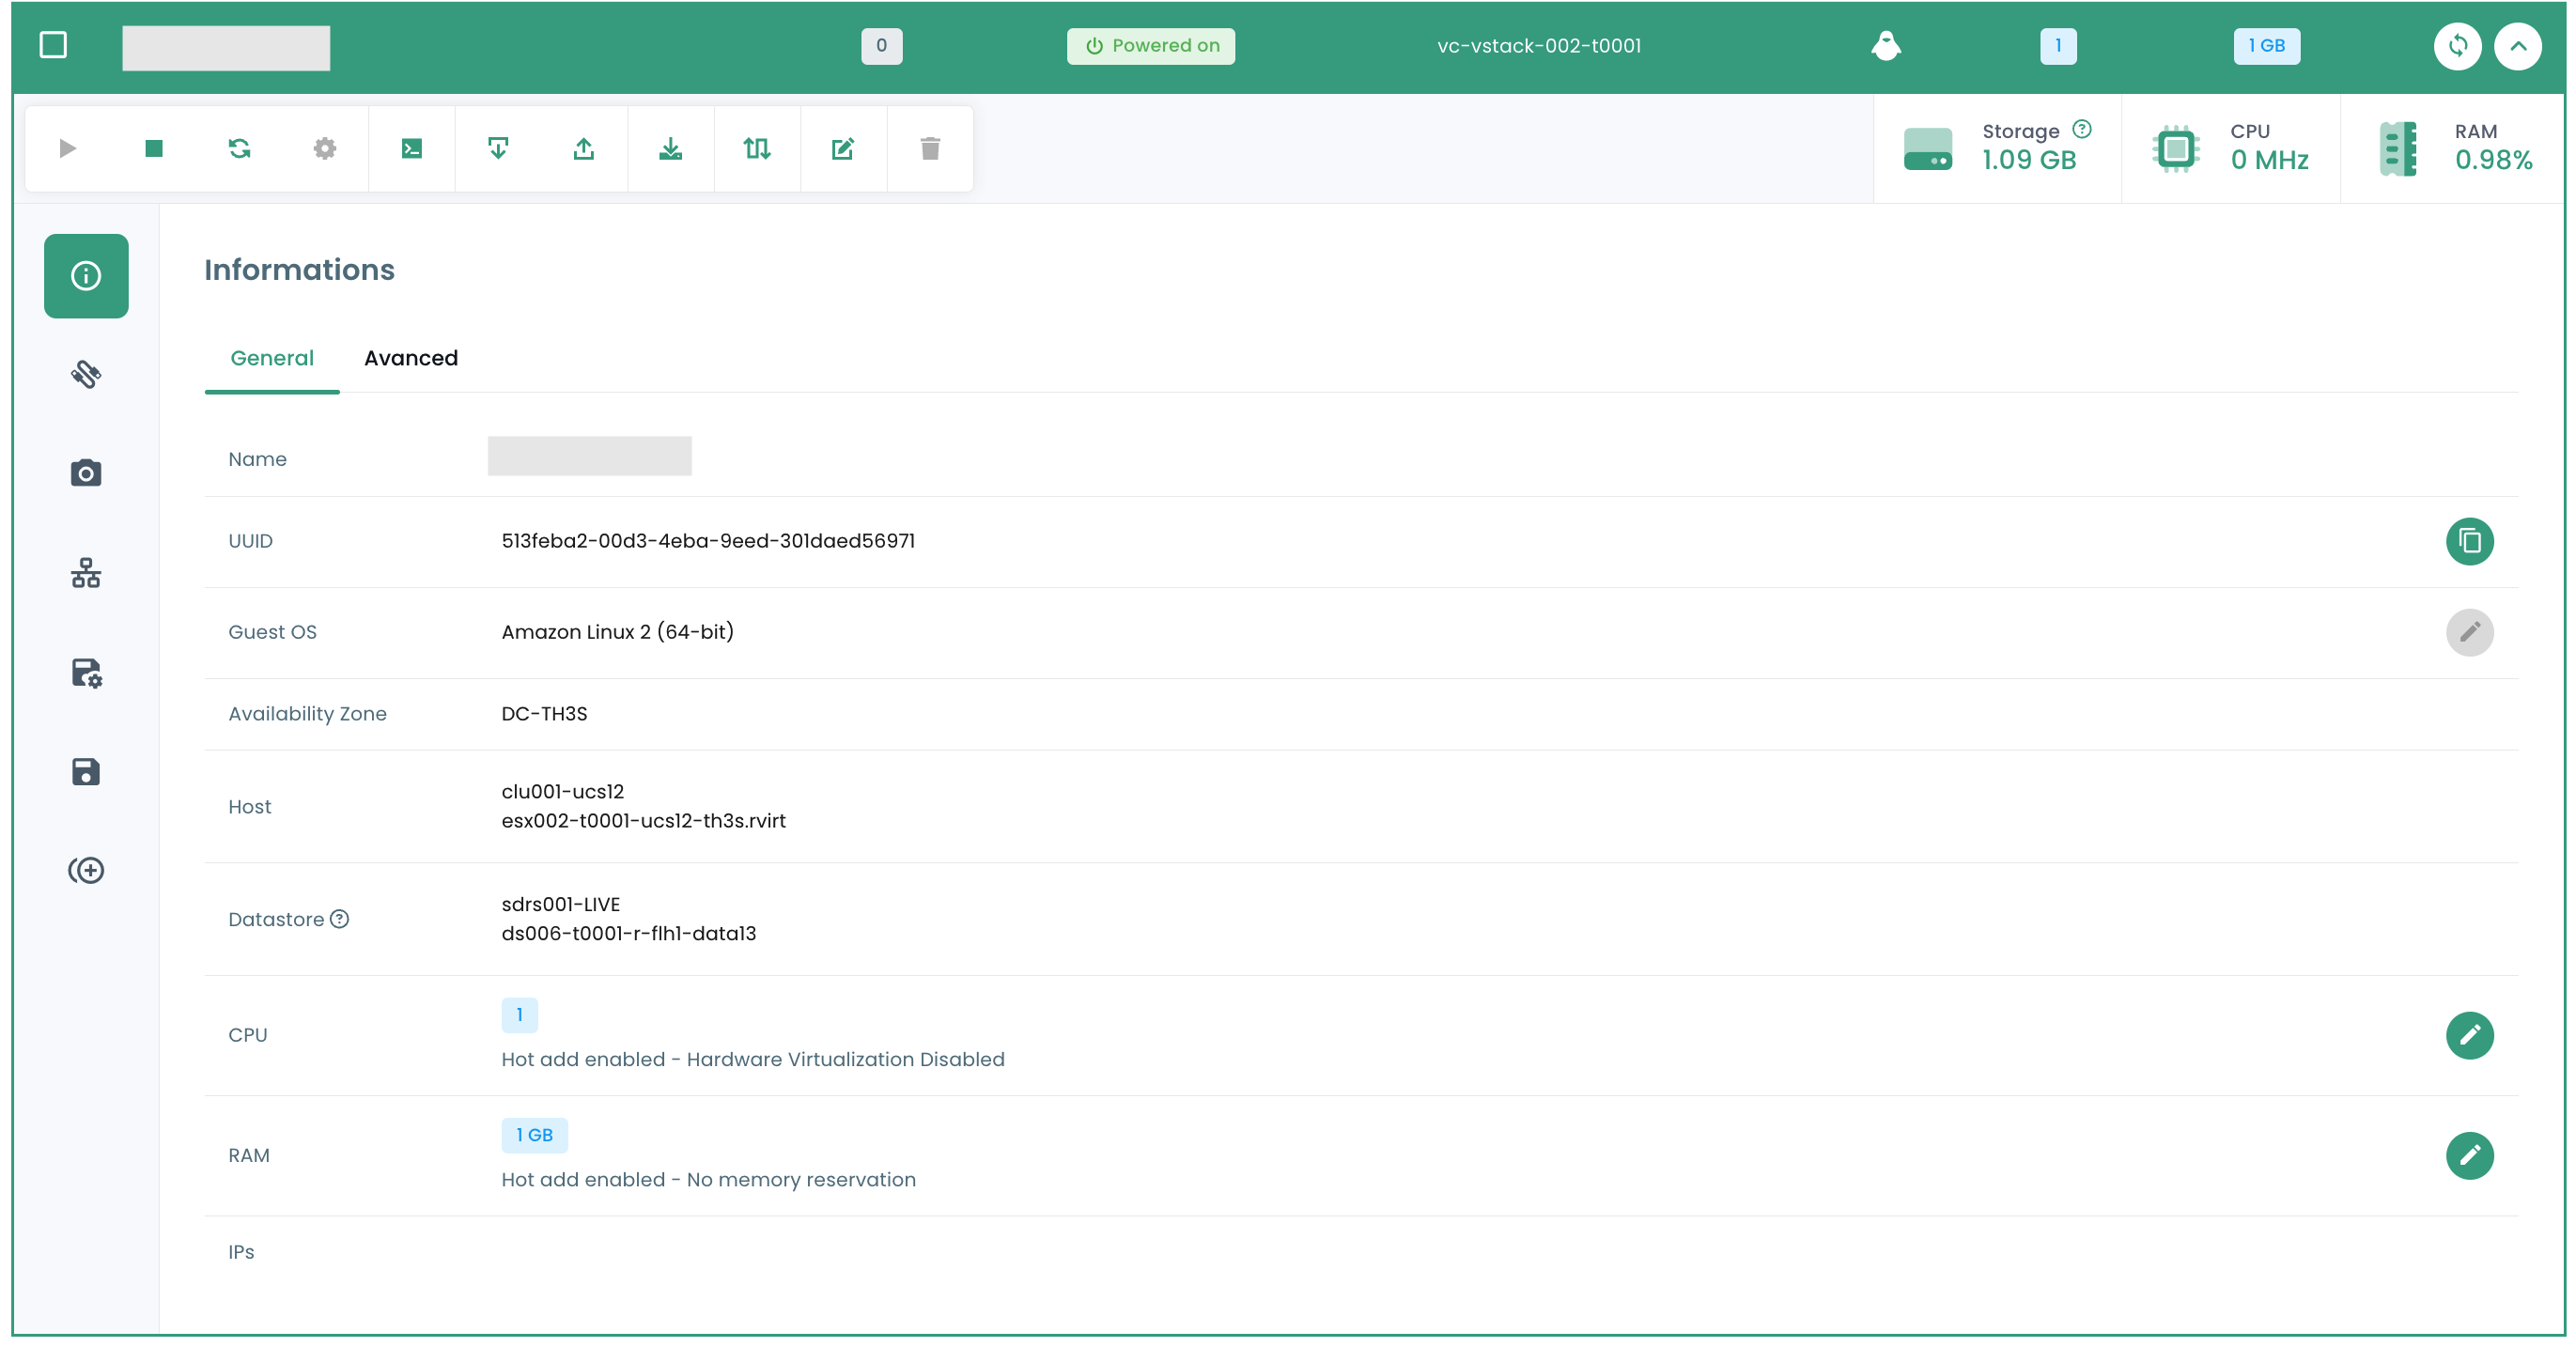
Im Reiter 'Allgemeine Informationen' finden Sie detaillierte Informationen zu Ihrer virtuellen Maschine, wie z. B. das Betriebssystem, den physischen Standort (Rechenzentrum, Datastore usw.), den RAM, die CPU, die IP-Adressen, die Logs und weitere.
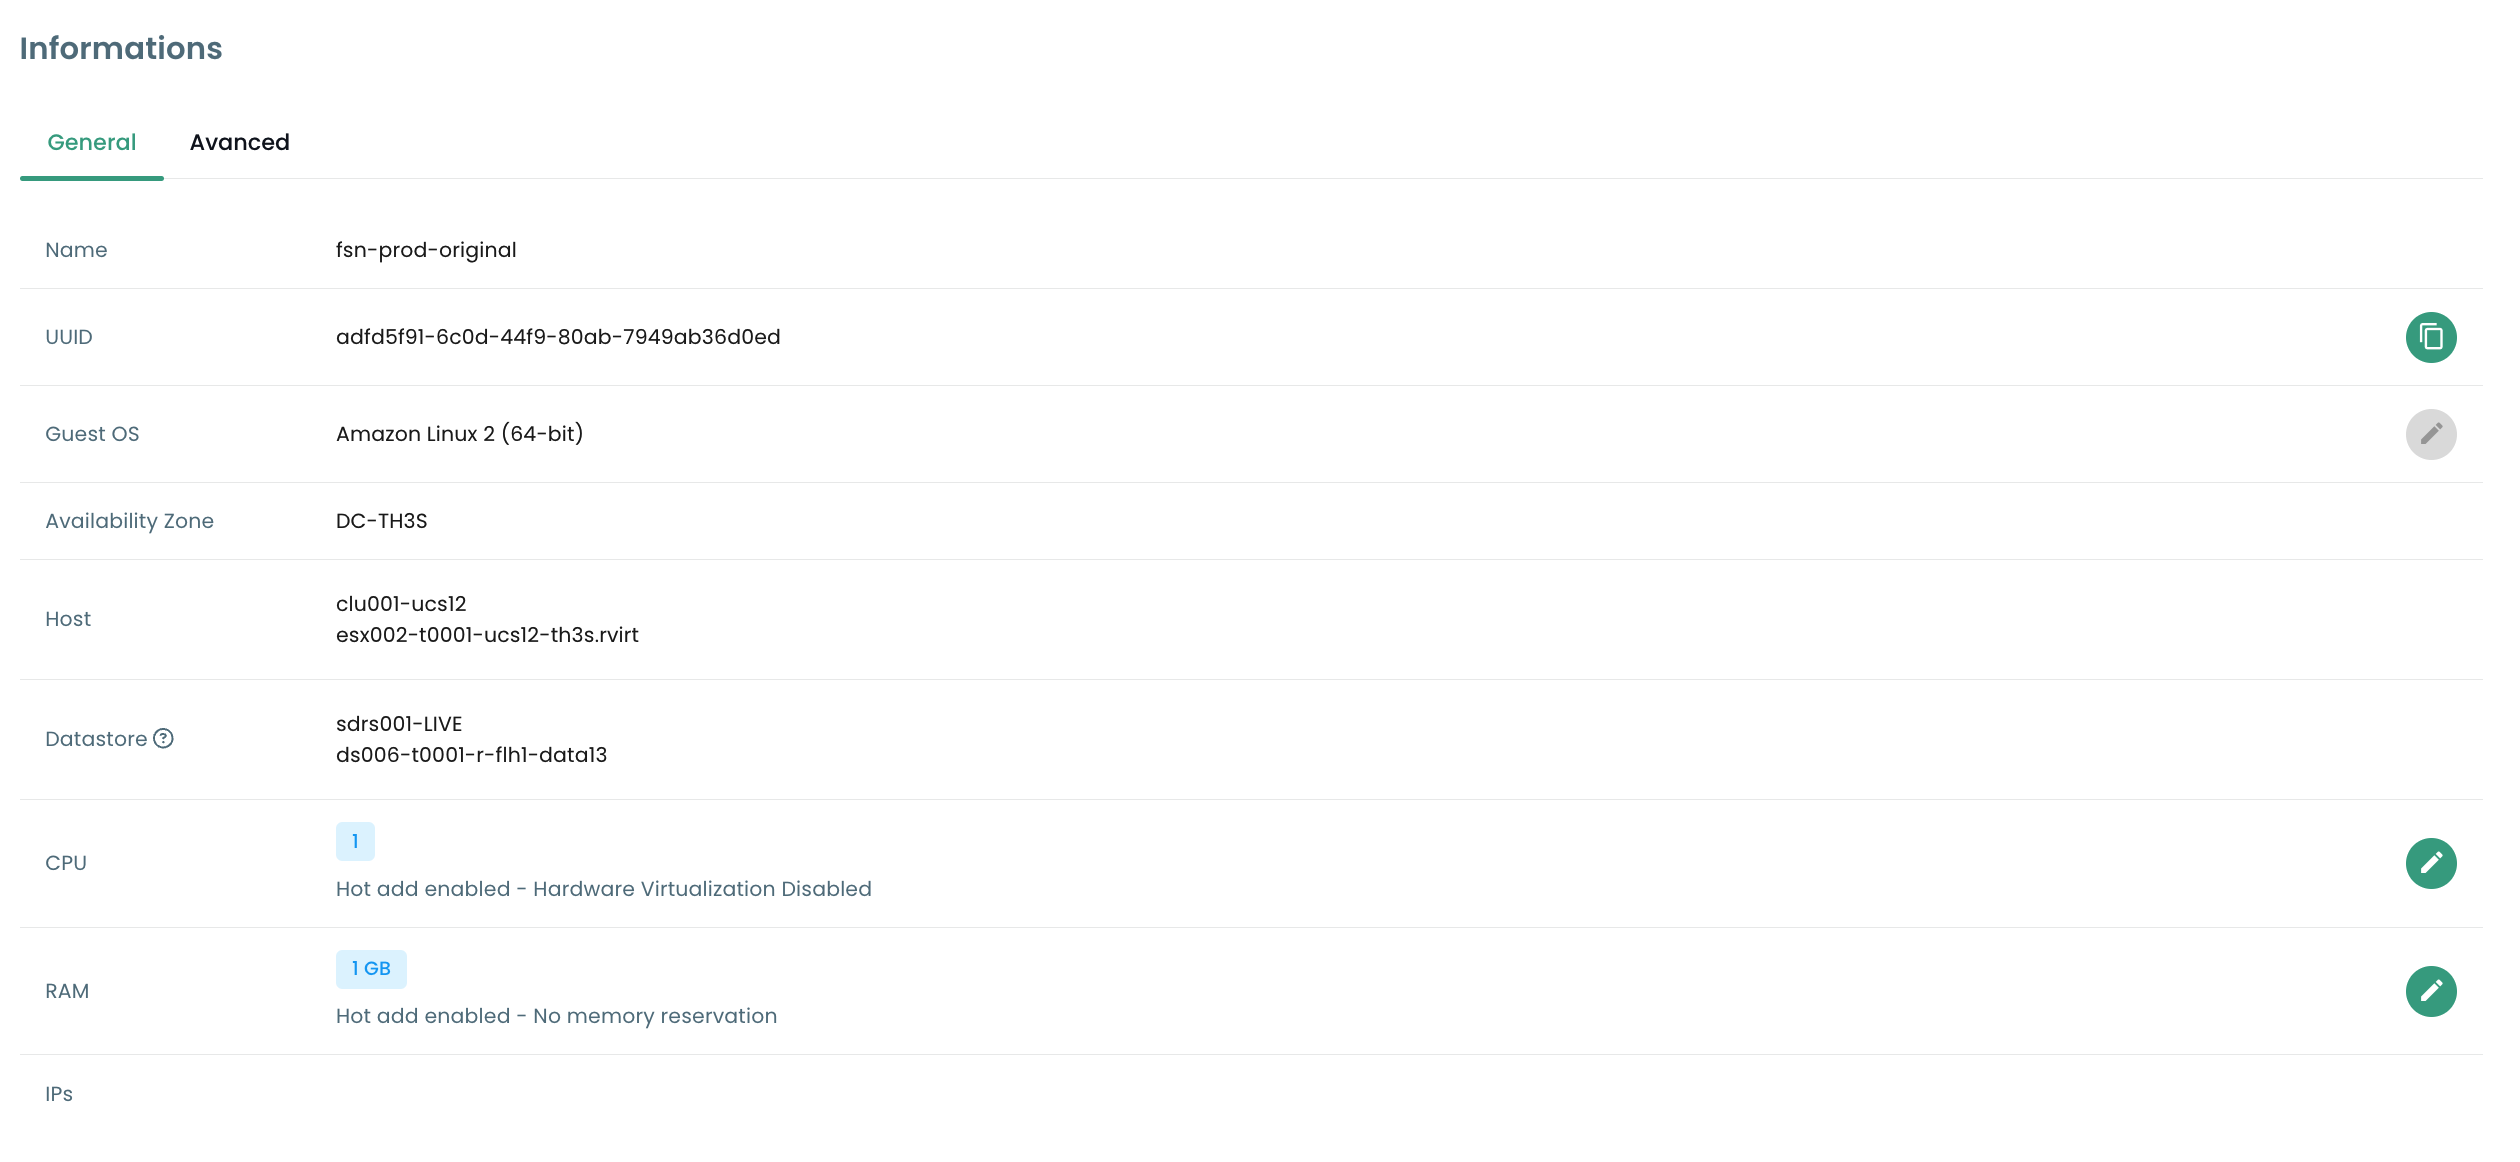
Von dieser Ansicht aus können Sie die folgenden Aktionen durchführen:
- Das Betriebssystem ändern (die virtuelle Maschine muss ausgeschaltet sein),
- Die Hardware-Version aktualisieren (die virtuelle Maschine muss ausgeschaltet sein),
- Den RAM oder die CPU ändern.
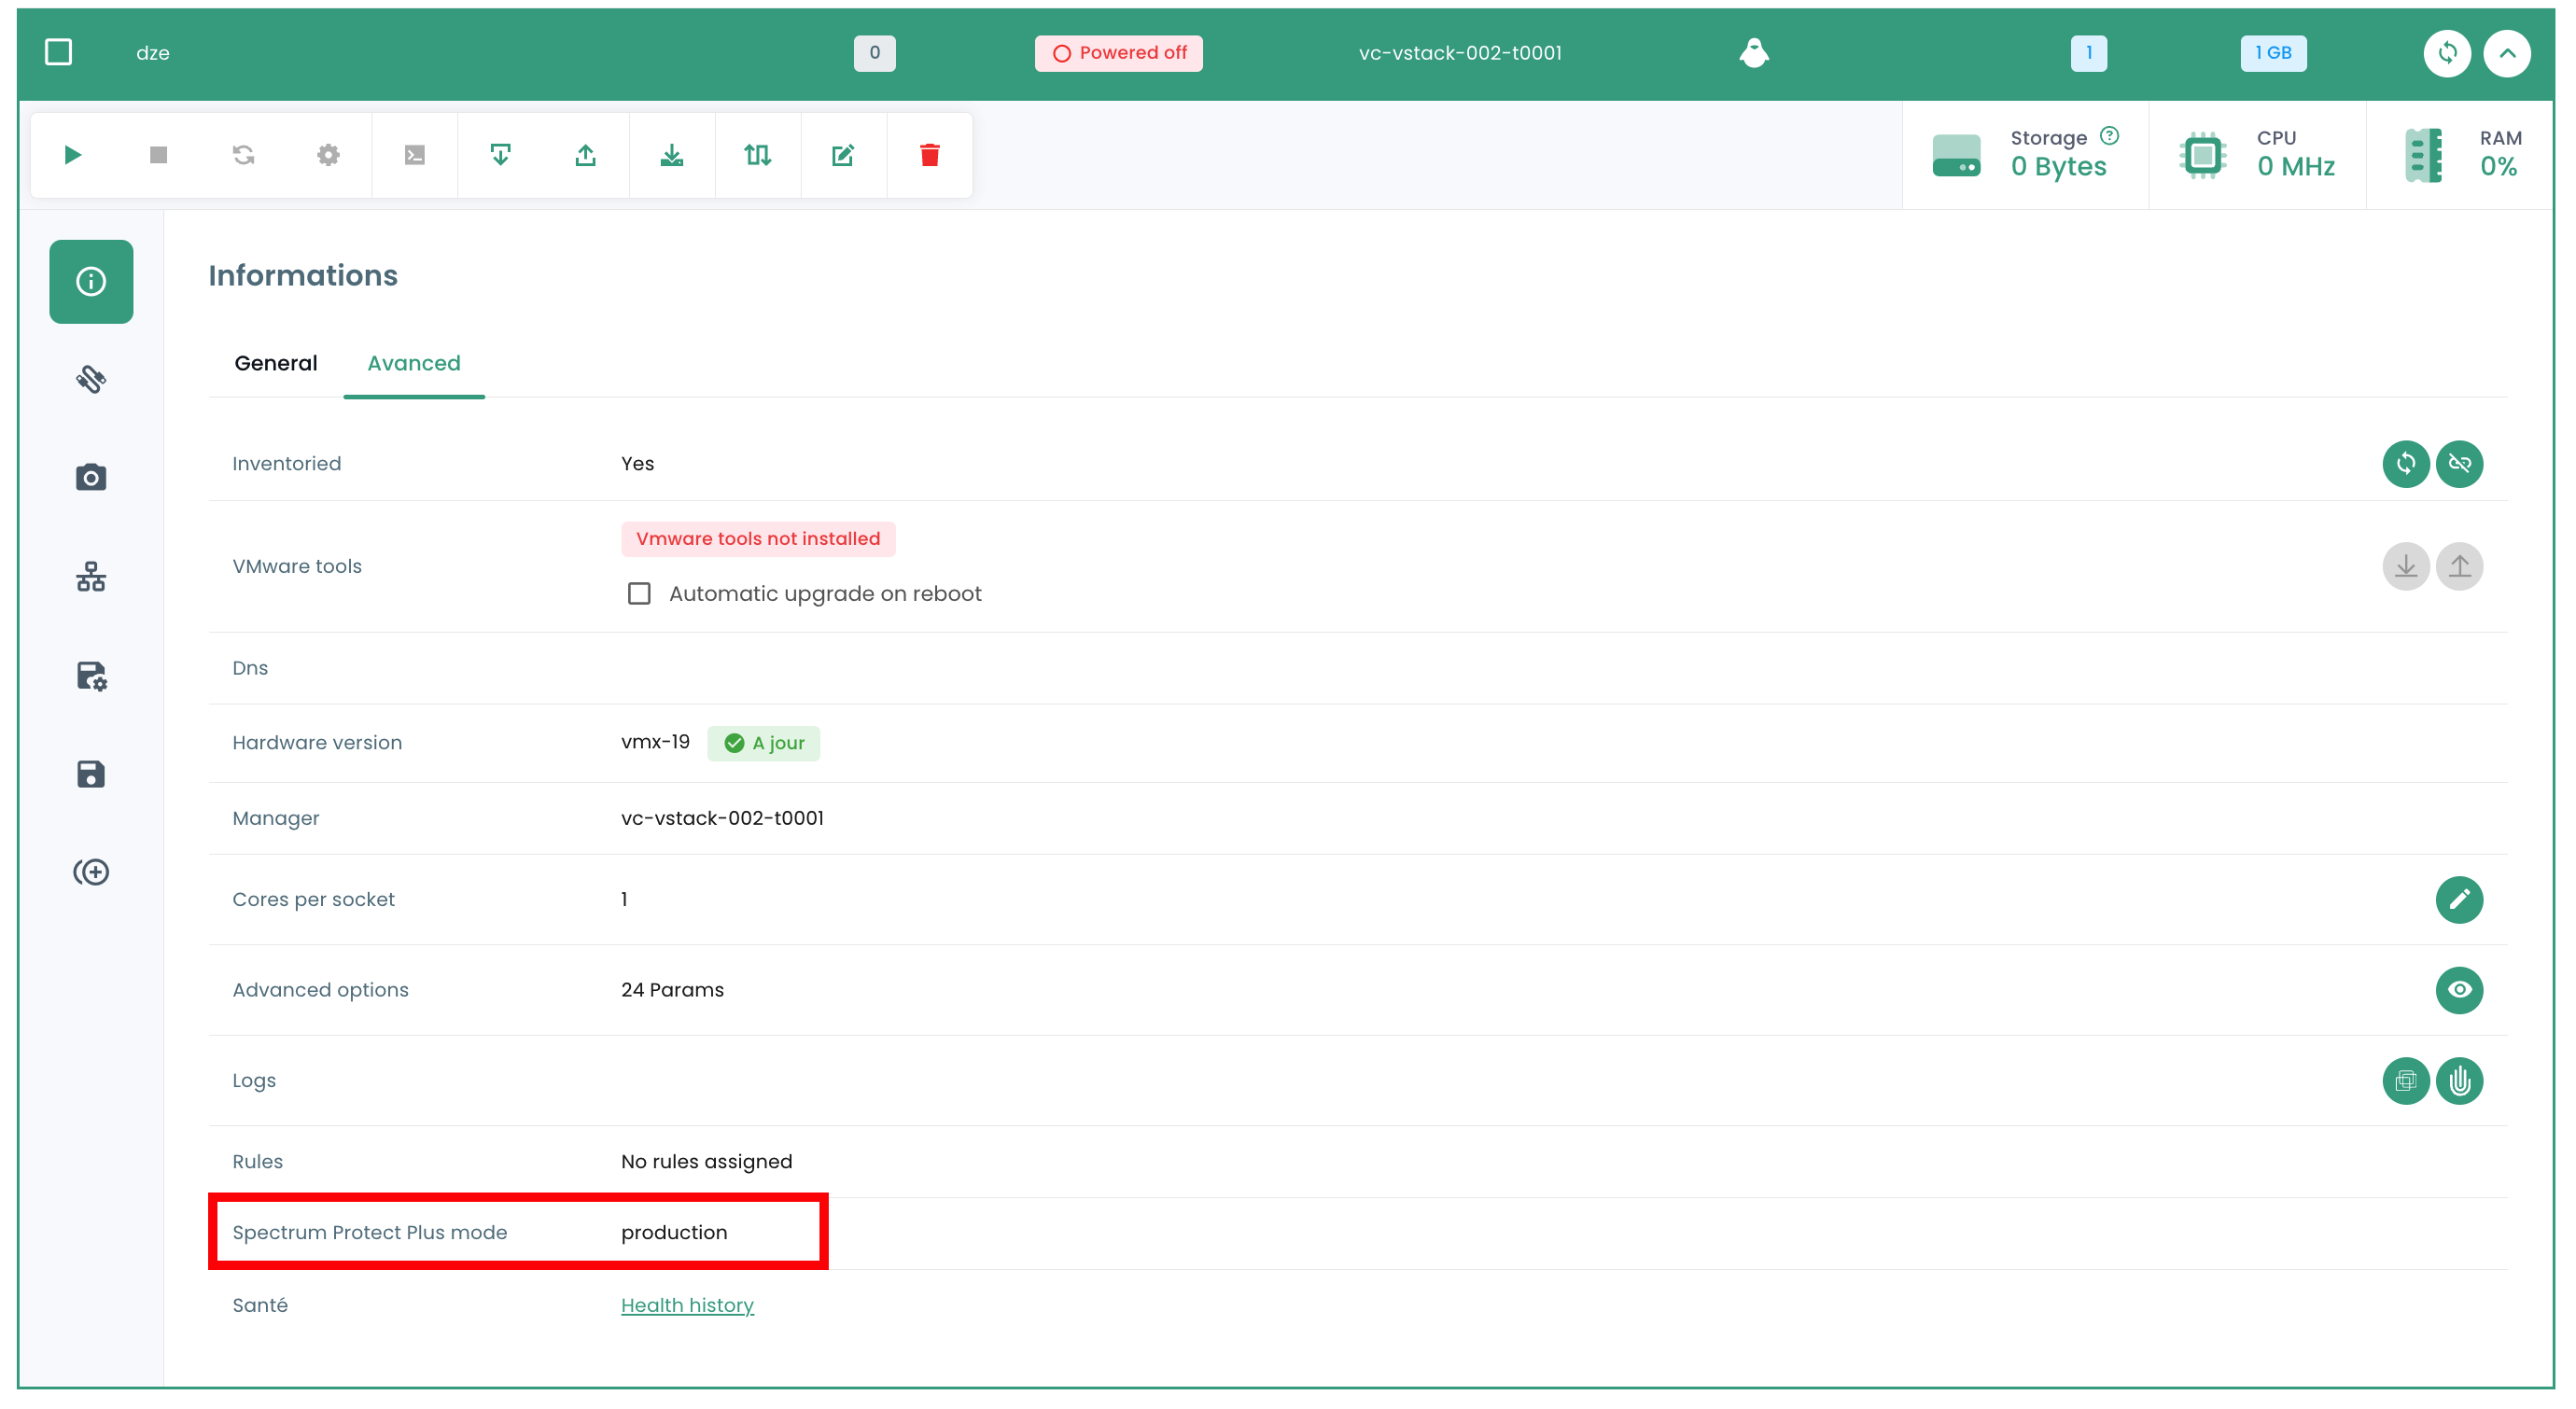
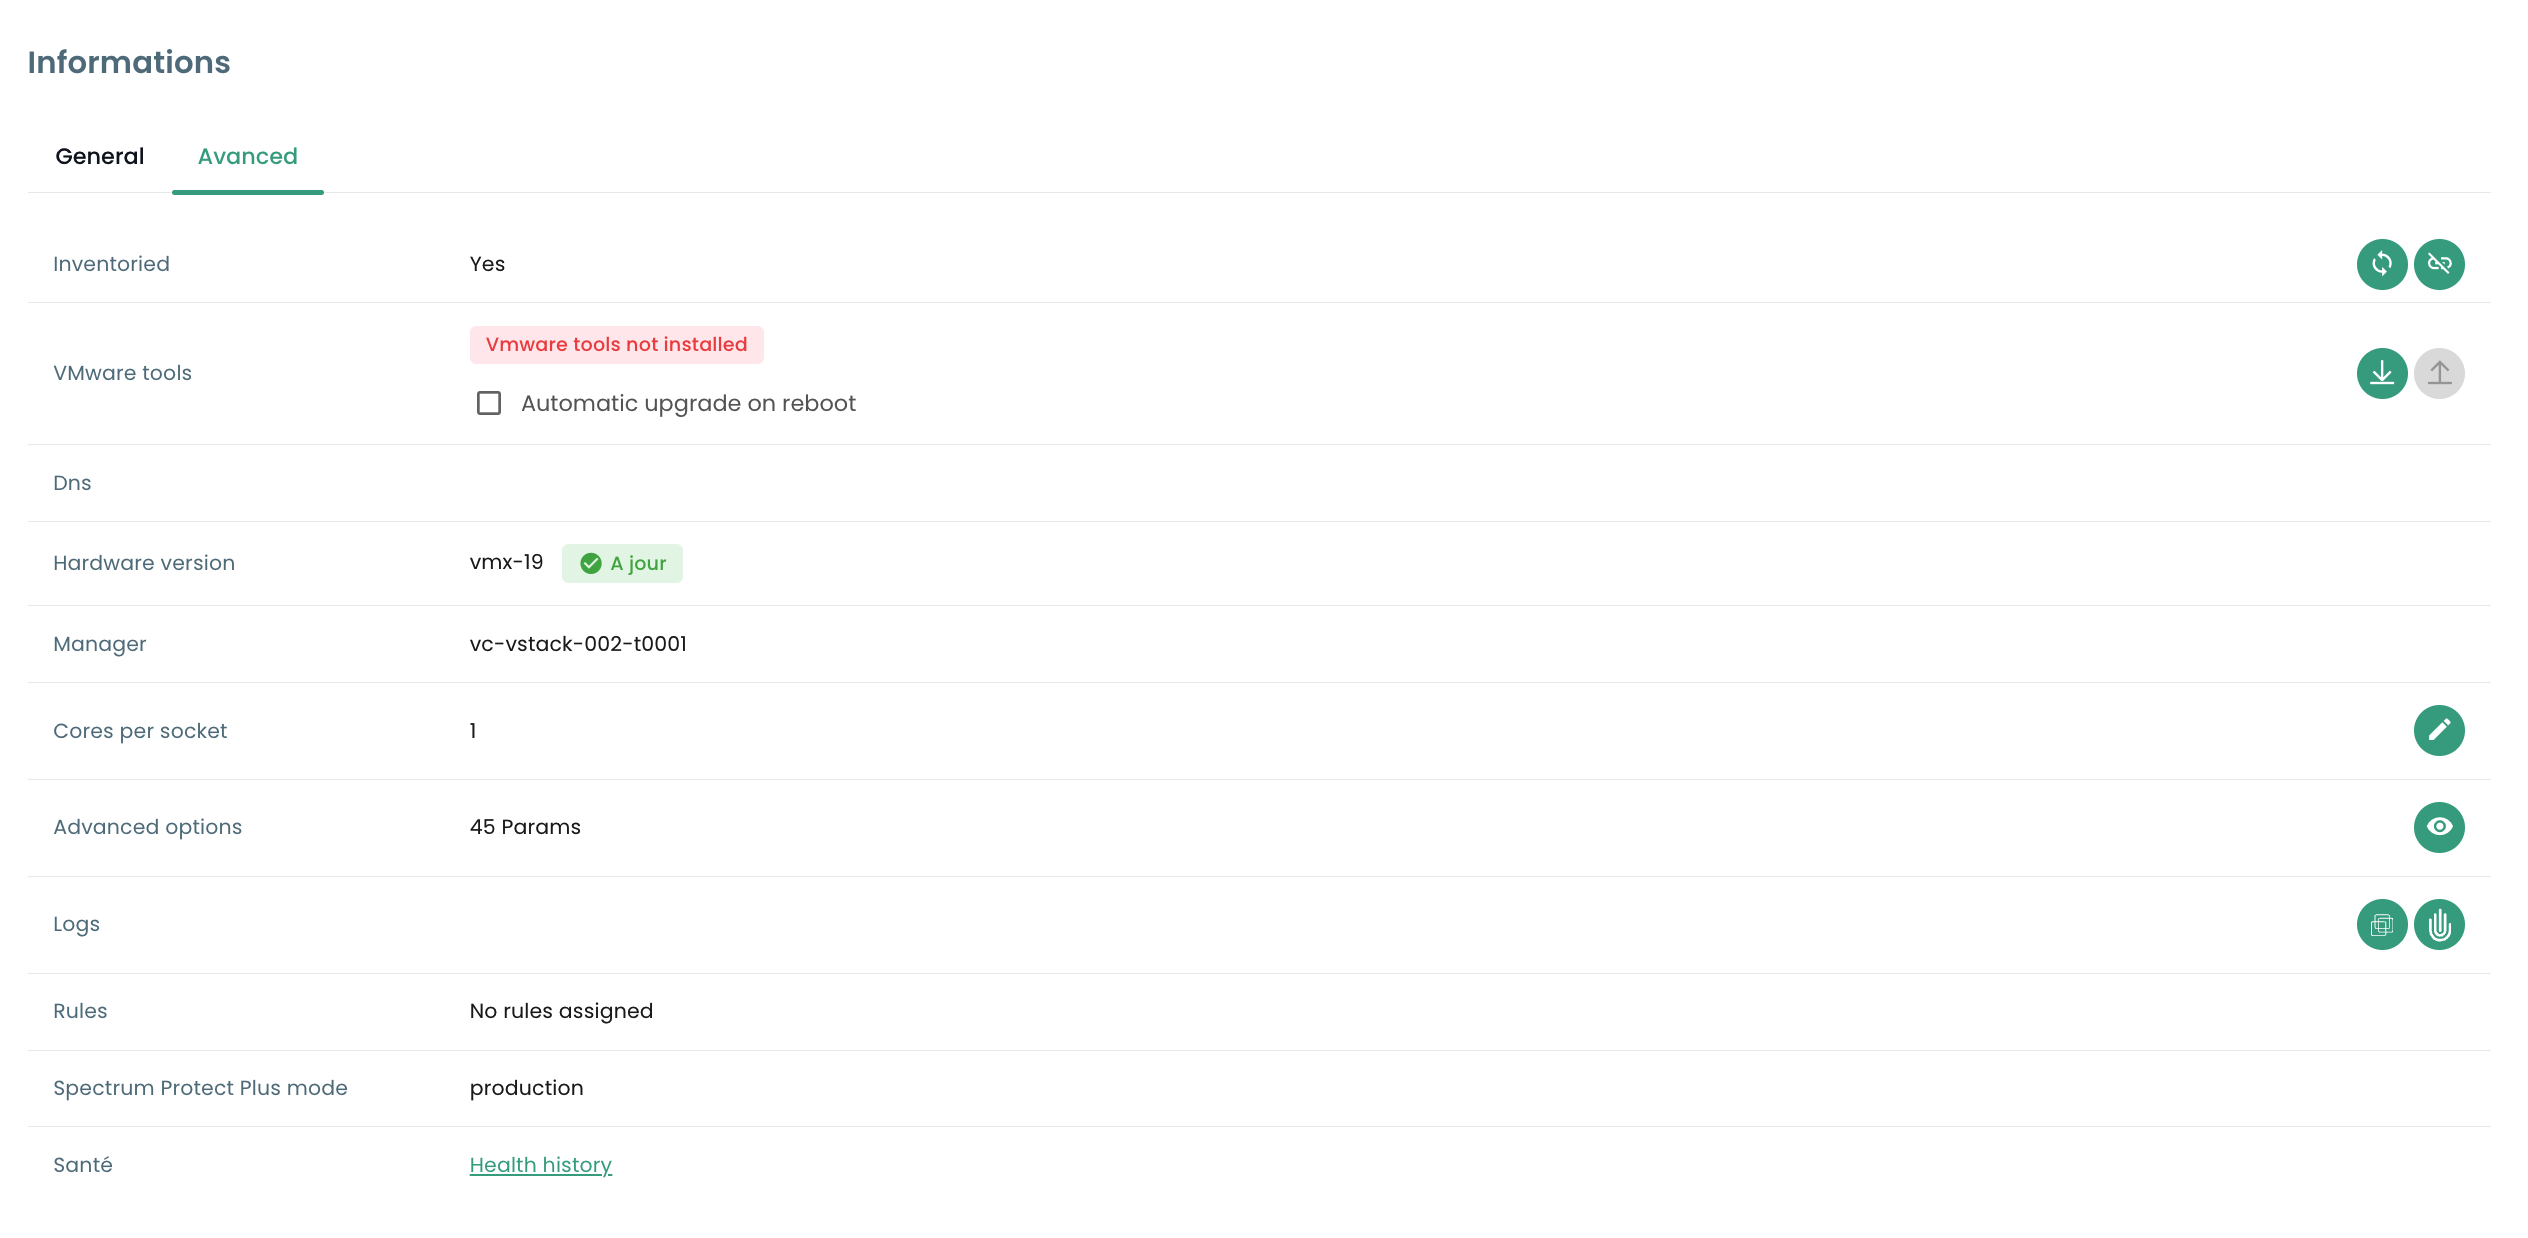
Ein Reiter 'Erweitert' ermöglicht den Zugriff auf spezifischere Informationen wie „VMware Tools“, die Hardware-Version, den Manager usw.
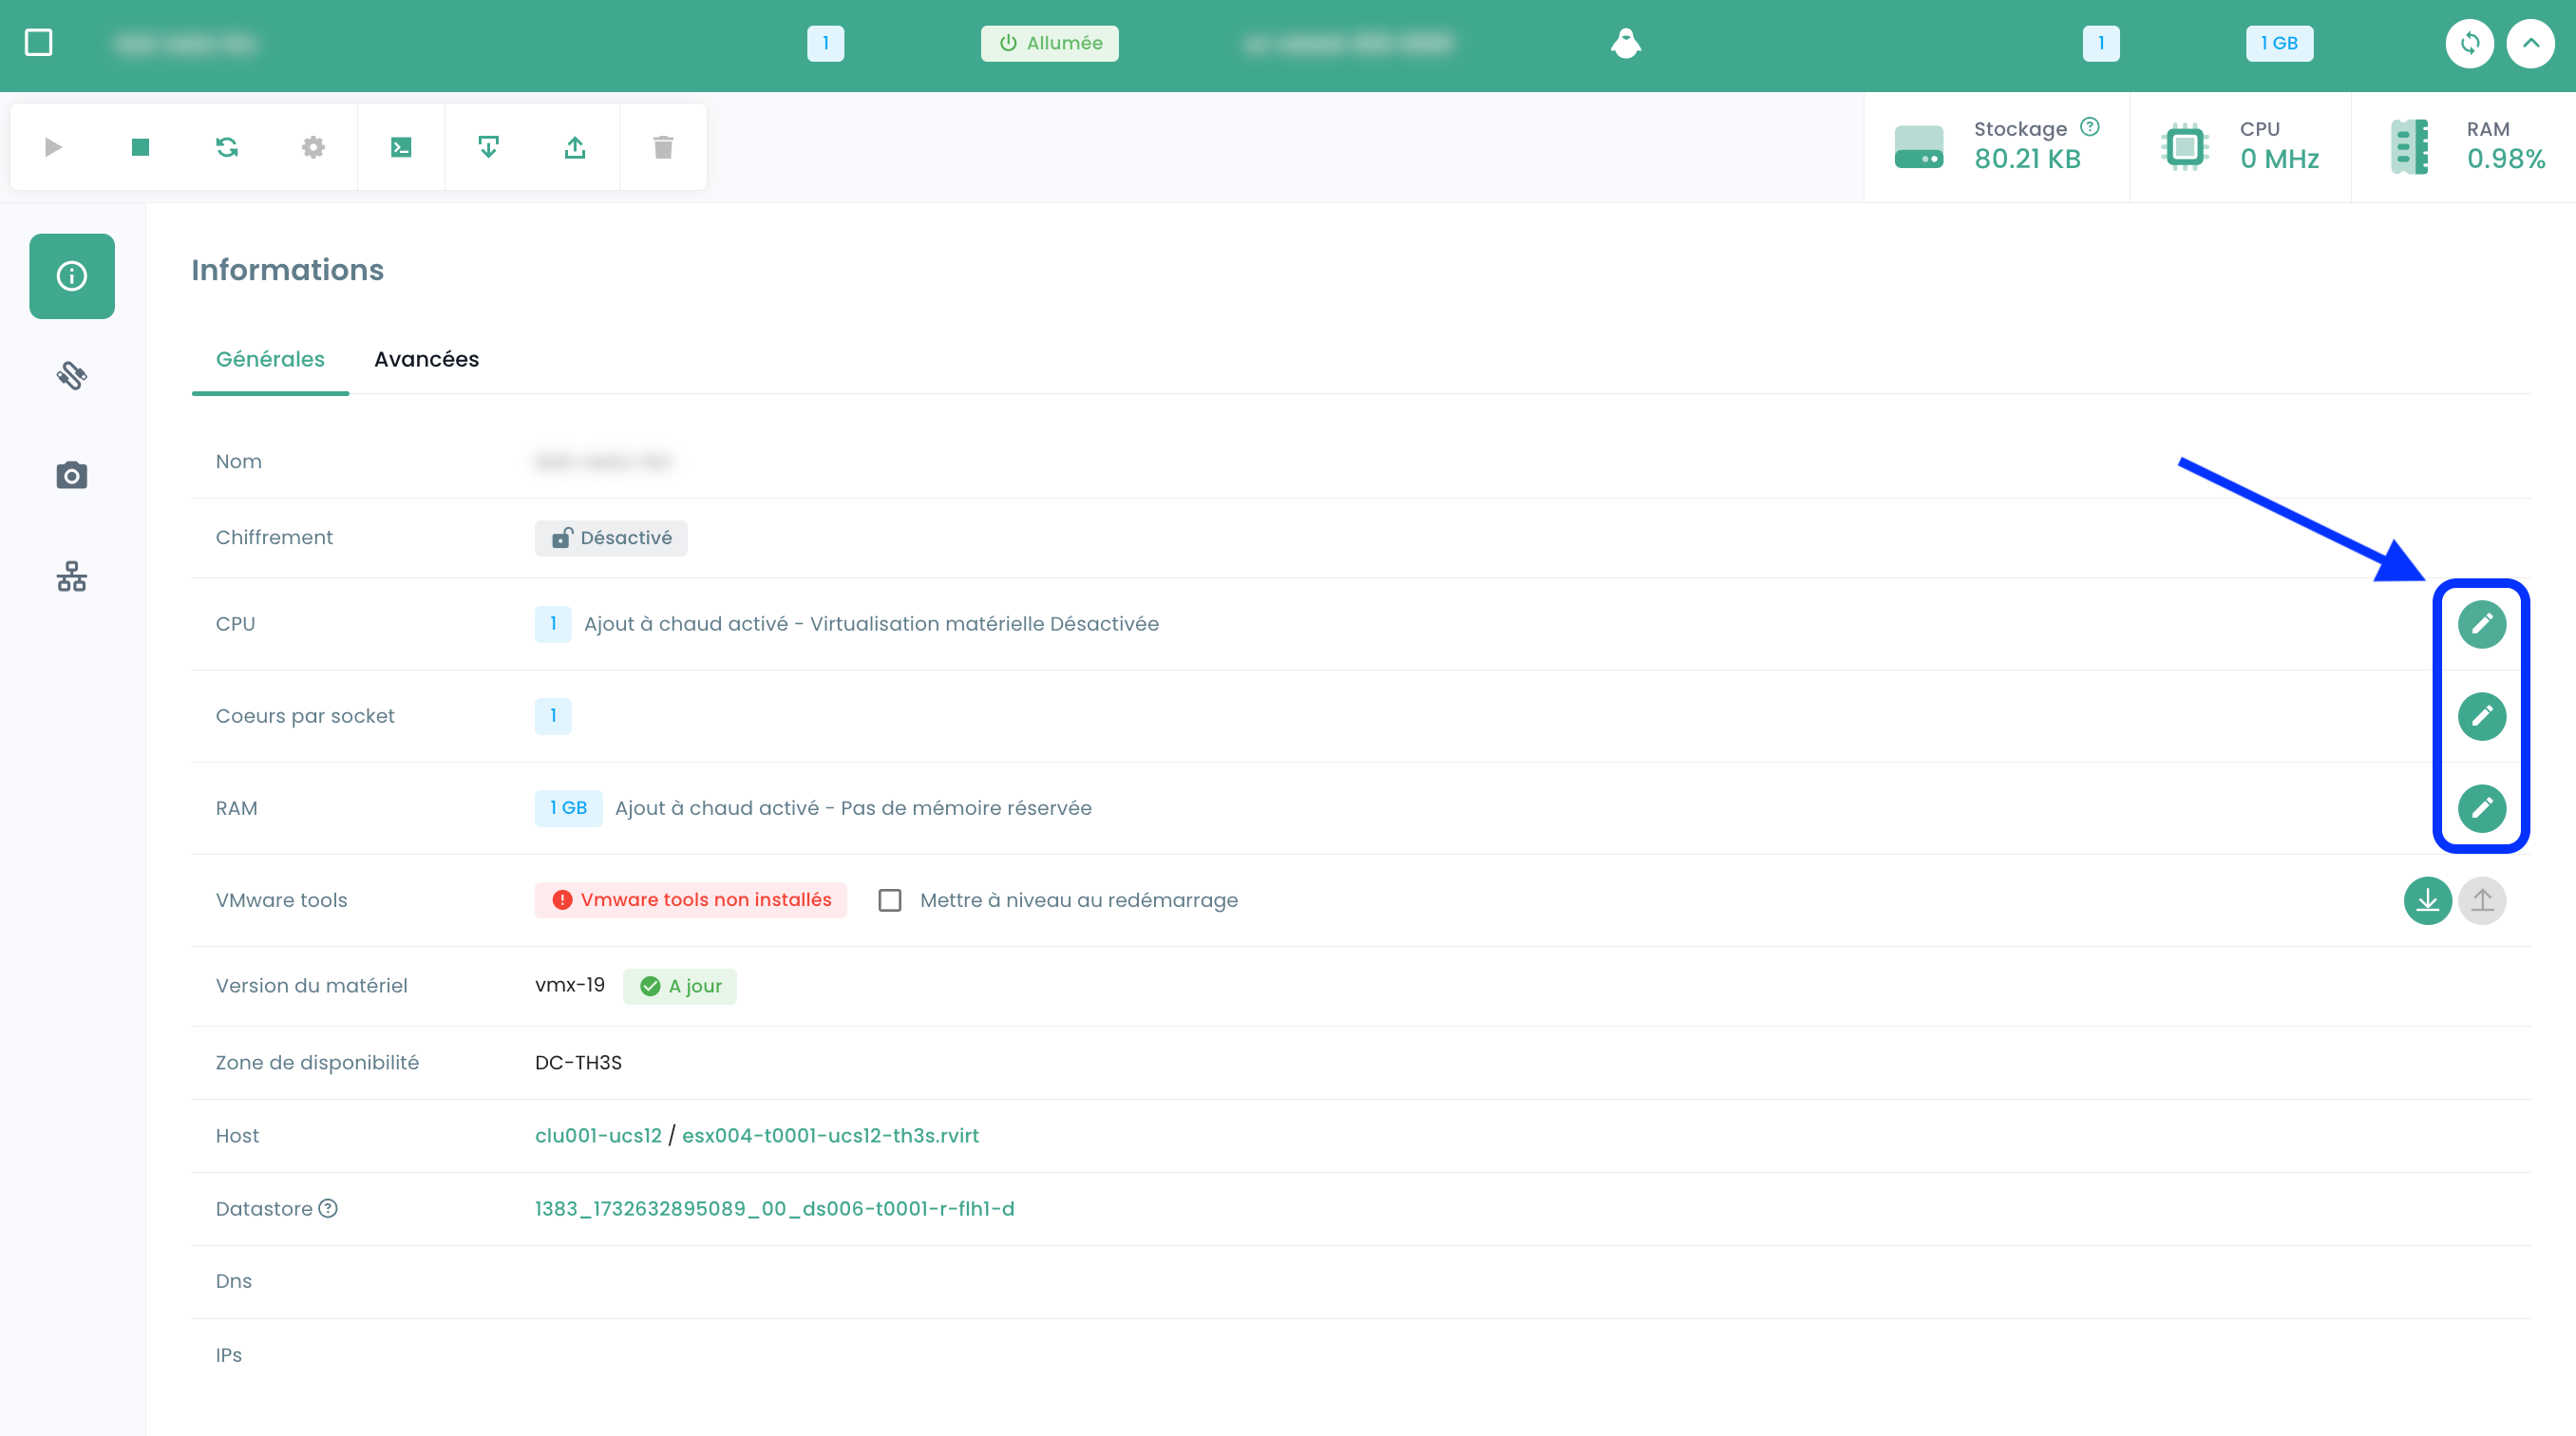
Ändern des RAM oder der CPU einer virtuellen Maschine
Gehen Sie zum Reiter 'Virtuelle Maschinen', zeigen Sie die Details einer virtuellen Maschine an, wählen Sie den Reiter 'Allgemeine Informationen' und klicken Sie auf die Schaltfläche zum Bearbeiten der zu ändernden Variable :
Festplattenmodi
Sie können verschiedene Festplattenmodi hinzufügen:
- Persistent : Änderungen werden sofort und dauerhaft auf der virtuellen Festplatte gespeichert. Dies ist der empfohlene Modus.
- Unabhängig, nicht persistent : Änderungen an der virtuellen Festplatte werden in einem neuen Protokoll gespeichert und beim Herunterfahren gelöscht. Nicht von Snapshots betroffen. Wird nicht von der Sicherung unterstützt.
- Unabhängig, persistent : Änderungen werden sofort und dauerhaft auf der virtuellen Festplatte gespeichert. Nicht von Snapshots betroffen. Wird nicht von der Sicherung unterstützt.
Verwaltung von Controllern virtueller Maschinen
Sie können den Typ des Festplatten-Controllers für Ihre virtuelle Maschine ändern.
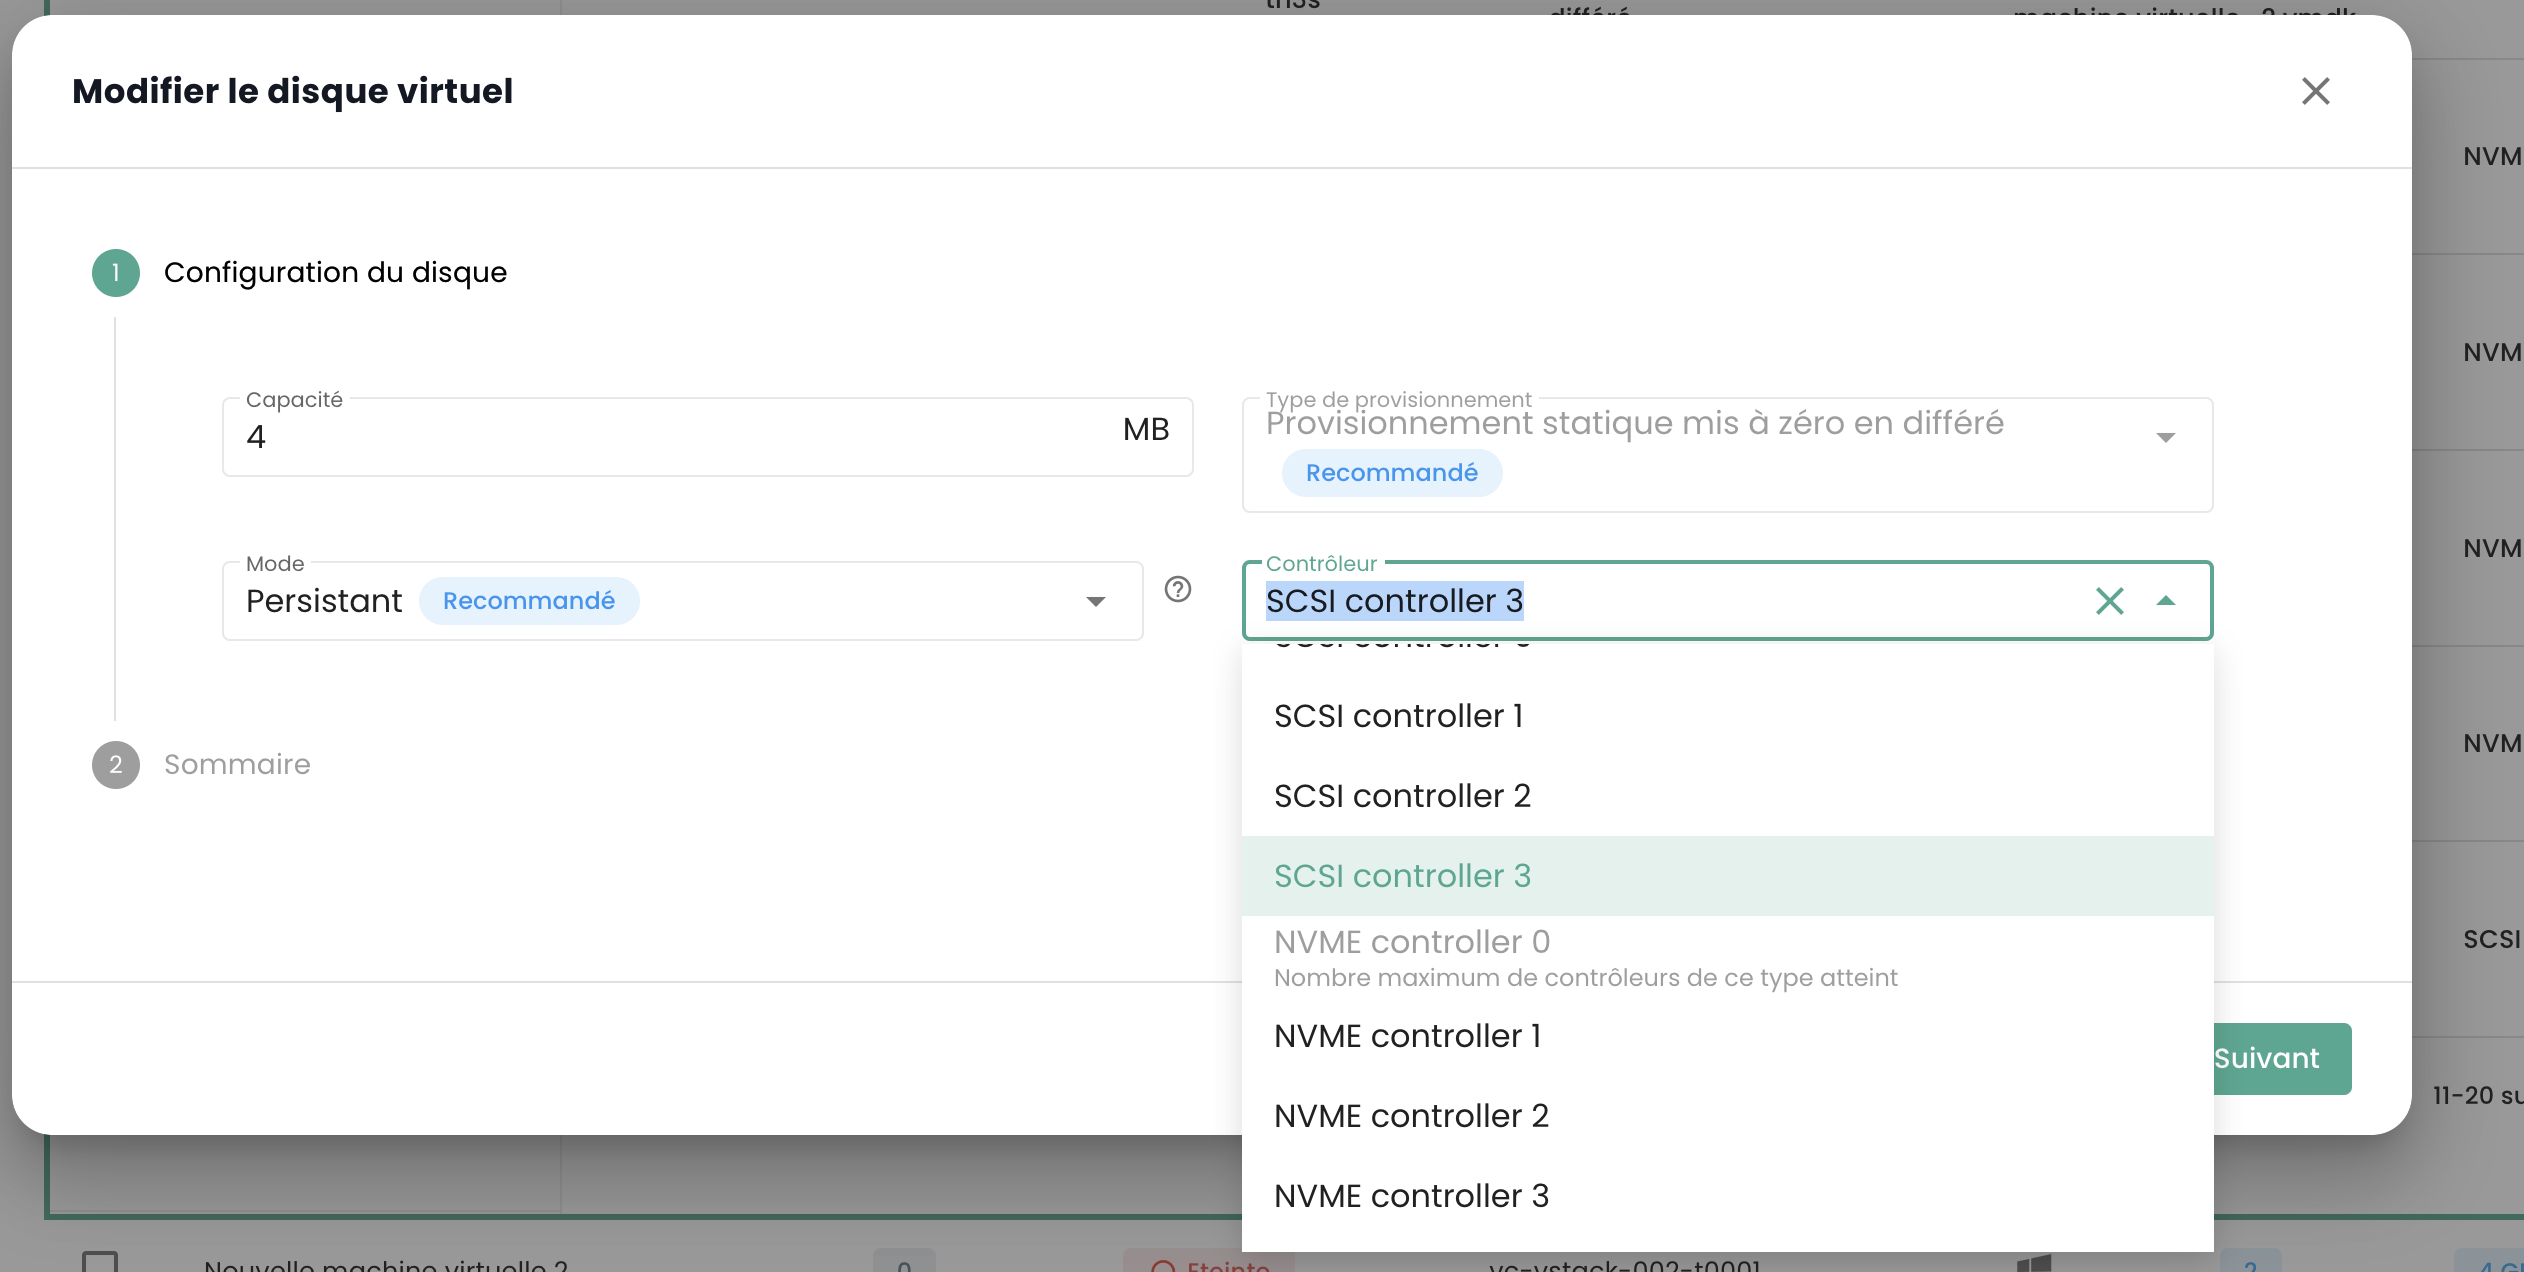
Virtuelle Maschinen können mit SCSI- und NVME-Controllern ausgestattet werden, wobei maximal 4 Controller jedes Typs zulässig sind. Jeder Controller kann bis zu 15 Festplatten verwalten.
Ein SCSI-Controller kann mit verschiedenen Untertypen konfiguriert werden: Para Virtual, Bus Logic, LSI Logic oder LSI Logic SAS.
Der Para Virtual-Controller zeichnet sich durch seine erweiterte Kapazität aus. Er kann bis zu 64 Festplatten unterstützen, wenn die Hardware-Version der virtuellen Maschine mit ESXi in Version 6.7 oder höher kompatibel ist.
Wichtig : Wenn Sie den Typ eines Para Virtual-Controllers ändern möchten, der mehr als 15 Festplatten besitzt, müssen Sie zunächst die Festplatten an den betreffenden Slots abtrennen.
Konsole einer virtuellen Maschine
Die Konsole einer virtuellen Maschine ist über die Liste der virtuellen Maschinen aufrufbar, indem Sie auf das Symbol 'Konsole' :
Es öffnet sich ein neuer Tab in Ihrem Browser, und die Konsole Ihrer Maschine, die auf einem VNC :
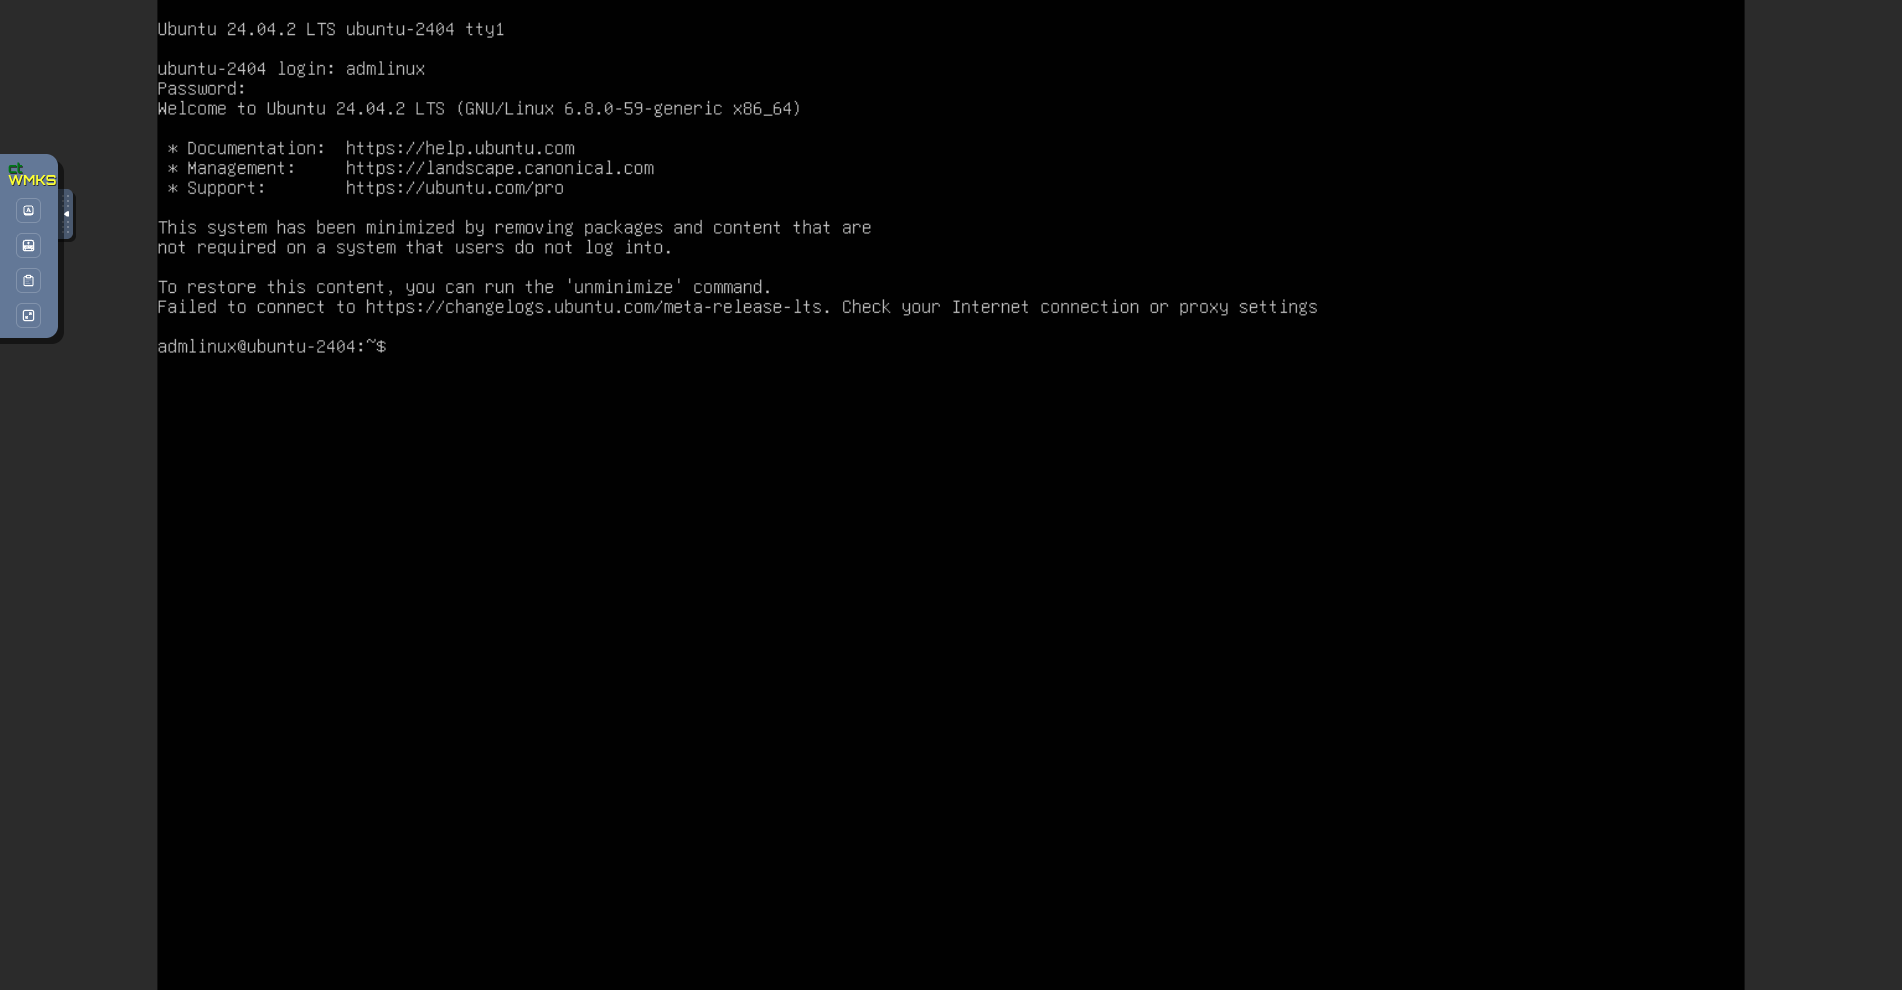
Im Menü VNC :
- das Senden bestimmter Tasten anzufordern,
- eine Tastaturzuordnung zu erzwingen (falls Ihre Tastatur nicht korrekt erkannt wurde),
- ein Textfeld zu öffnen, das an die Maschine gesendet werden kann. Diese Methode ersetzt den alten, nicht funktionierenden Zwischenablage-Modus,
- in den Vollbildmodus zu wechseln.
Hinweis : Die Skalierung des Fensters erfolgt automatisch.
Unterstützung von Tastatursprachen
Die in der Konsole vorgenommene Eingabe hängt von der Tastatursprache Ihres Webbrowsers, der Tastatursprache der virtuellen Maschine sowie von der Aktivierung oder Deaktivierung der Option 'enforce keyboard' links auf dem Bildschirm ab. Nachfolgend eine Übersicht der möglichen Szenarien:
| Tastatursprache des physischen Computers (Eingabe) | Tastatursprache der virtuellen Maschine | Option 'enforce keyboard' ausgewählt | Ergebnis (Ausgabe) |
|---|---|---|---|
| Französisch | Französisch | Nein | ✅ |
| Französisch | Französisch | Ja | Nicht empfohlen |
| Französisch | Englisch | Nein | Englisch |
| Französisch | Englisch | Ja | ✅ |
| Englisch | Französisch | Nein | Französisch |
| Englisch | Französisch | Ja | ✅ |
| Englisch | Englisch | Nein | ✅ |
| Englisch | Englisch | Ja | Nicht empfohlen |
Hinweis :
- Falls einige Zeichen bei der manuellen Eingabe nicht übernommen werden, können Sie es über die Zwischenablage versuchen.
Funktionsweise der Zwischenablage
Diese Funktion ermöglicht es Ihnen, eine gesamte Zeichenkette an Ihre virtuelle Maschine zu senden. Es ist wichtig zu beachten, dass die Taste "enforce keyboard" beeinflusst, wie diese Zeichenkette
an Ihre virtuelle Maschine übermittelt wird. Wenn Sie bei der Eingabe in der Konsole feststellen, dass die Option "enforce keyboard" erforderlich ist, denken Sie daran, sie zu aktivieren, bevor Sie die Zwischenablage verwenden.
Diese Funktion kann beispielsweise zum Senden eines Passworts, eines Befehls oder des Inhalts einer Konfigurationsdatei verwendet werden:
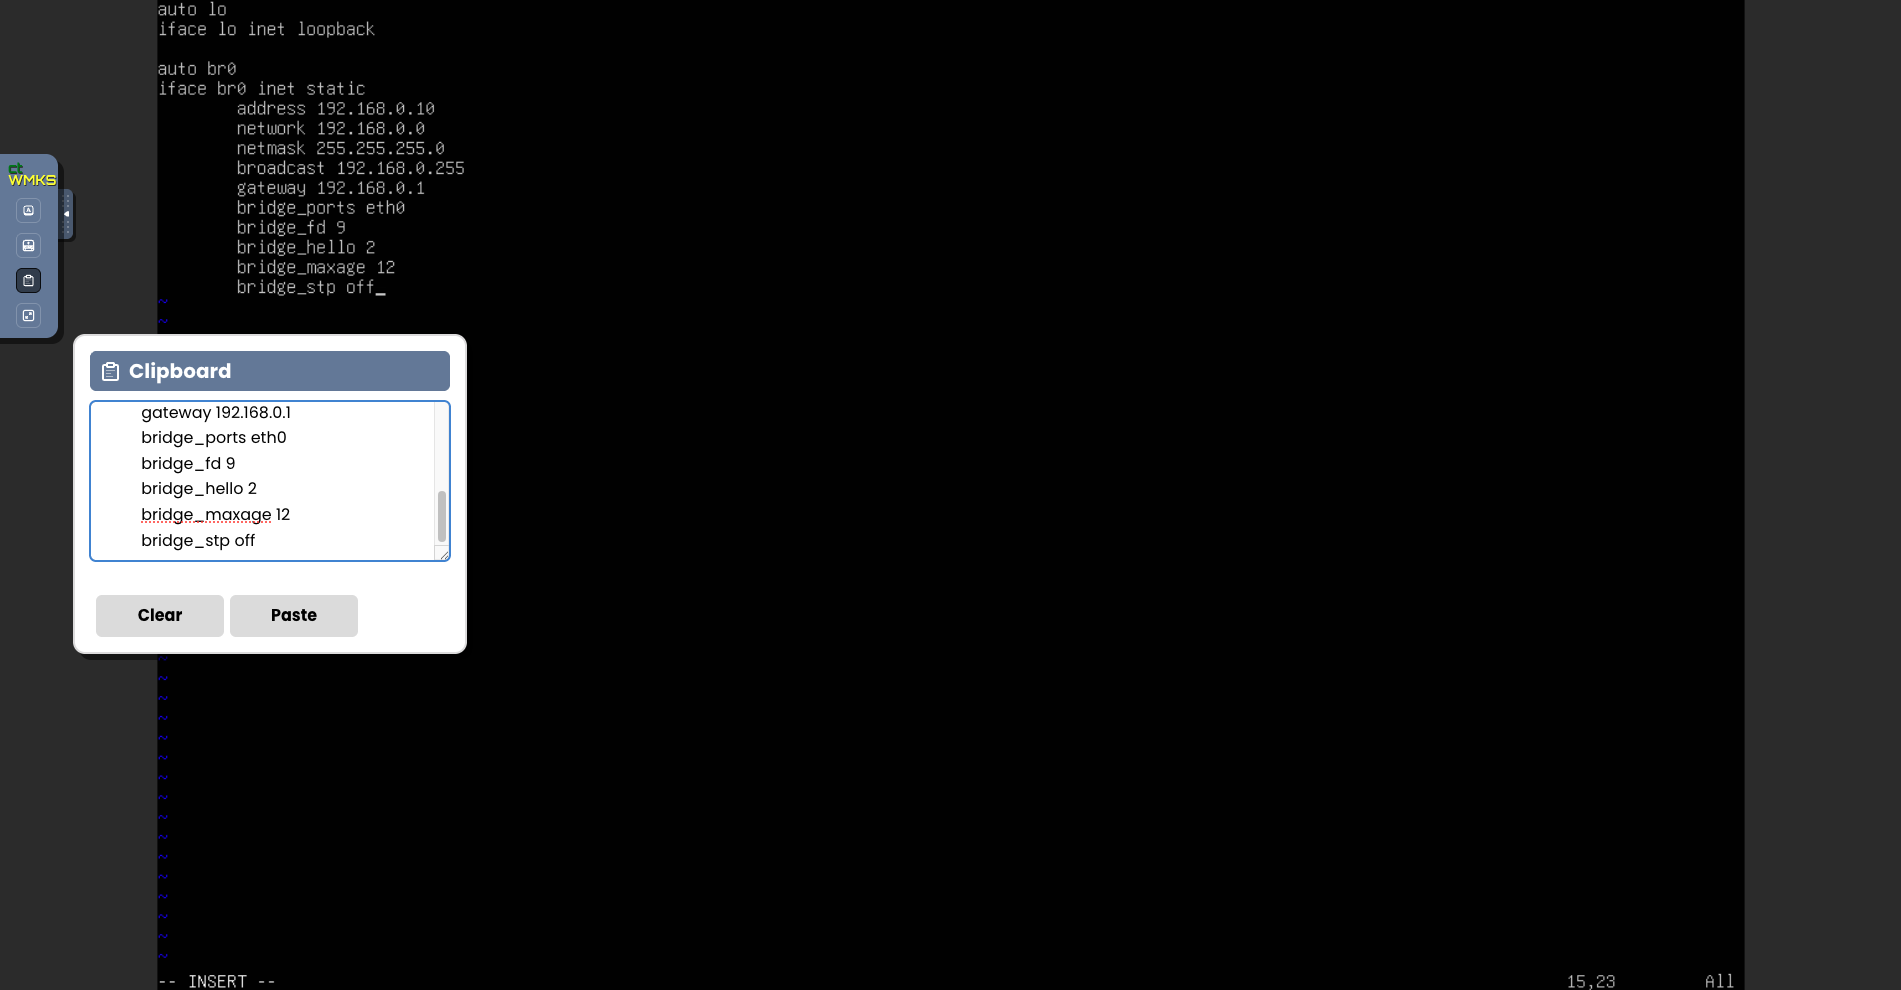
Nach einem Klick auf die Schaltfläche "Paste" wird der Inhalt Ihres Textfelds an Ihre virtuelle Maschine gesendet.
Cloud Temple Kataloge für virtuelle Maschinen
Cloud Temple stellt Ihnen einen Katalog mit Templates zur Verfügung, der regelmäßig von unseren Teams erweitert und aktualisiert wird.
Er umfasst derzeit mehrere Dutzend Templates und Images, die auf Ihren virtuellen Maschinen bereitgestellt werden können.
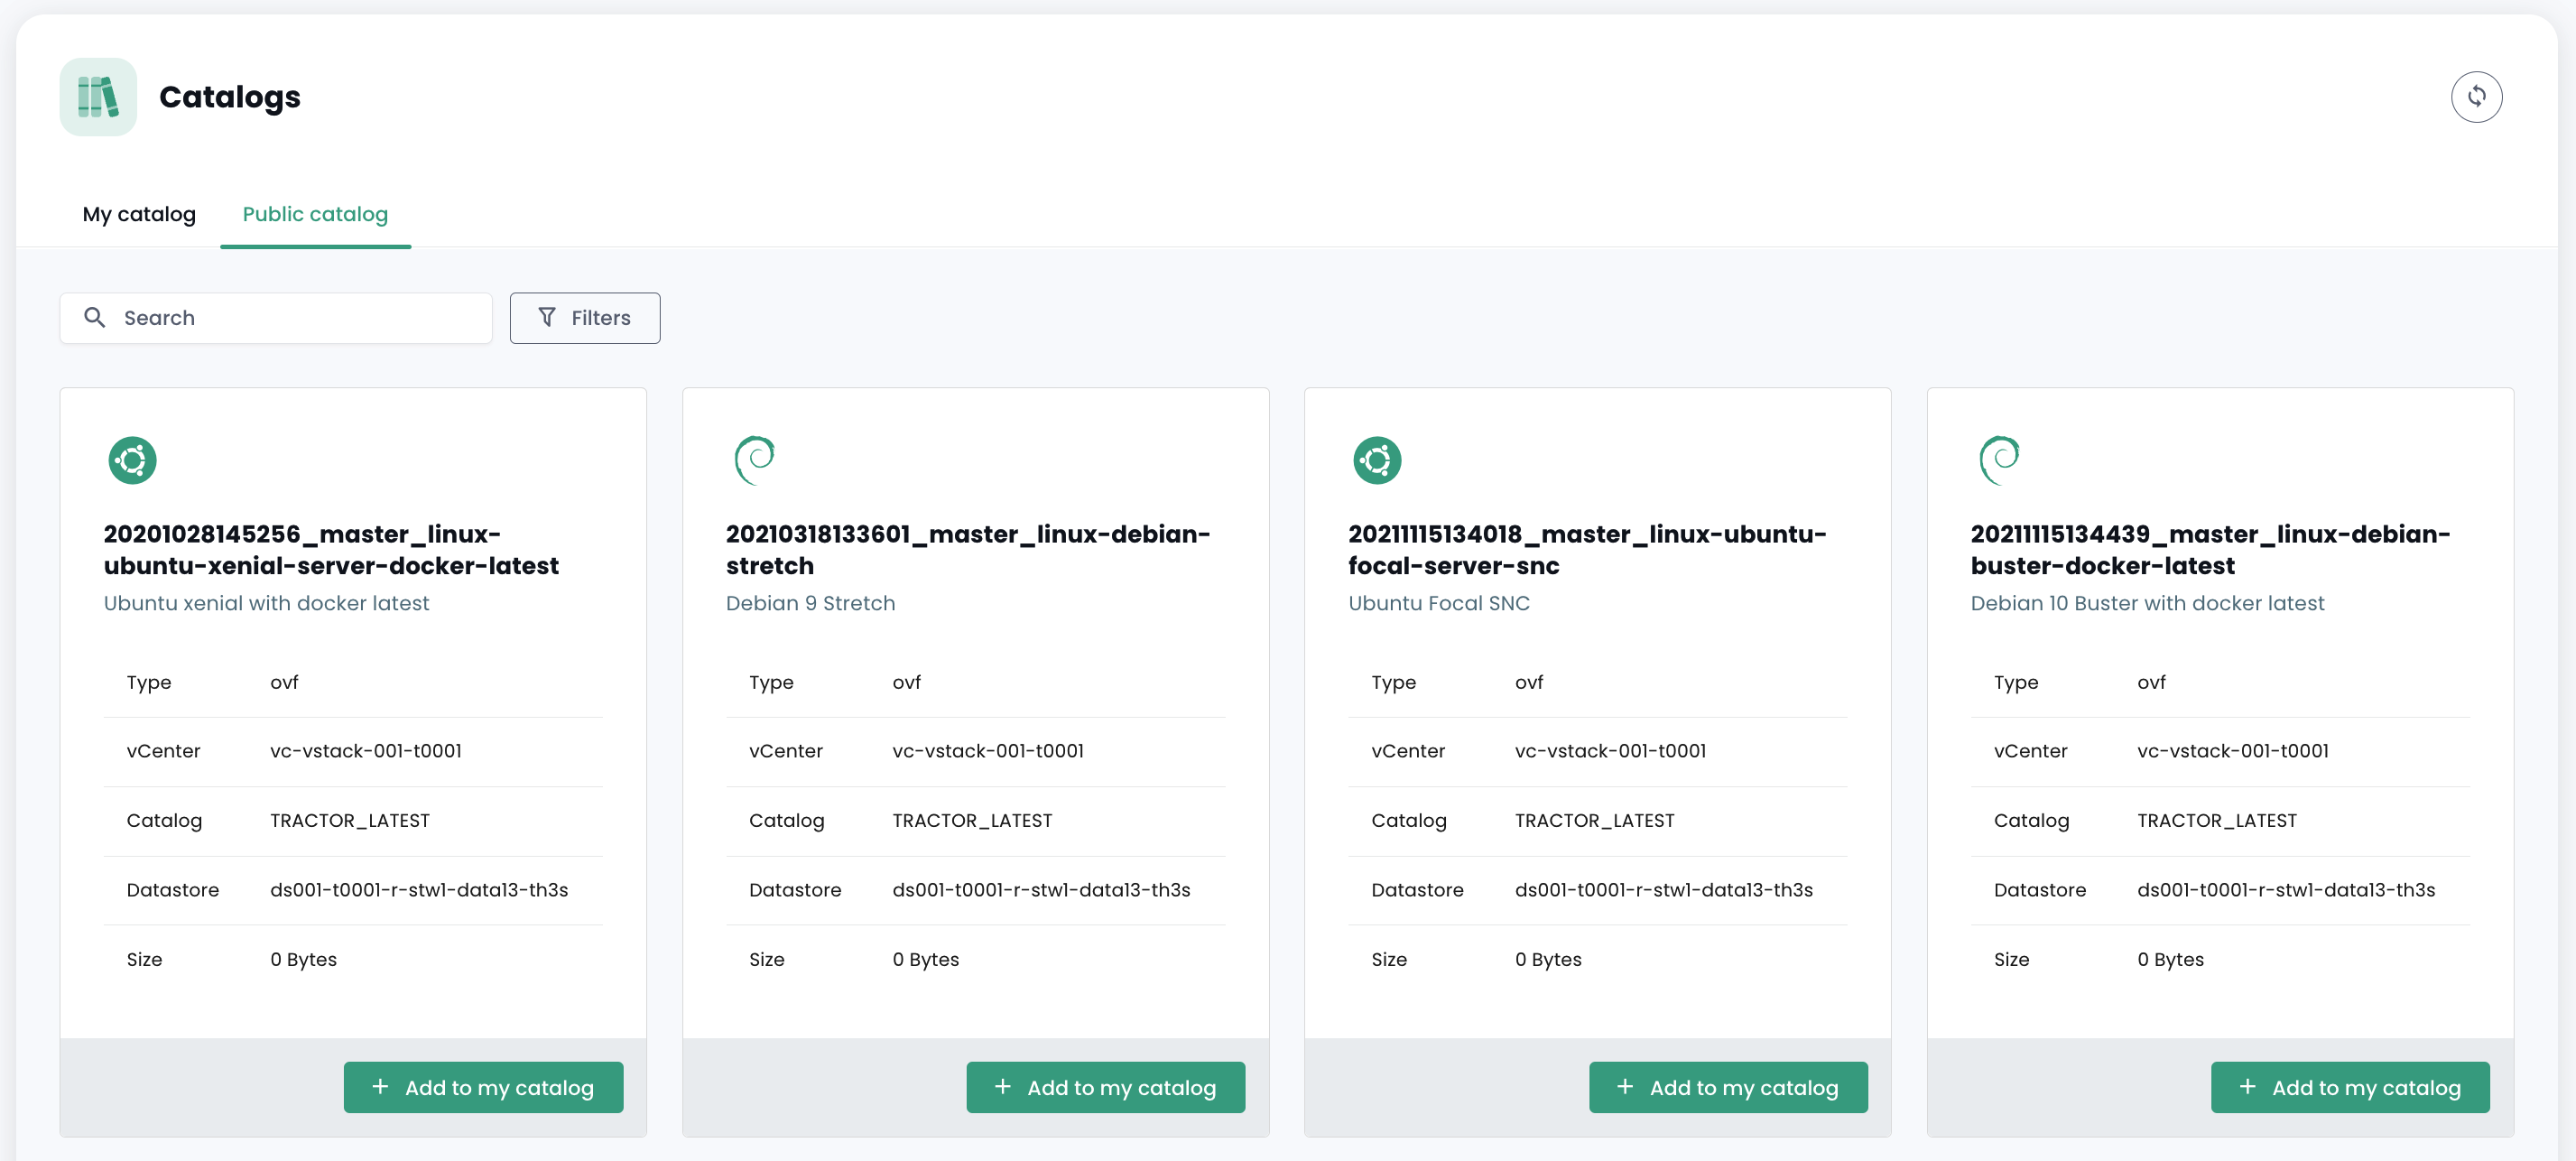
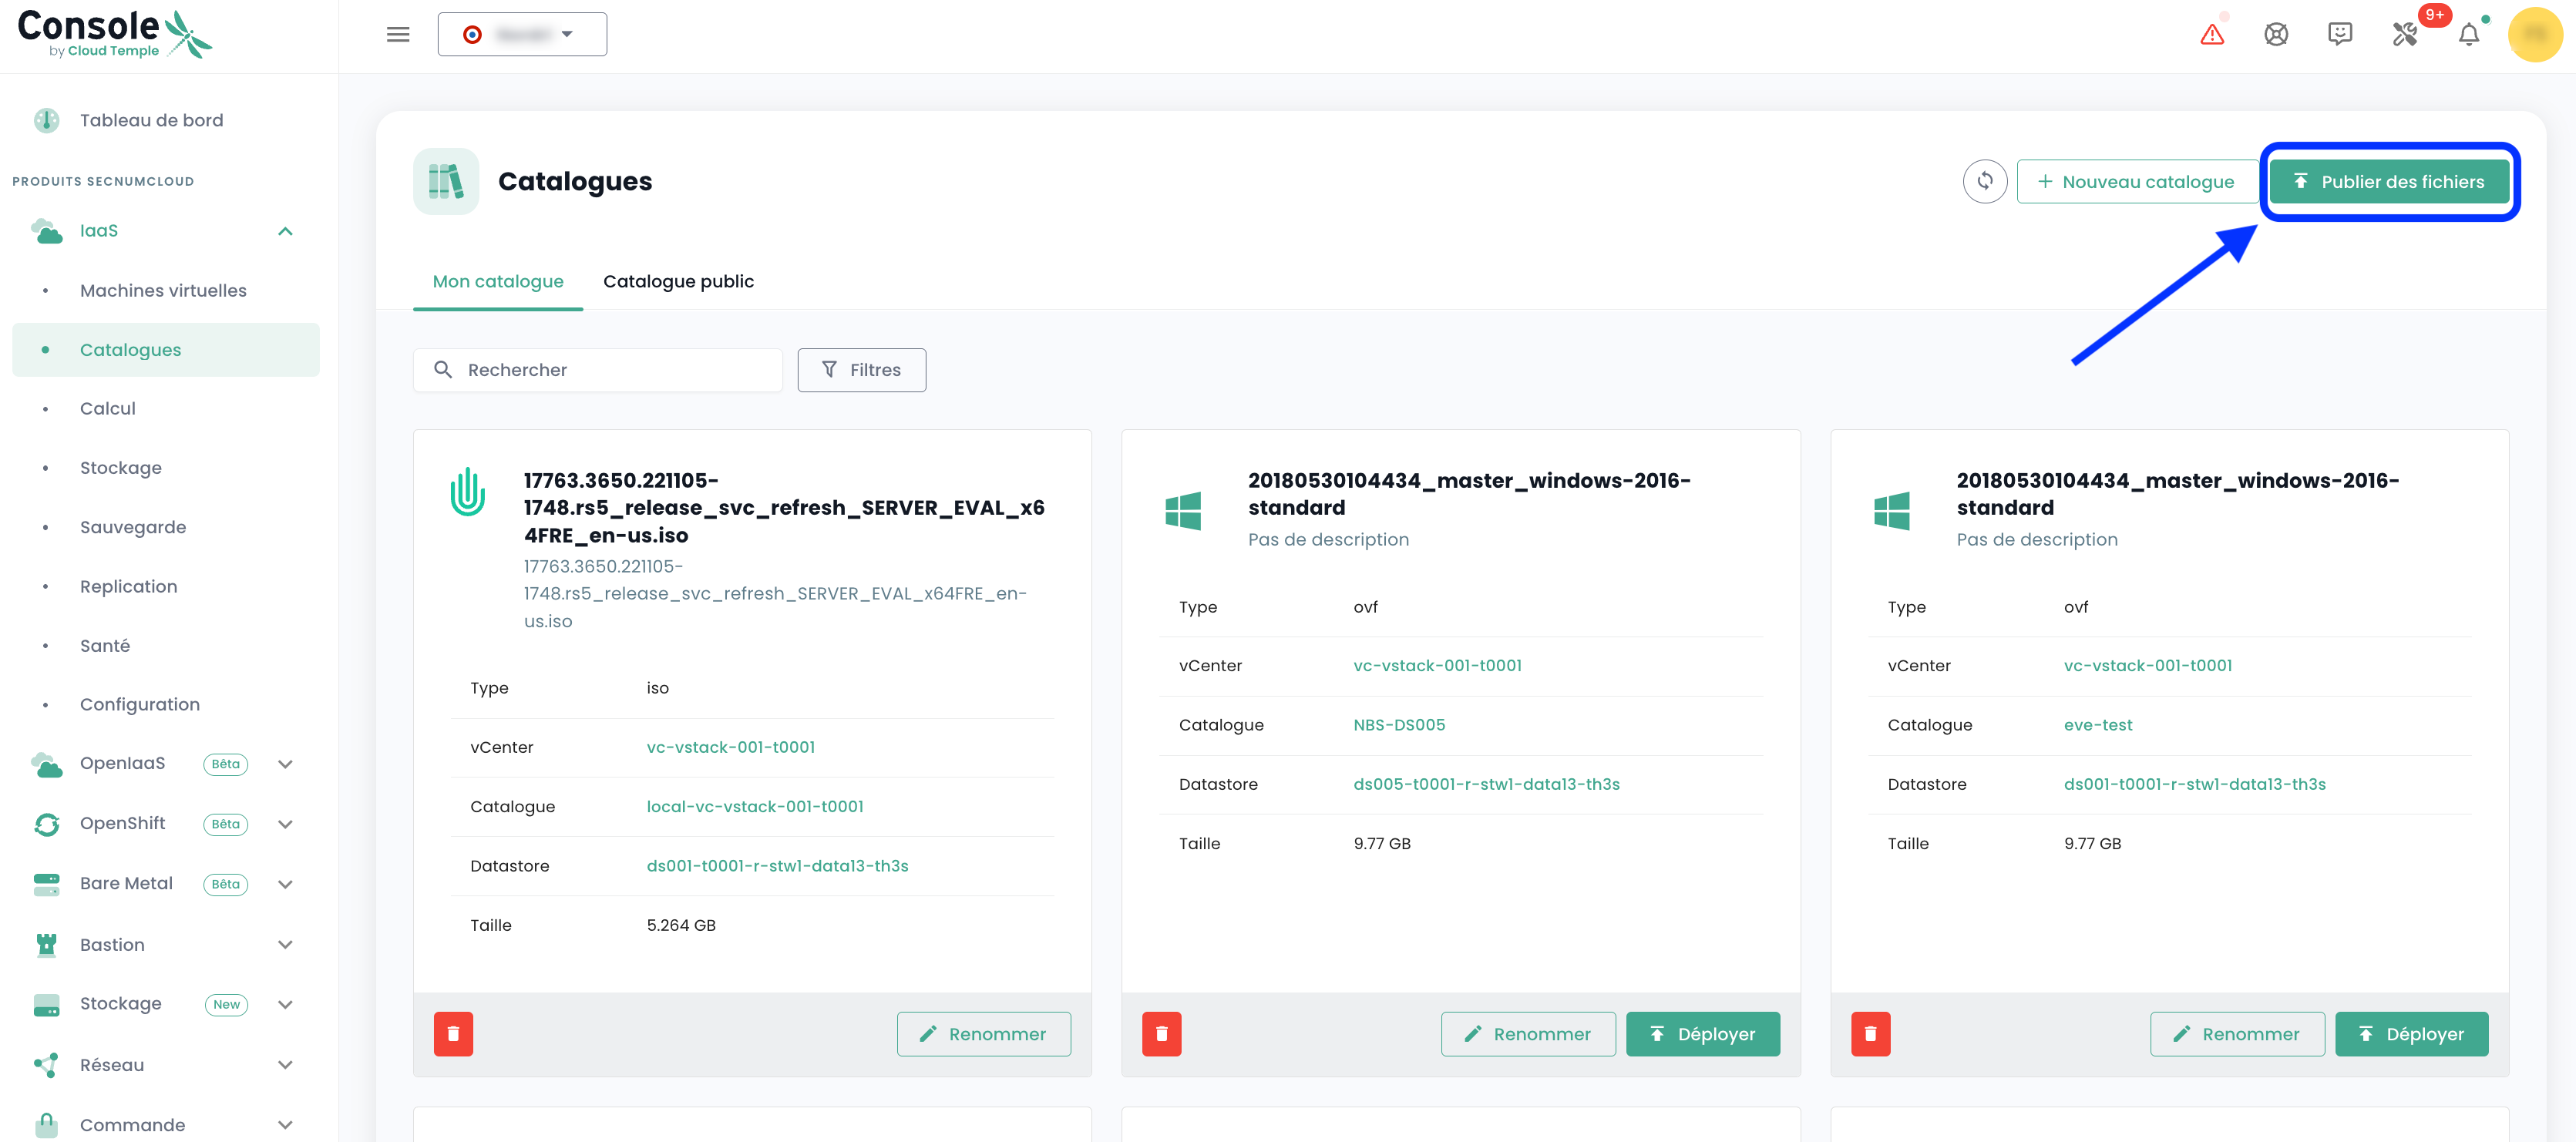
Um ein ISO/OVF zu veröffentlichen, wechseln Sie zur Ansicht 'Katalog' und klicken Sie oben auf der Seite auf die Schaltfläche 'Dateien veröffentlichen' :
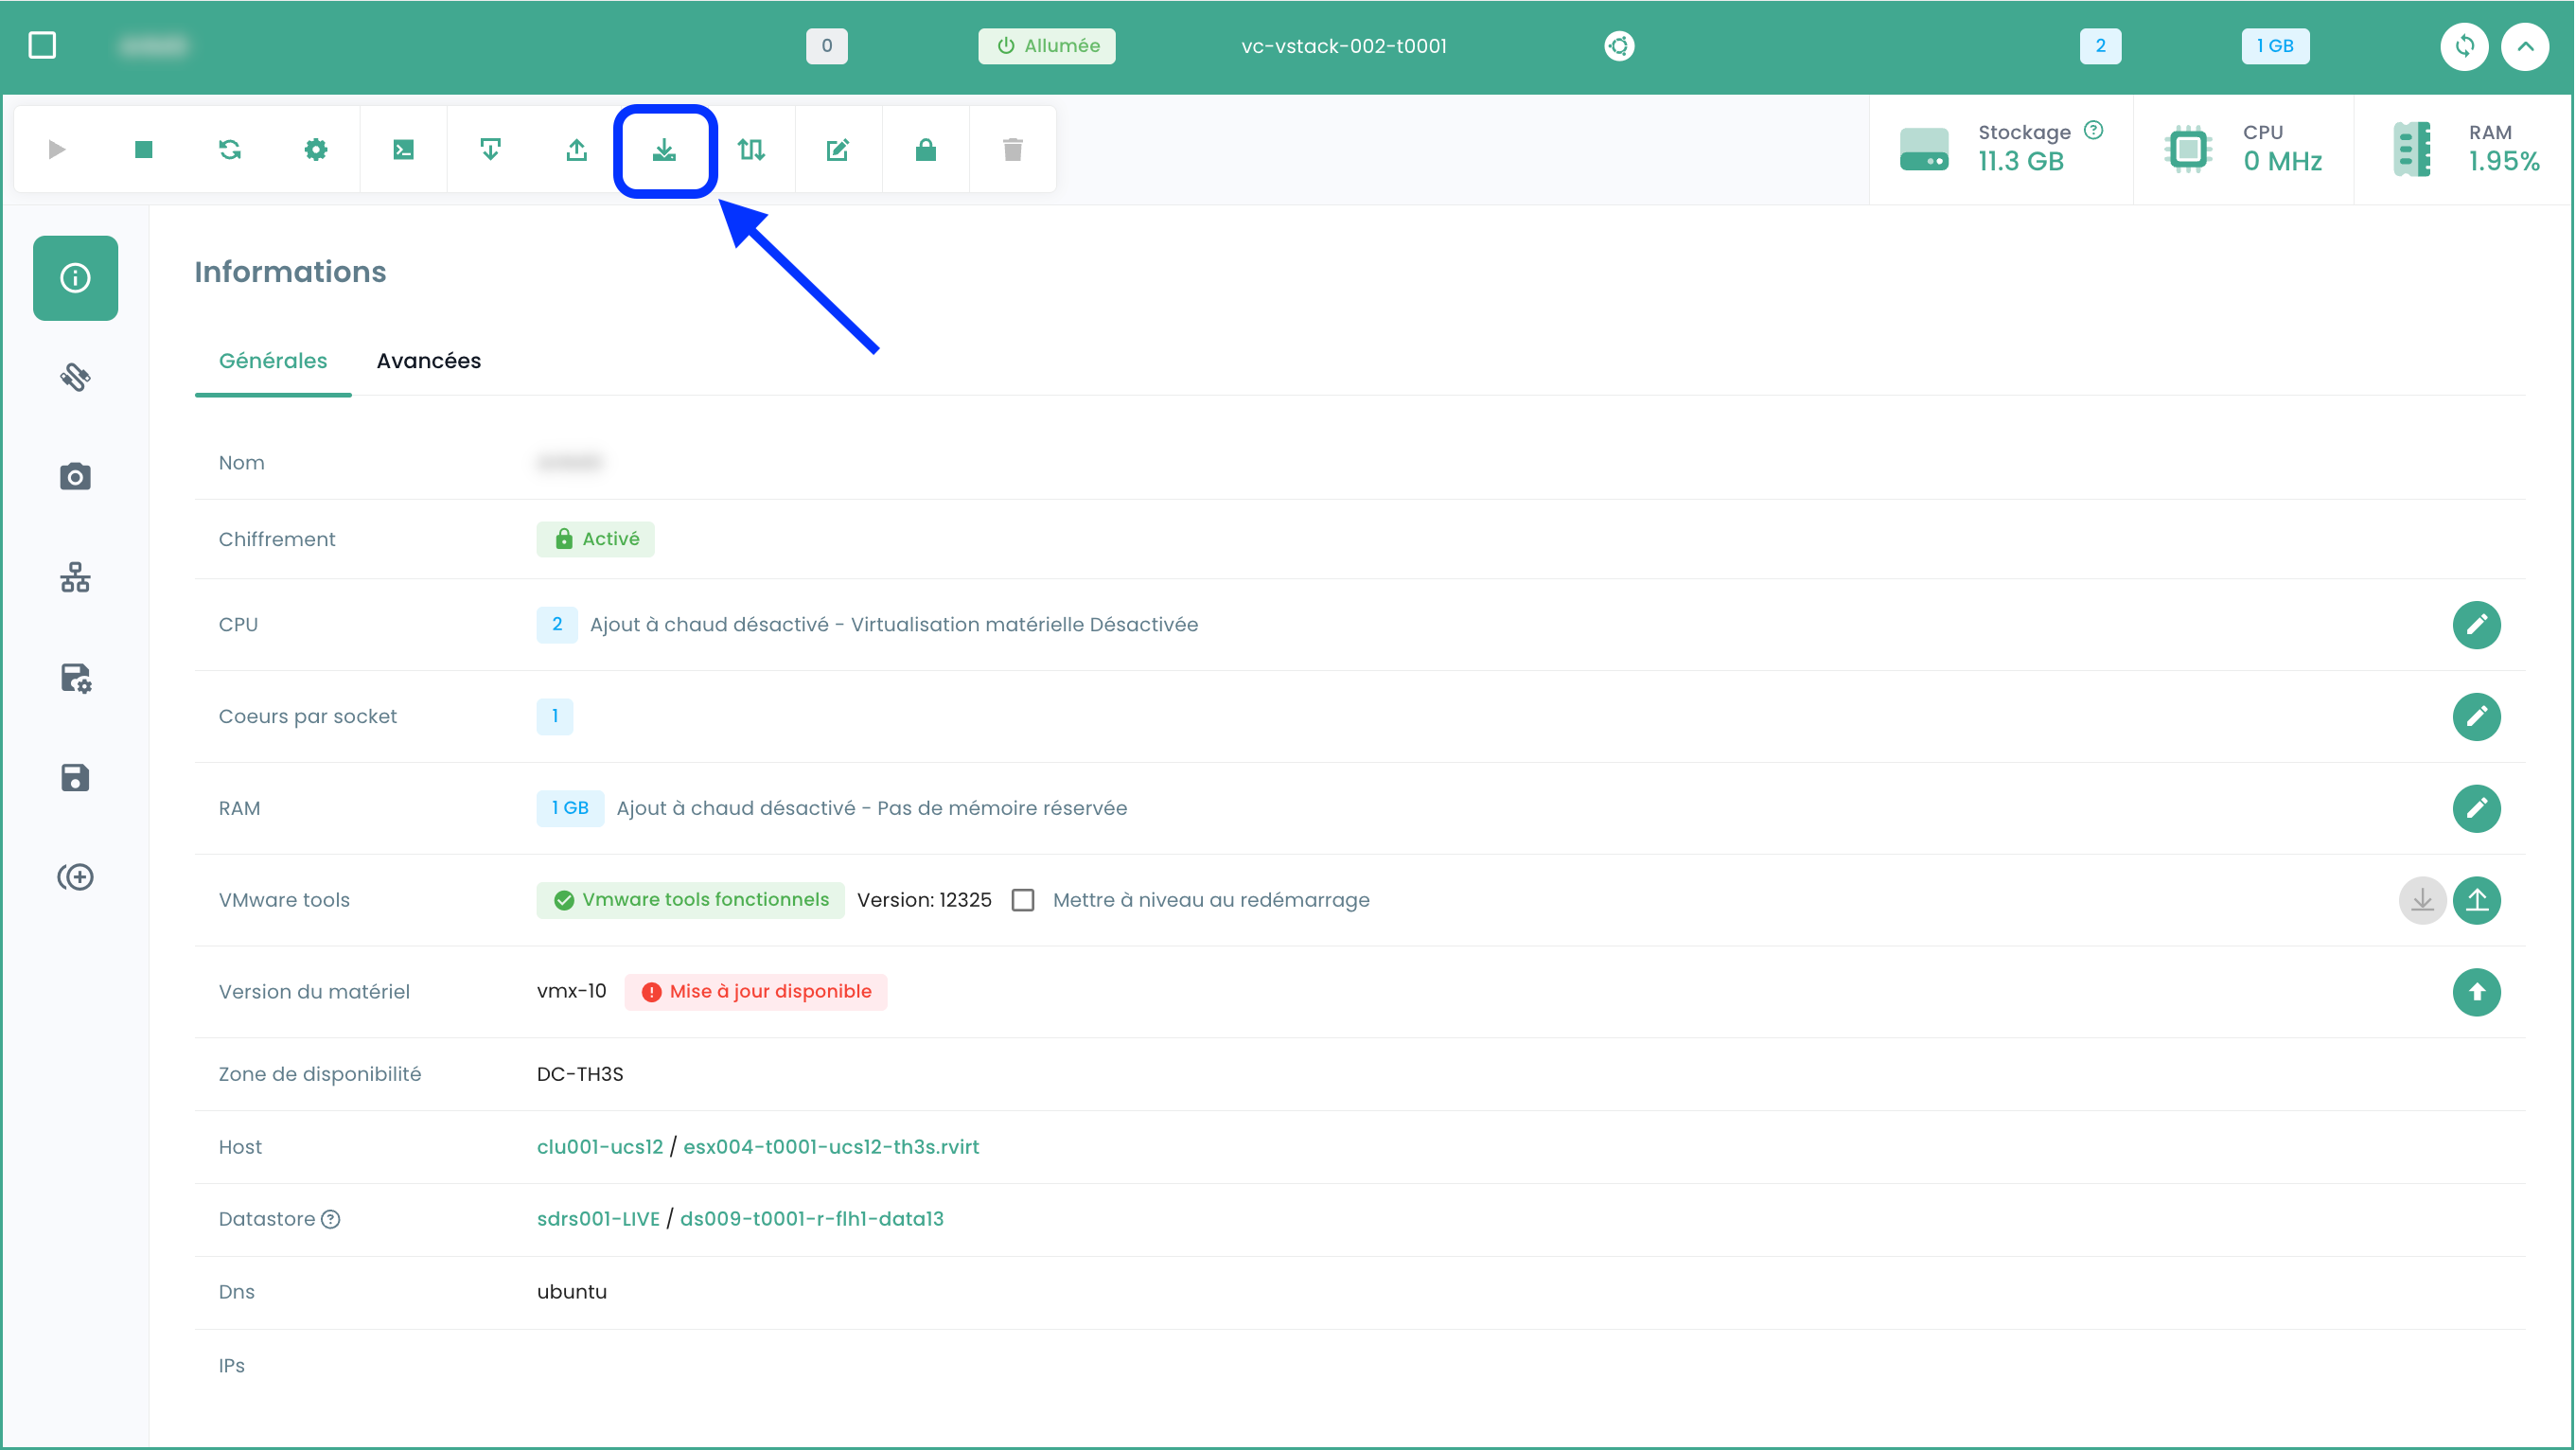
Es ist möglich, eine VM in eine Vorlage umzuwandeln und in den Katalog zu exportieren. Wählen Sie dazu eine virtuelle Maschine aus und verwenden Sie die Aktionsschaltfläche 'Klonen' :
Wählen Sie 'Als vm-template exportieren' :
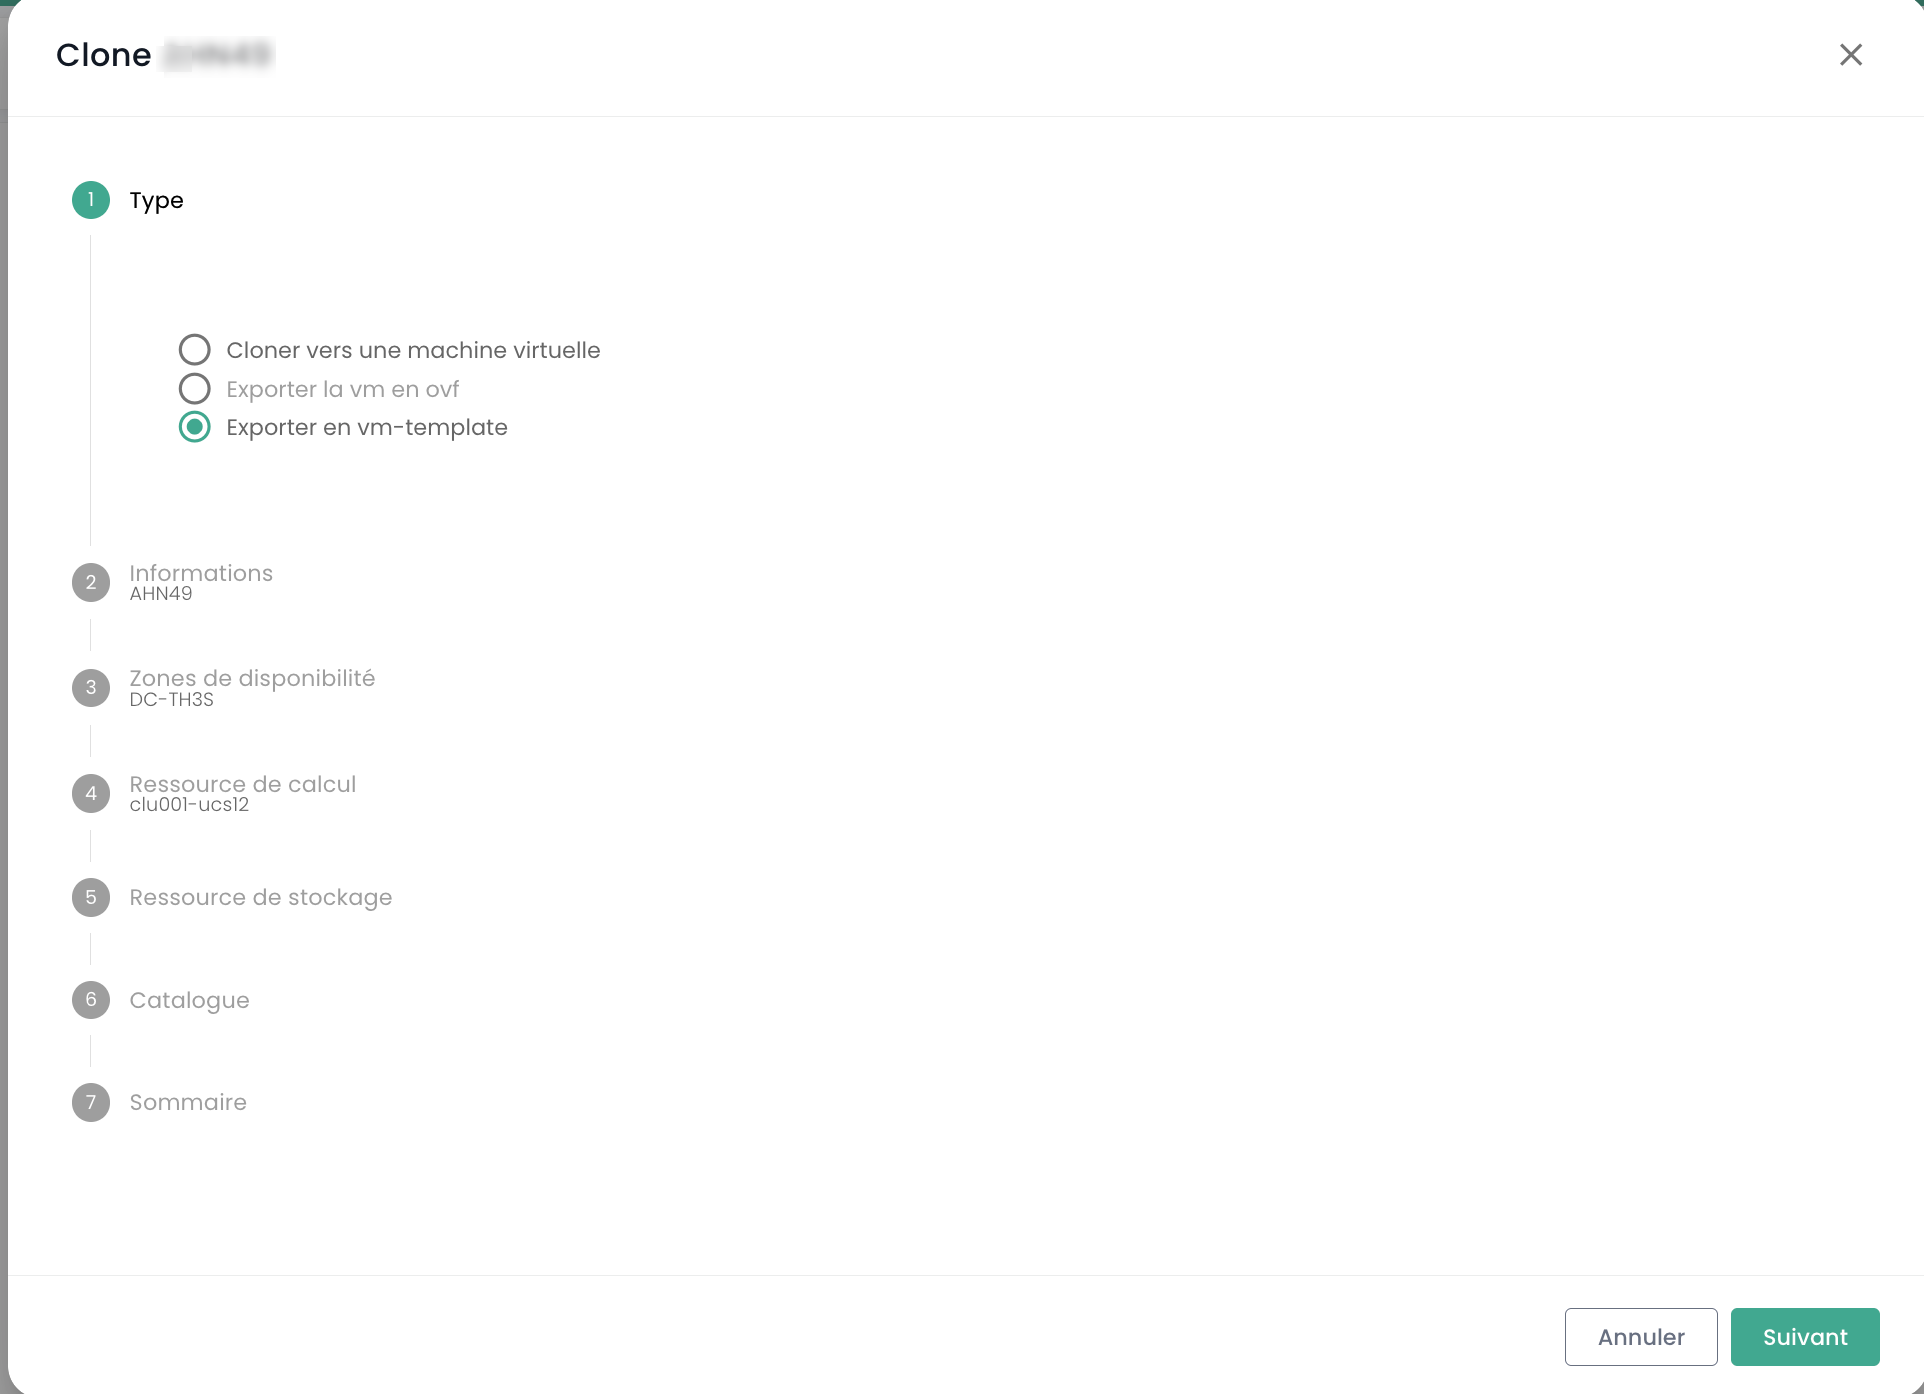
Geben Sie anschließend die erforderlichen Informationen ein. Anschließend können Sie eine neue VM basierend auf der Vorlage über die Schaltfläche 'Neue virtuelle Maschine' oder über die Seite 'Kataloge' bereitstellen. Es ist auch möglich, die VM im OVF-Format zu exportieren.
Gut zu wissen: Es ist möglich, eine OVA-Datei in OVF und umgekehrt zu konvertieren.
Die am häufigsten verwendete Methode ist der VMware Converter, aber es gibt auch eine einfache Methode mit tar
Extrahieren der OVA-Datei:
tar -xvf vmName.ova
Erstellen einer OVA-Datei aus einer OVF-Datei:
tar -cvf vmName-NEW.ova vmName.ovf vmName-disk1.vmdk vmName.mf
Erweiterte Einstellungen für virtuelle Maschinen: Extra Config
Extra Config bietet eine flexible Möglichkeit, Schlüssel-Wert-Paare in die Konfiguration einer virtuellen Maschine aufzunehmen. Schlüssel und Werte werden vom System interpretiert, wenn die virtuelle Maschine bereitgestellt wird.
Ab jetzt können Sie direkt die Eigenschaften vom Typ Extra Config in den erweiterten Optionen einer virtuellen Maschine ändern:
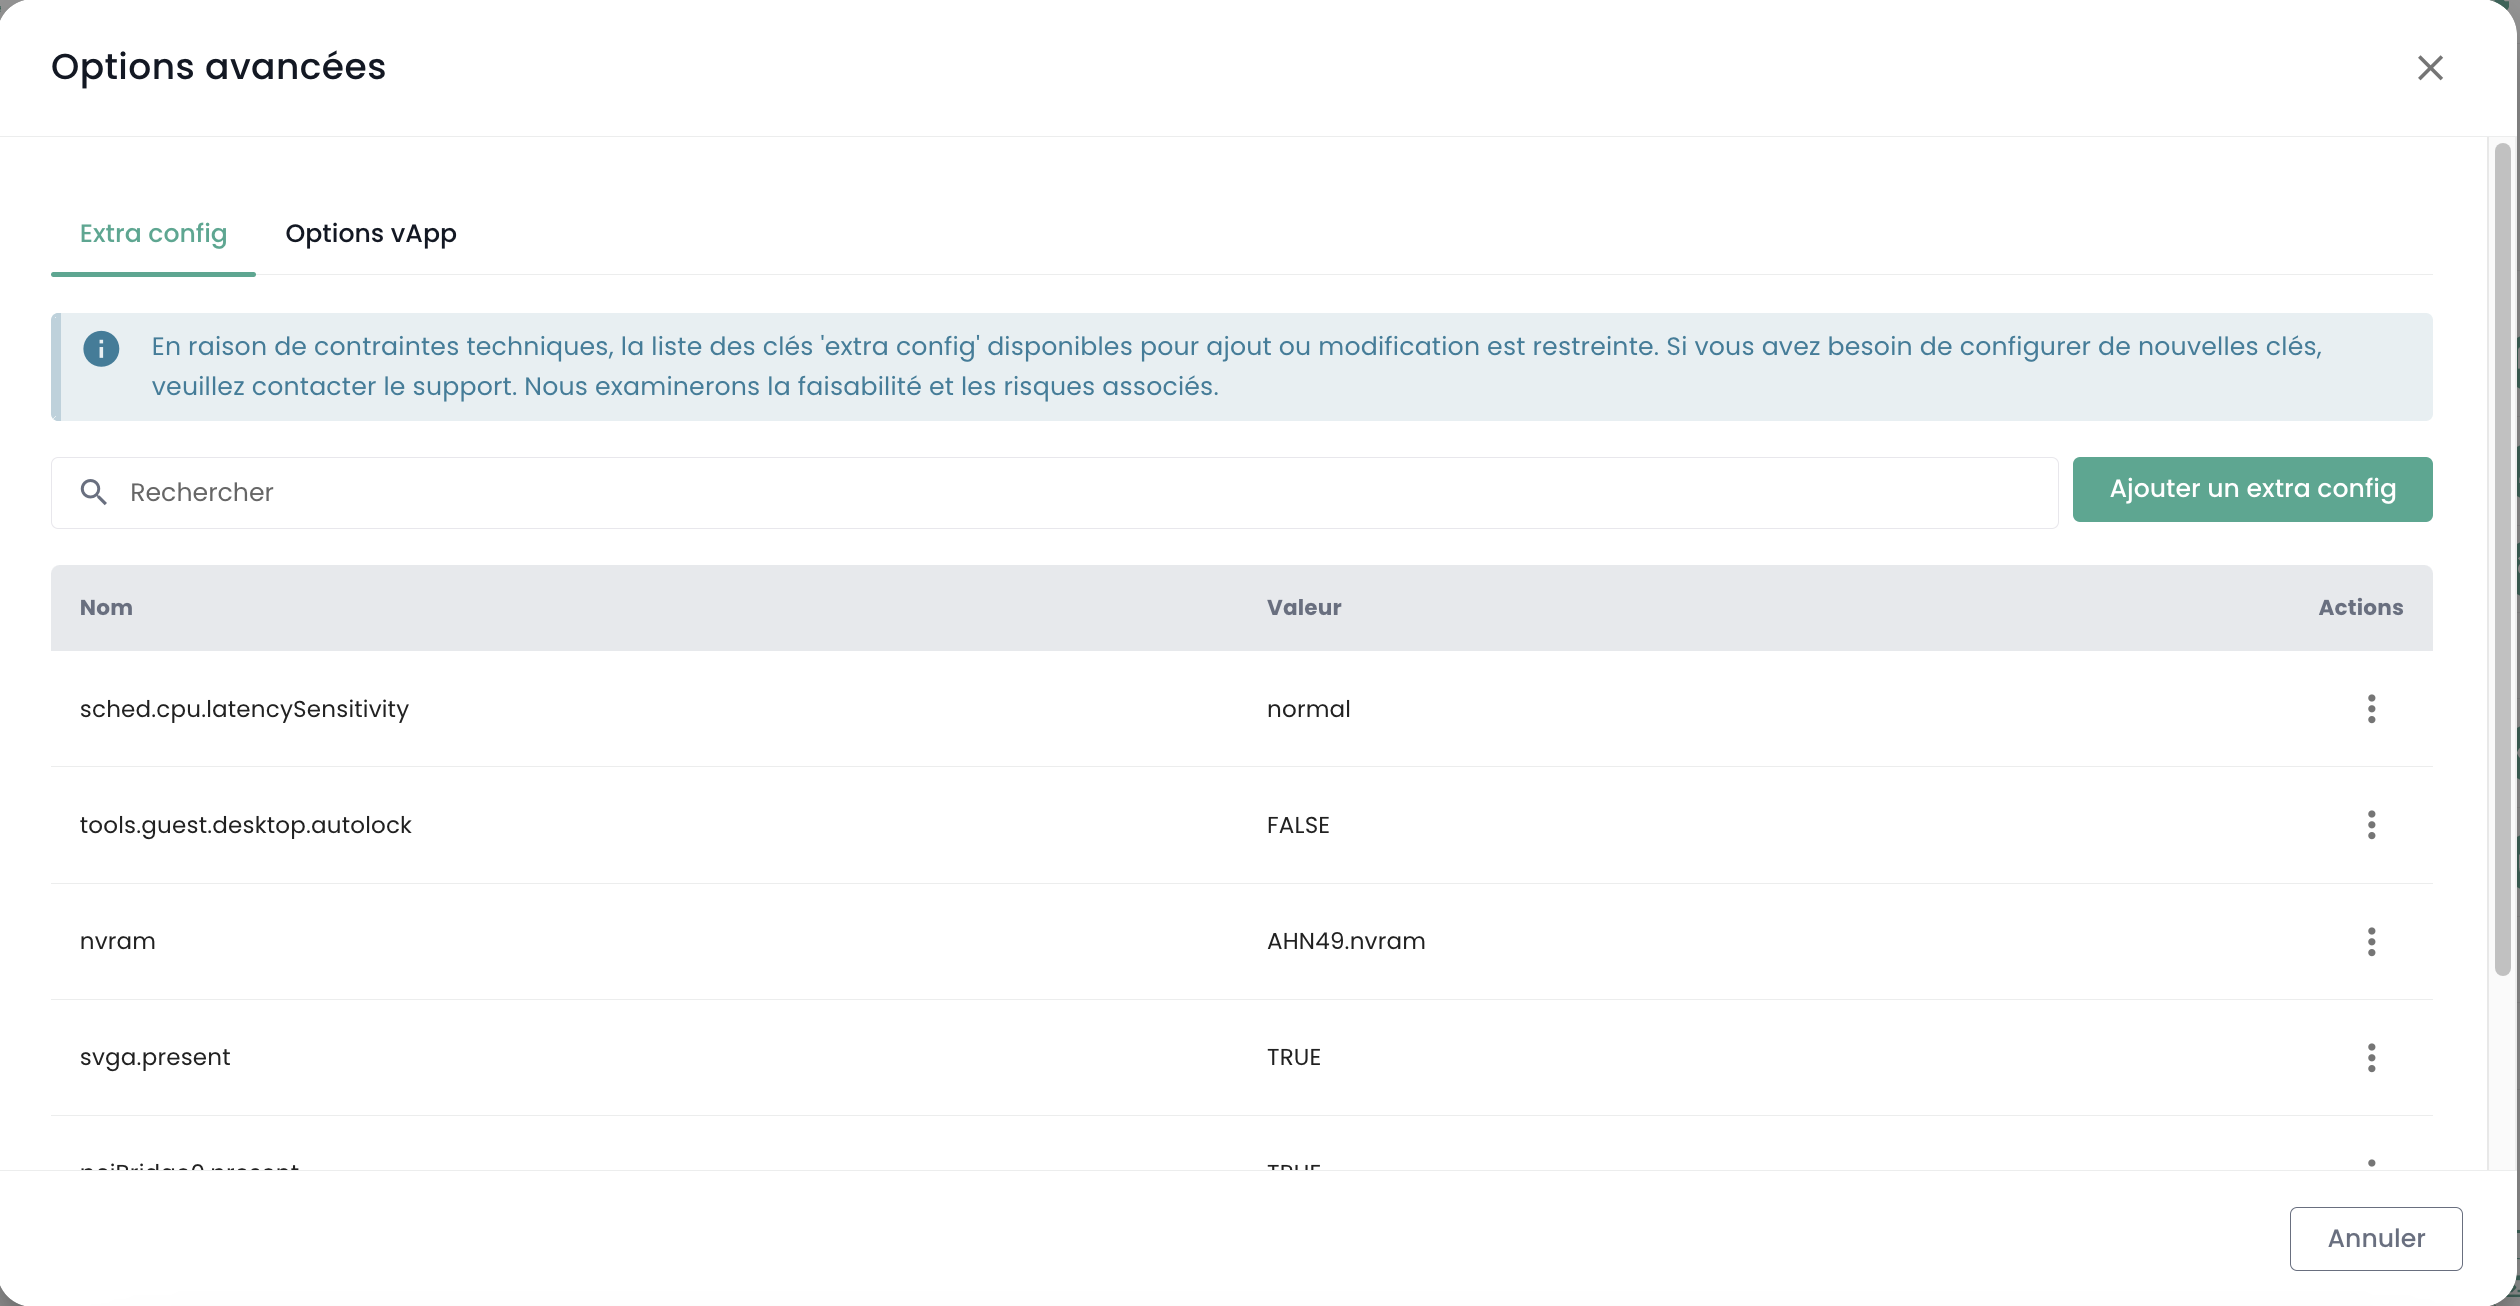
Sie können eine Eigenschaft aus einer Liste von Schlüsseln hinzufügen. Darüber hinaus können Sie den Wert eines Schlüssels ändern, den Sie selbst hinzugefügt haben. Bereits vorhandene Schlüssel-Wert-Paare können nicht geändert werden.
Bitte wenden Sie sich an den Support, wenn Sie neue Schlüssel hinzufügen möchten.
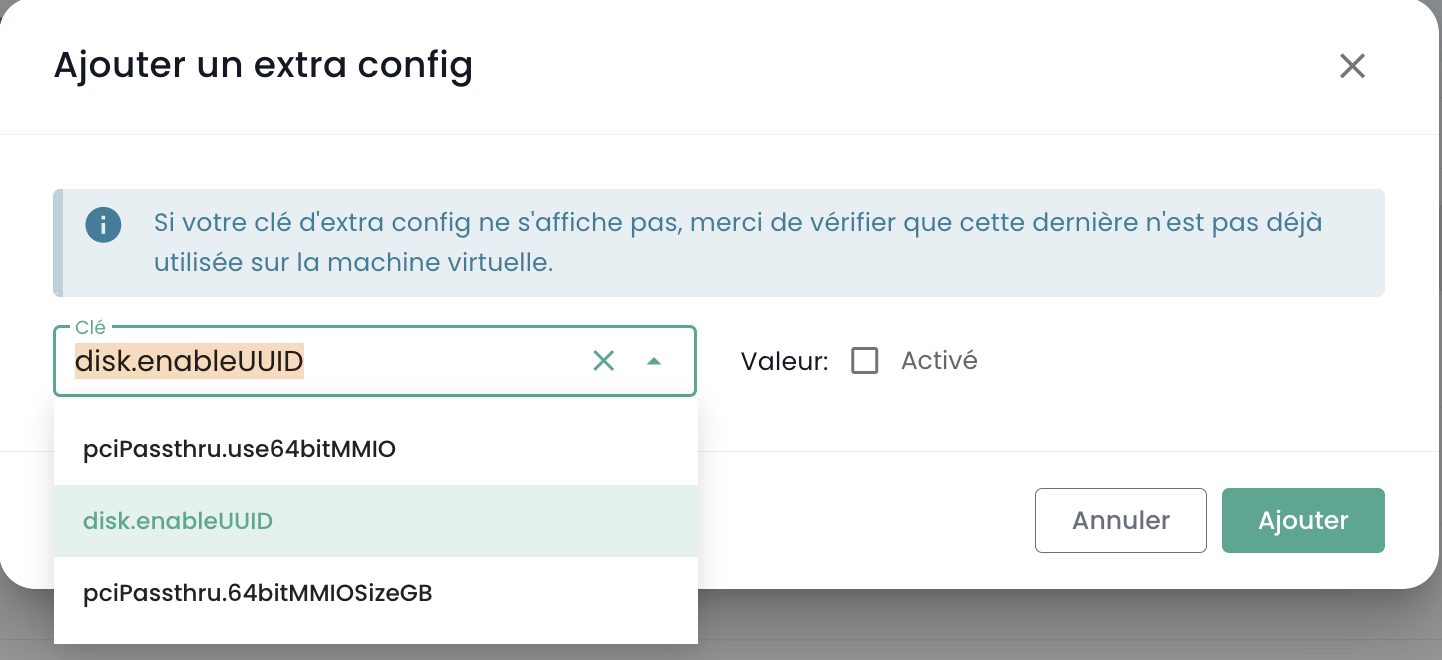
Hinweis: Für die Nutzung einer GPU durch die virtuelle Maschine ist es zwingend erforderlich, den Schlüssel 'pciPassthru.use64bitMMIO' zu aktivieren und den erforderlichen MMIO-Speicherplatz (Memory-mapped I/O) über 'pciPassthru.64bitMMIOSizeGB' zuzuweisen. Es wird dringend empfohlen, die offizielle Nvidia-Dokumentation zu konsultieren.
Erweiterte Einstellungen für virtuelle Maschinen: vApp
Sie können außerdem die Eigenschaften vom Typ vApp in den erweiterten Optionen einer virtuellen Maschine ändern:
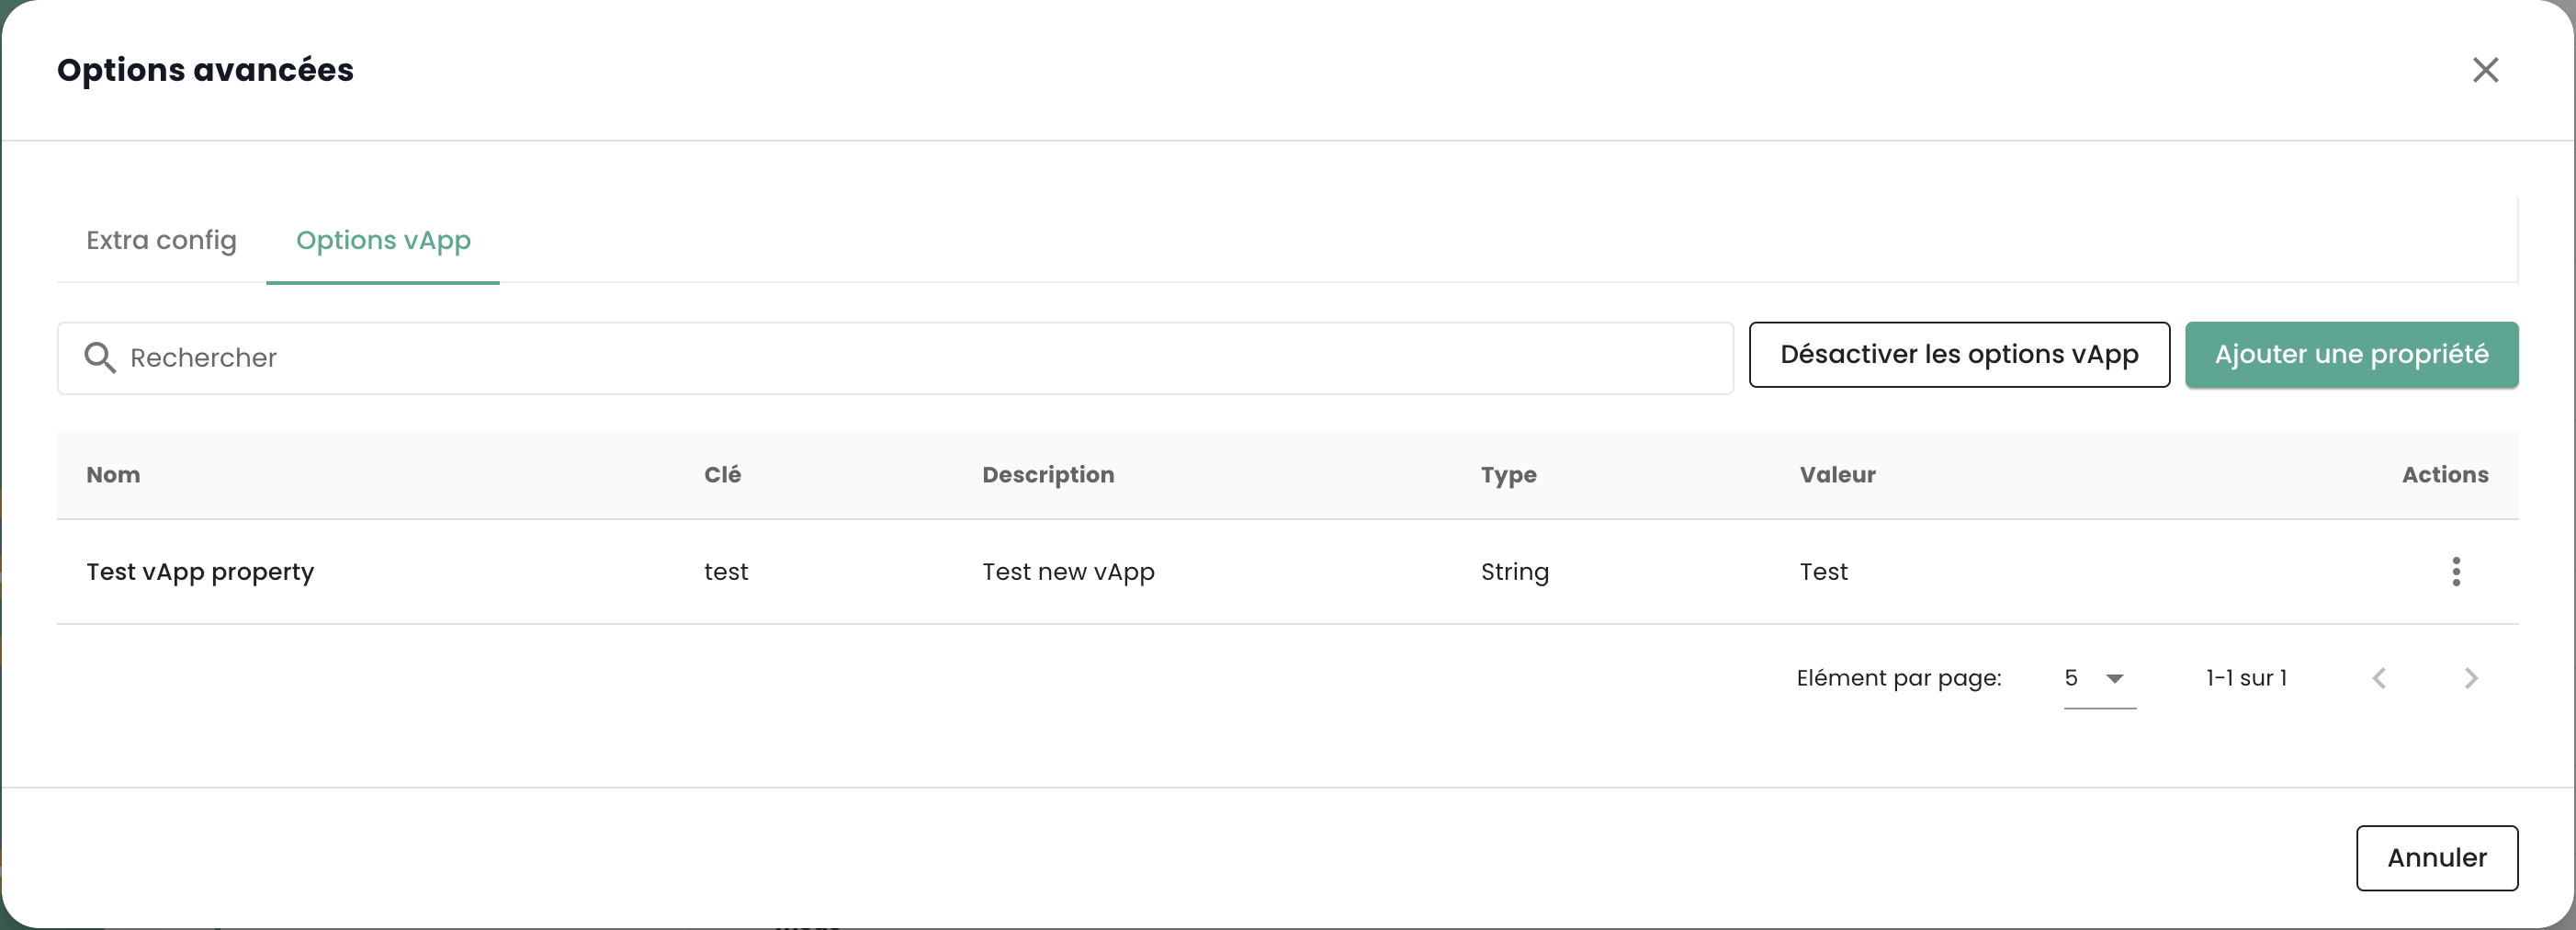
Sie können eine Eigenschaft hinzufügen, ändern oder löschen. Es werden vier Eigenschaftstypen angeboten: String, Zahl, Boolesch, Passwort:
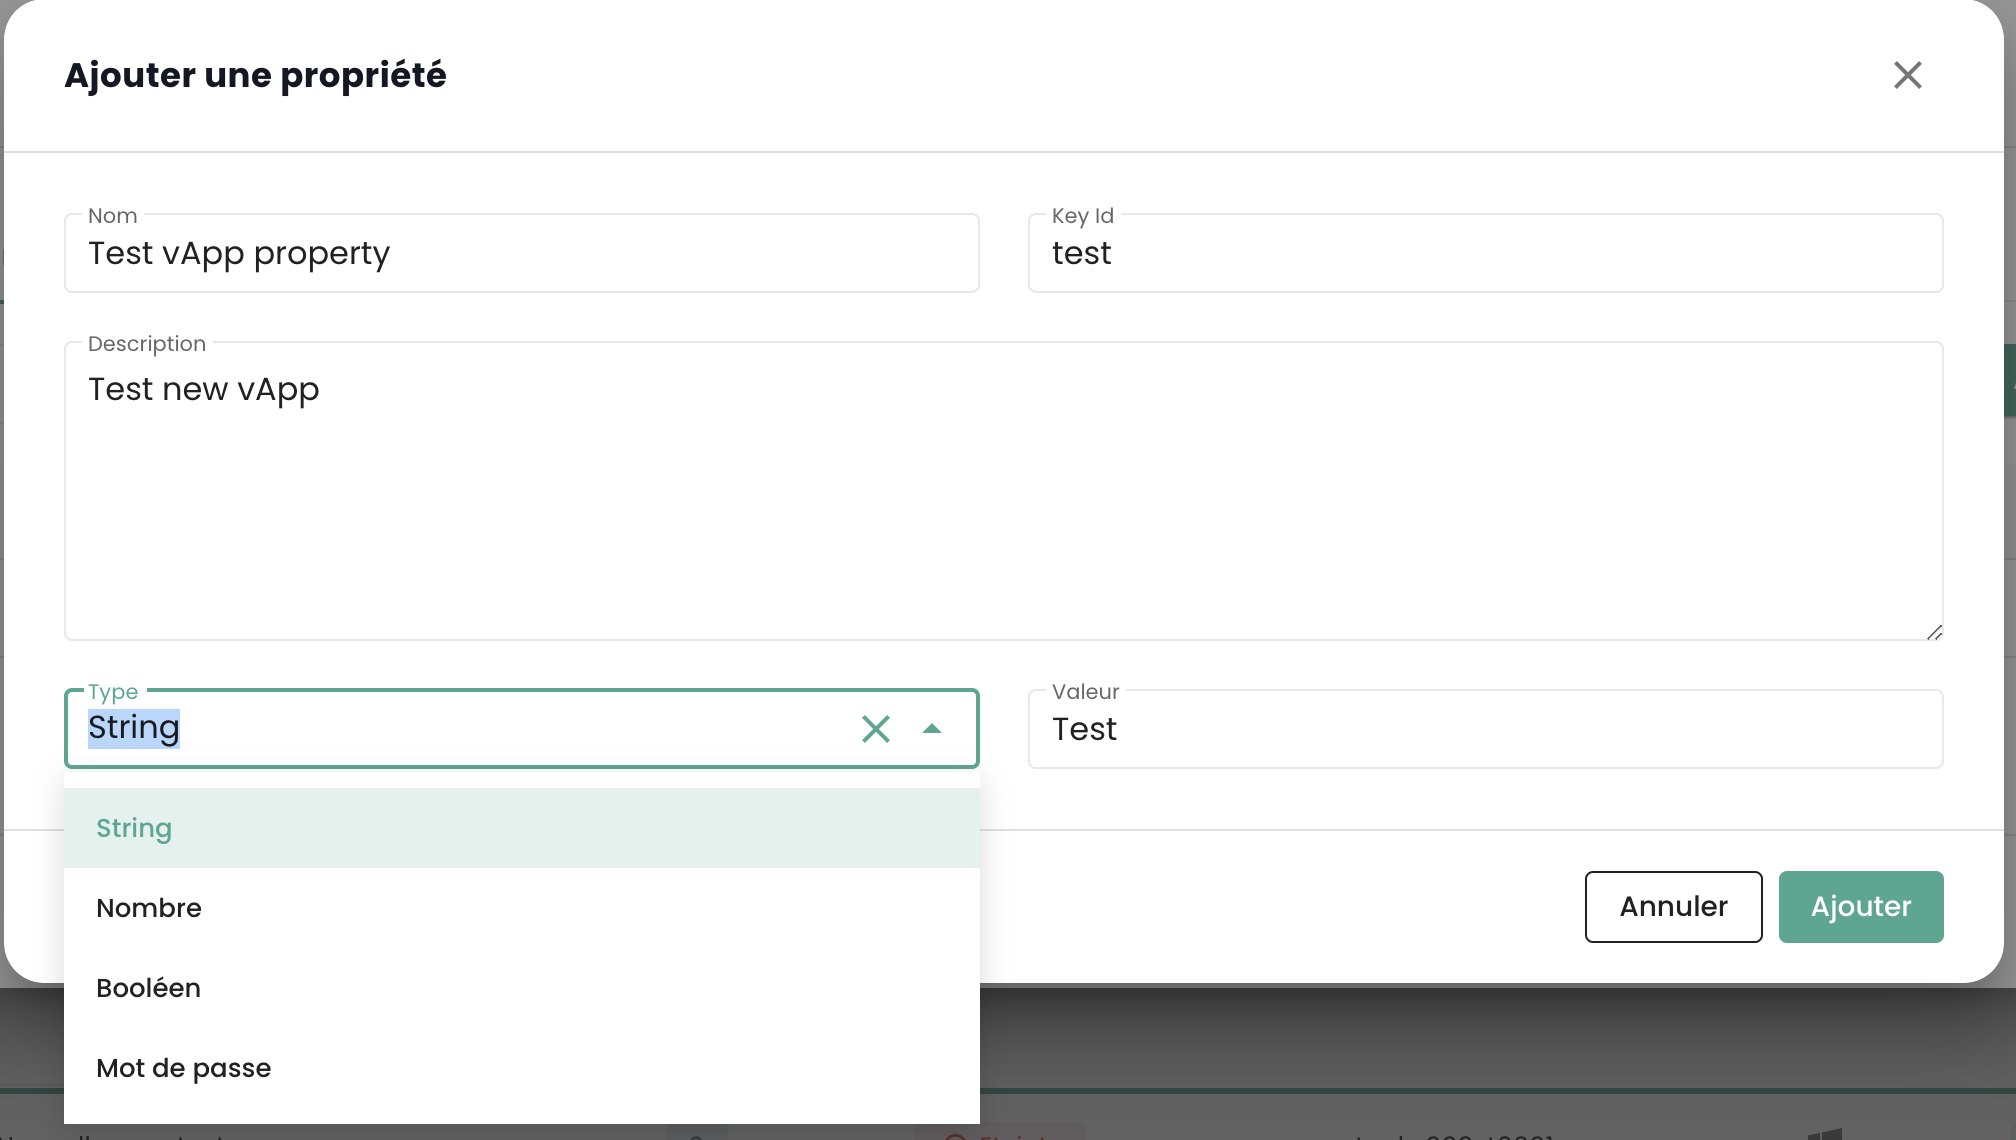
Hinweis: Die virtuelle Maschine muss gestoppt sein, um ihre vApp-Eigenschaften zu ändern.
Verwaltung der 'Hypervisor' und 'Cpool' (Hypervisor-Cluster)
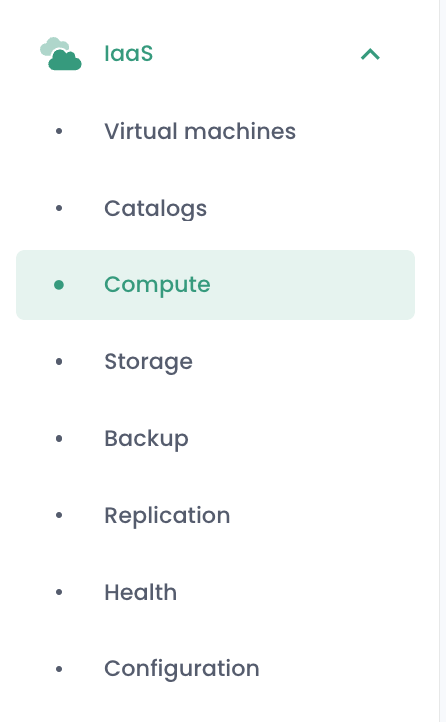
Die Verwaltung Ihrer Hypervisor erfolgt im Untermenü 'Compute' des Menüs 'IaaS', das sich im grünen Bereich links auf Ihrem Bildschirm befindet.
In diesem Untermenü haben Sie einen Überblick über:
- den Software-Stack der Hypervisor, deren AZ und deren Ressourcen,
- den Software-Stack für die Sicherung.
Im Januar 2024 basiert die verfügbare Hypervisor-Plattform auf der qualifizierten Cloud-Temple-Infrastruktur auf VMware. Die verwendete Sicherungssoftware ist IBM Spectrum Protect Plus.
Verwaltung der VMware-Cluster
Um auf die Verwaltung der VMware-Cluster zuzugreifen, klicken Sie im Untermenü 'Compute' des Menüs 'IaaS' :
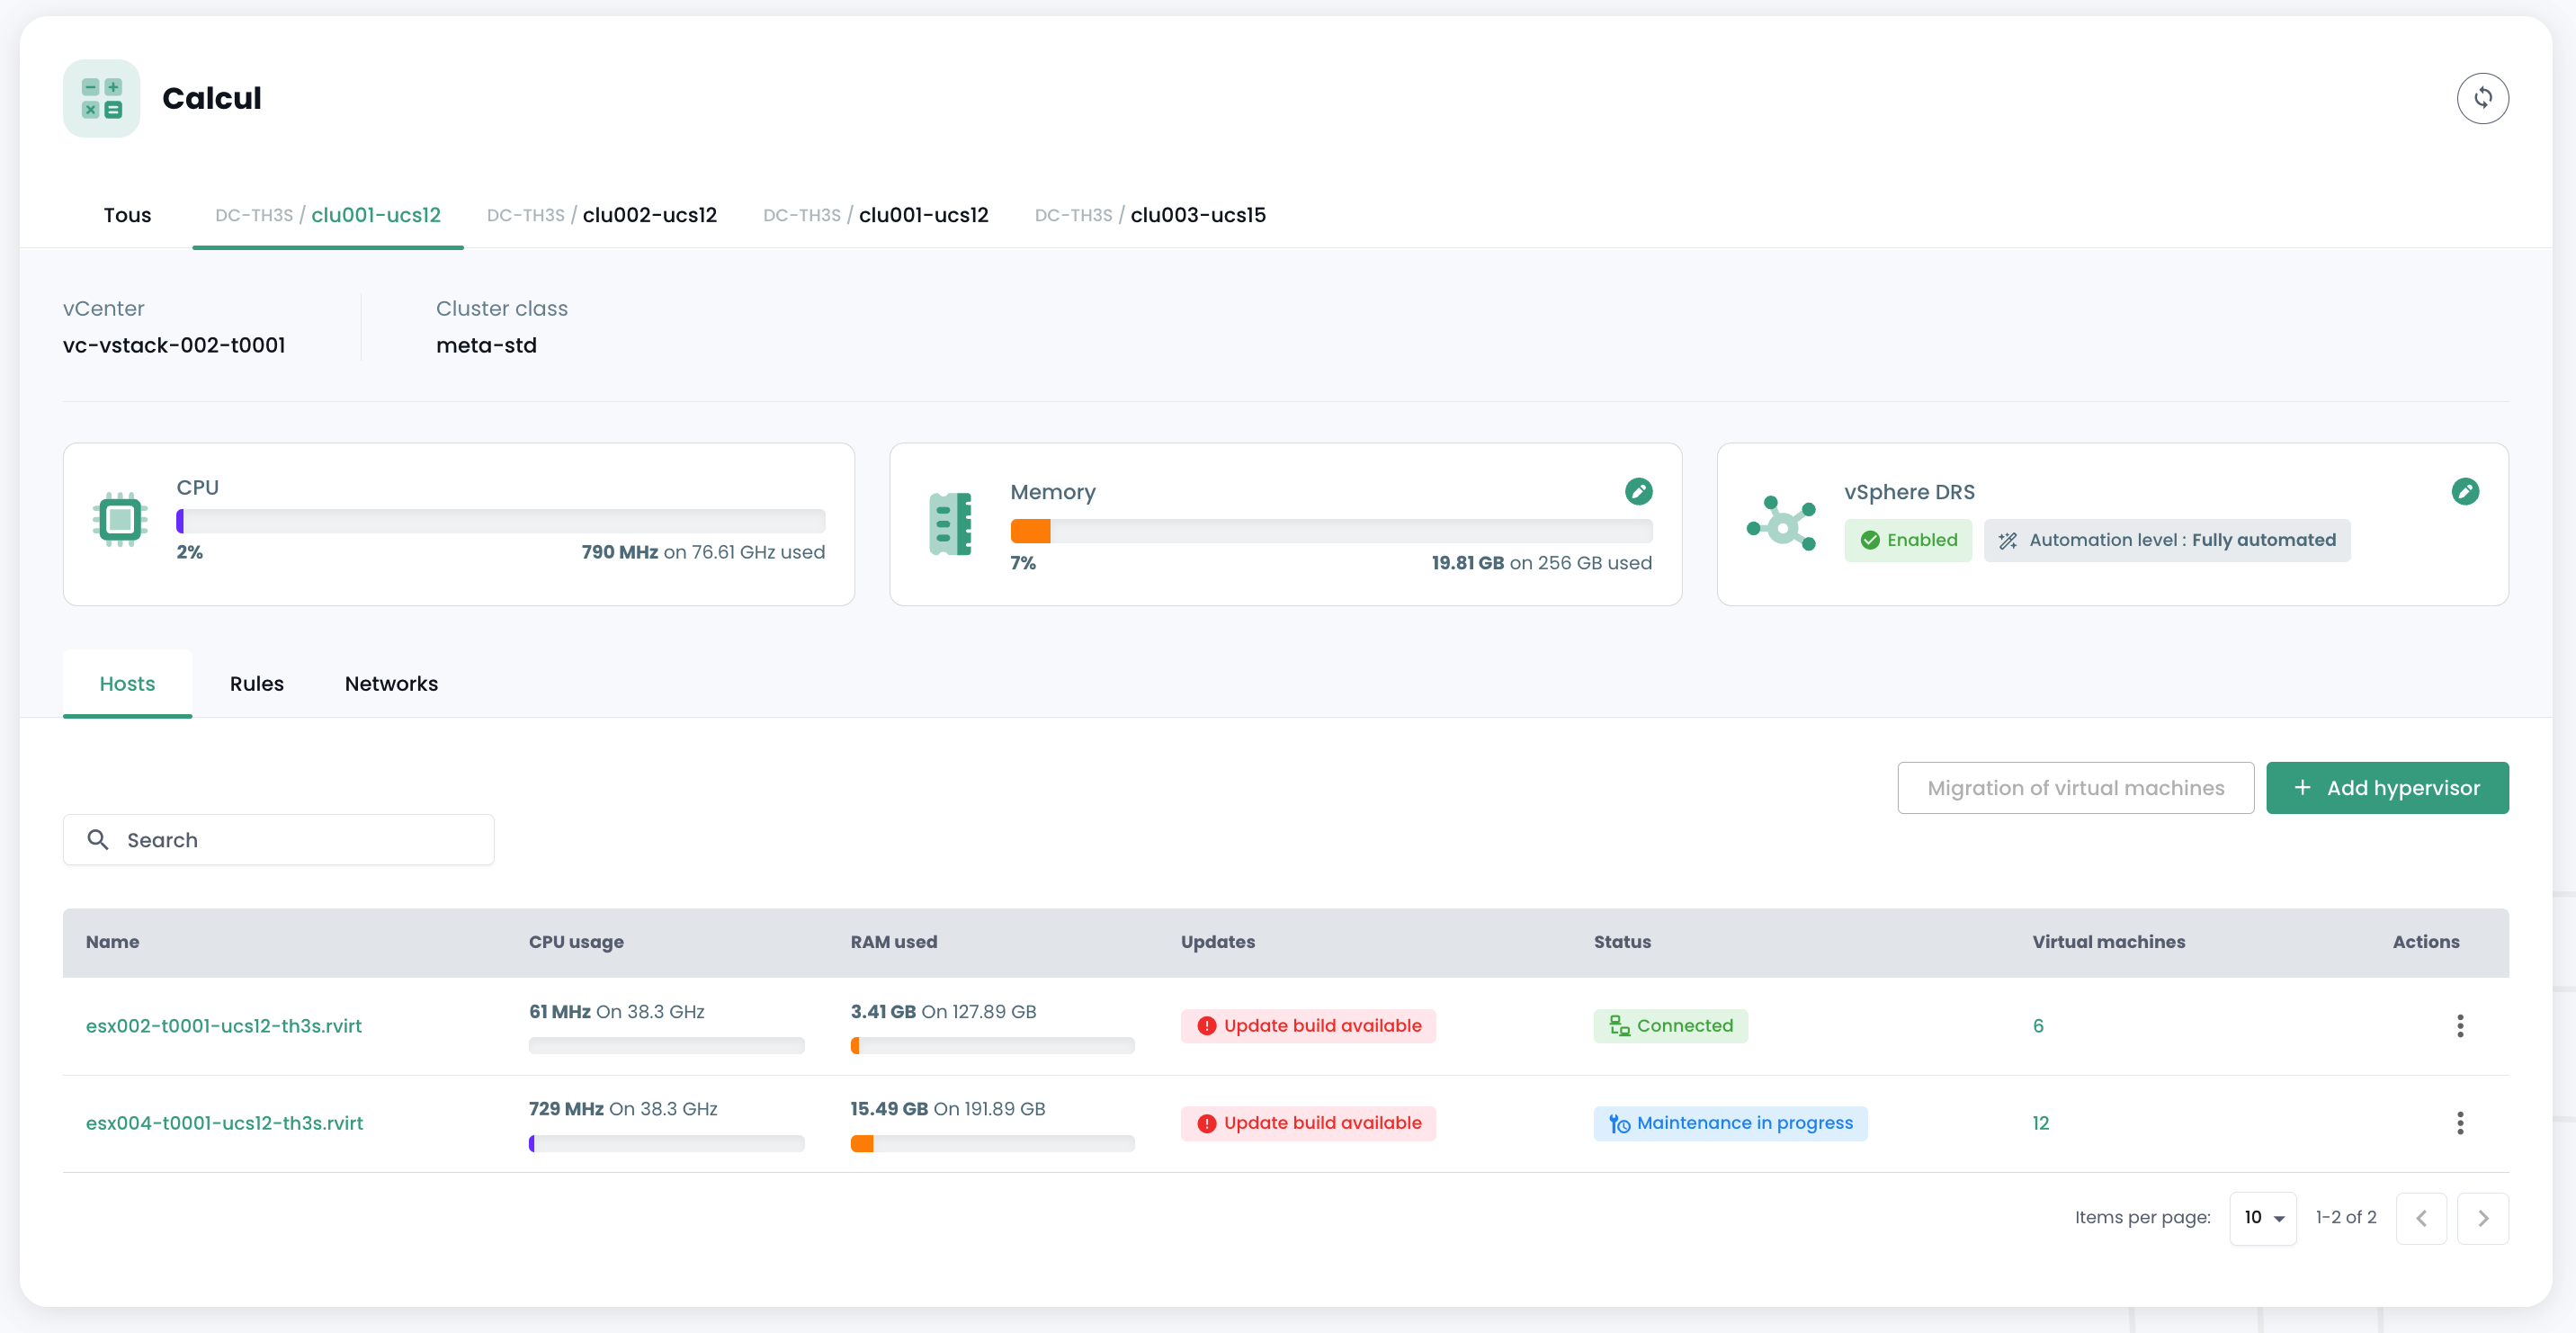
Standardmäßig listet die erste Registerkarte alle Hypervisor (tous cluster confondus):

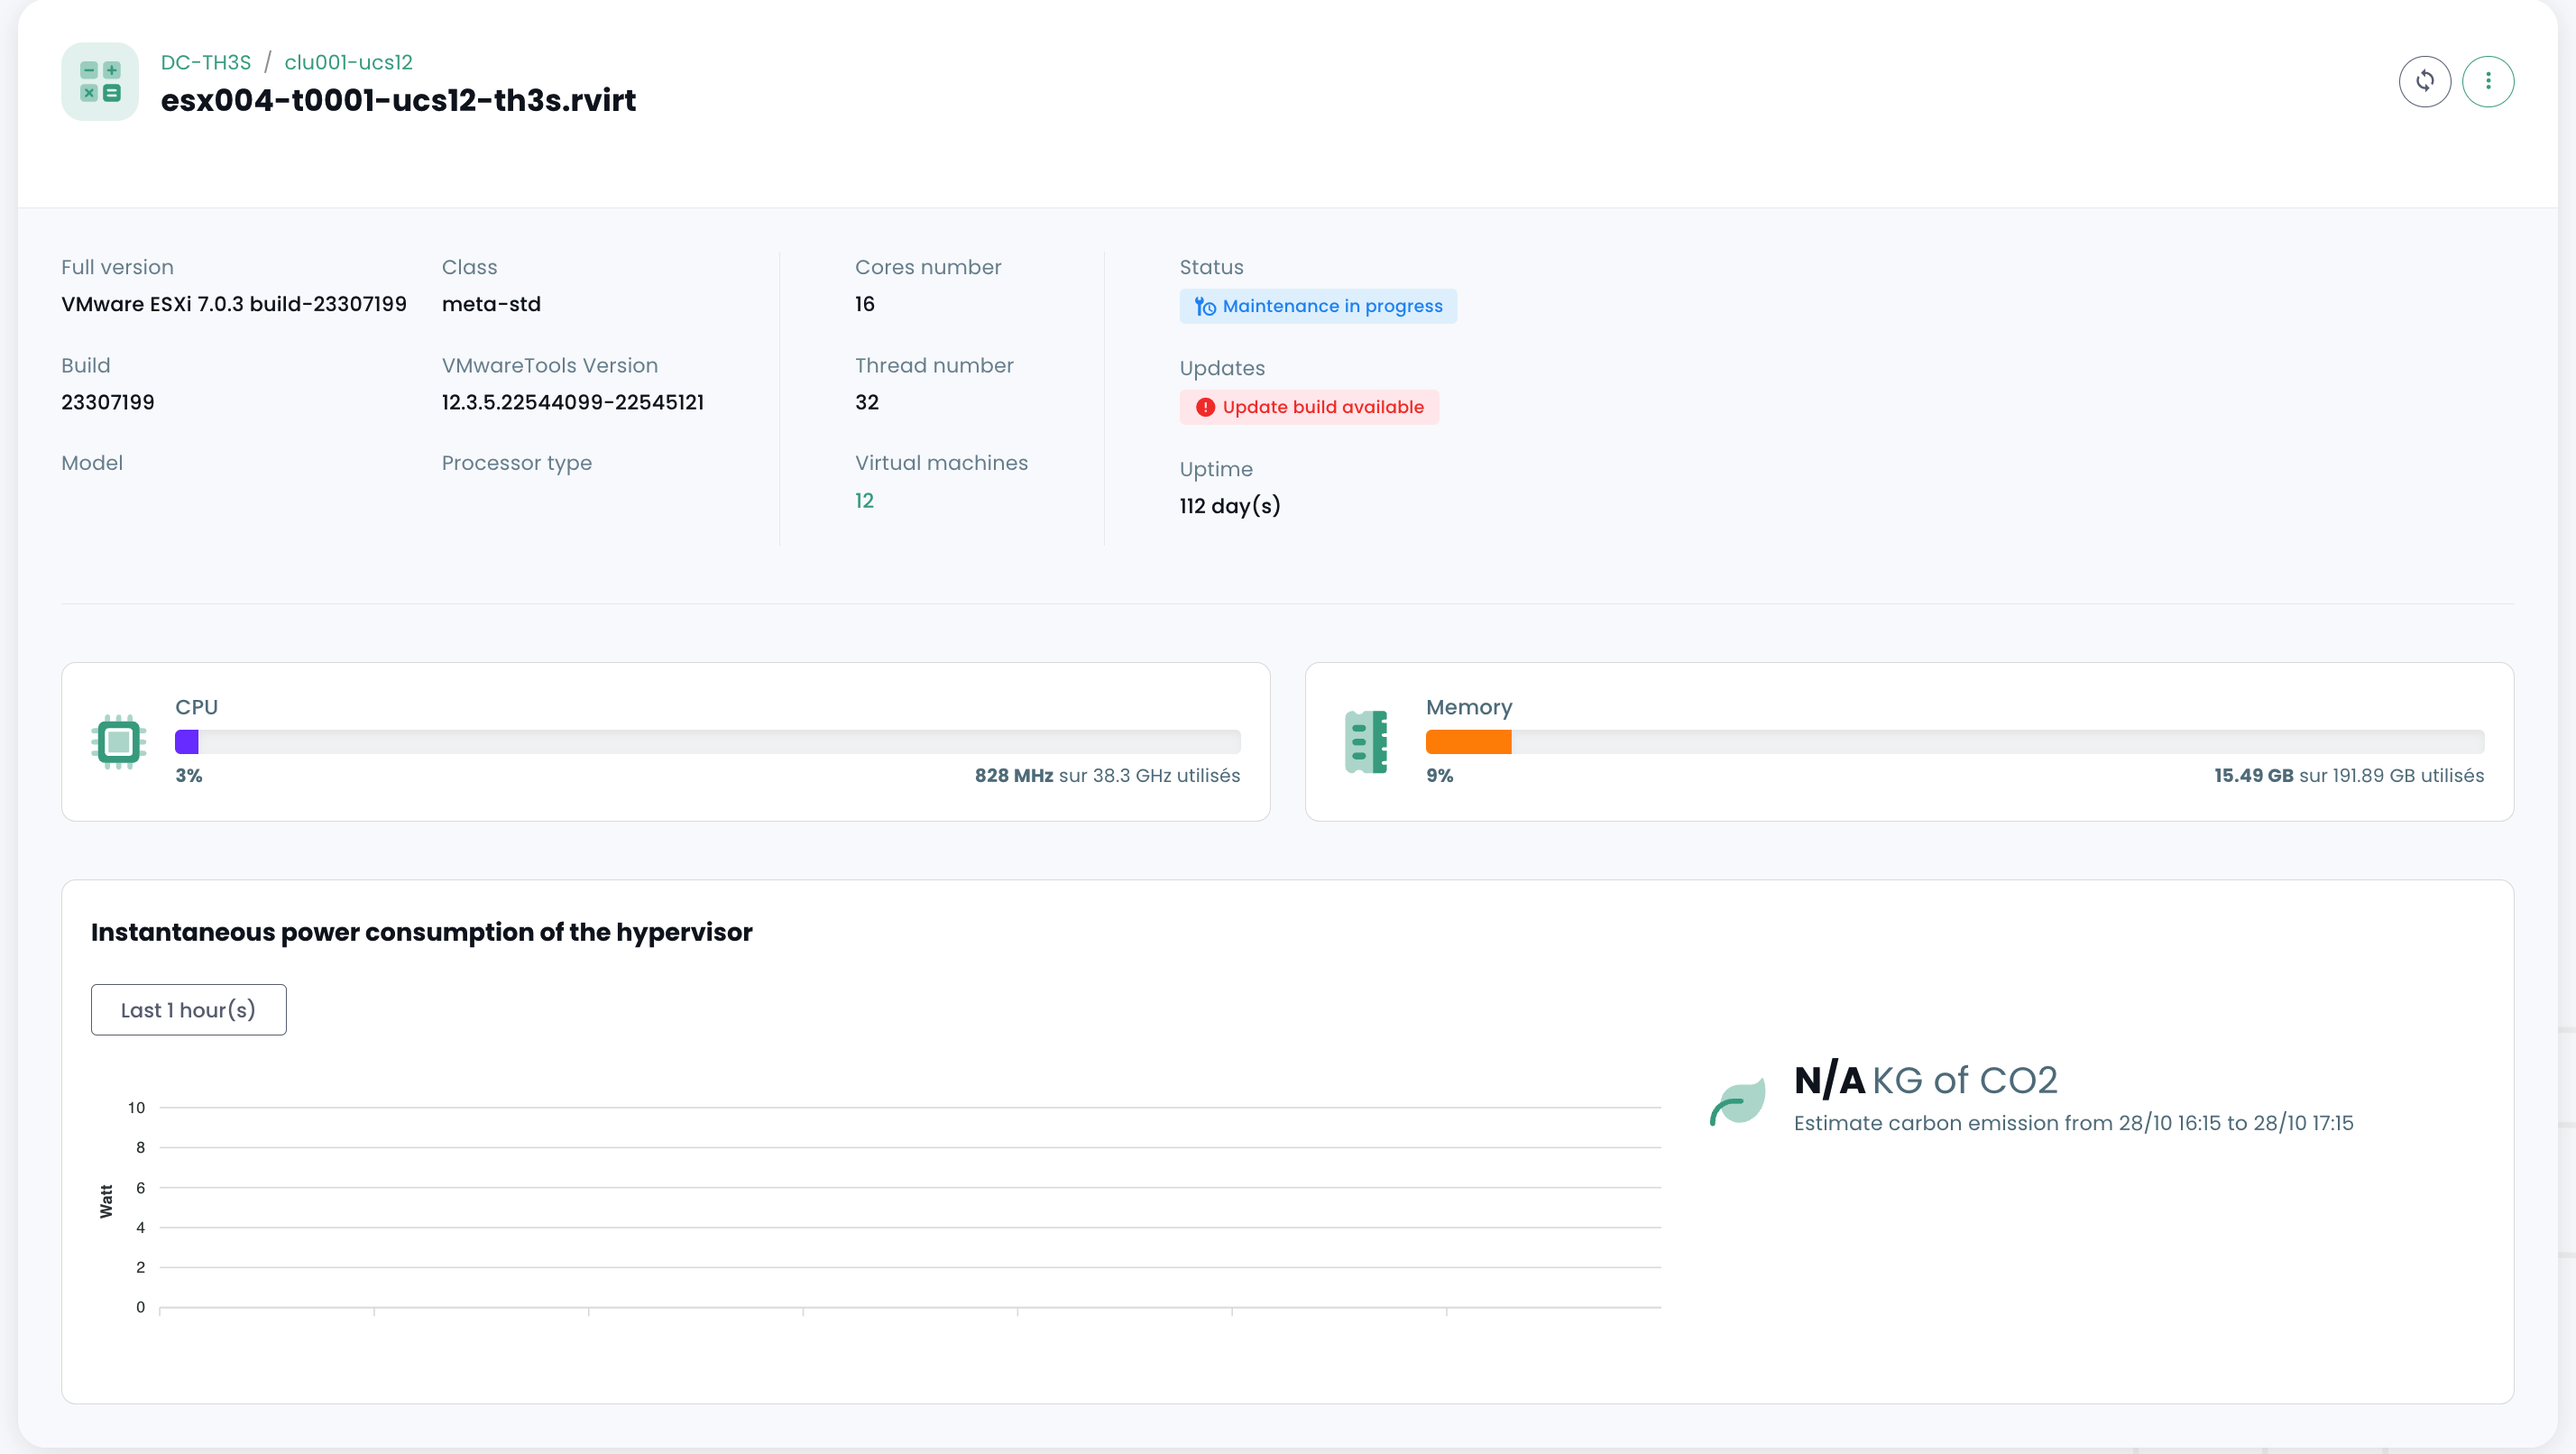
Die Details eines Hypervisors können durch Klicken auf seinen Namen angezeigt werden:
Für jeden Hypervisor-Cluster steht eine eigene Registerkarte zur Verfügung, um die Details einzeln einzusehen:
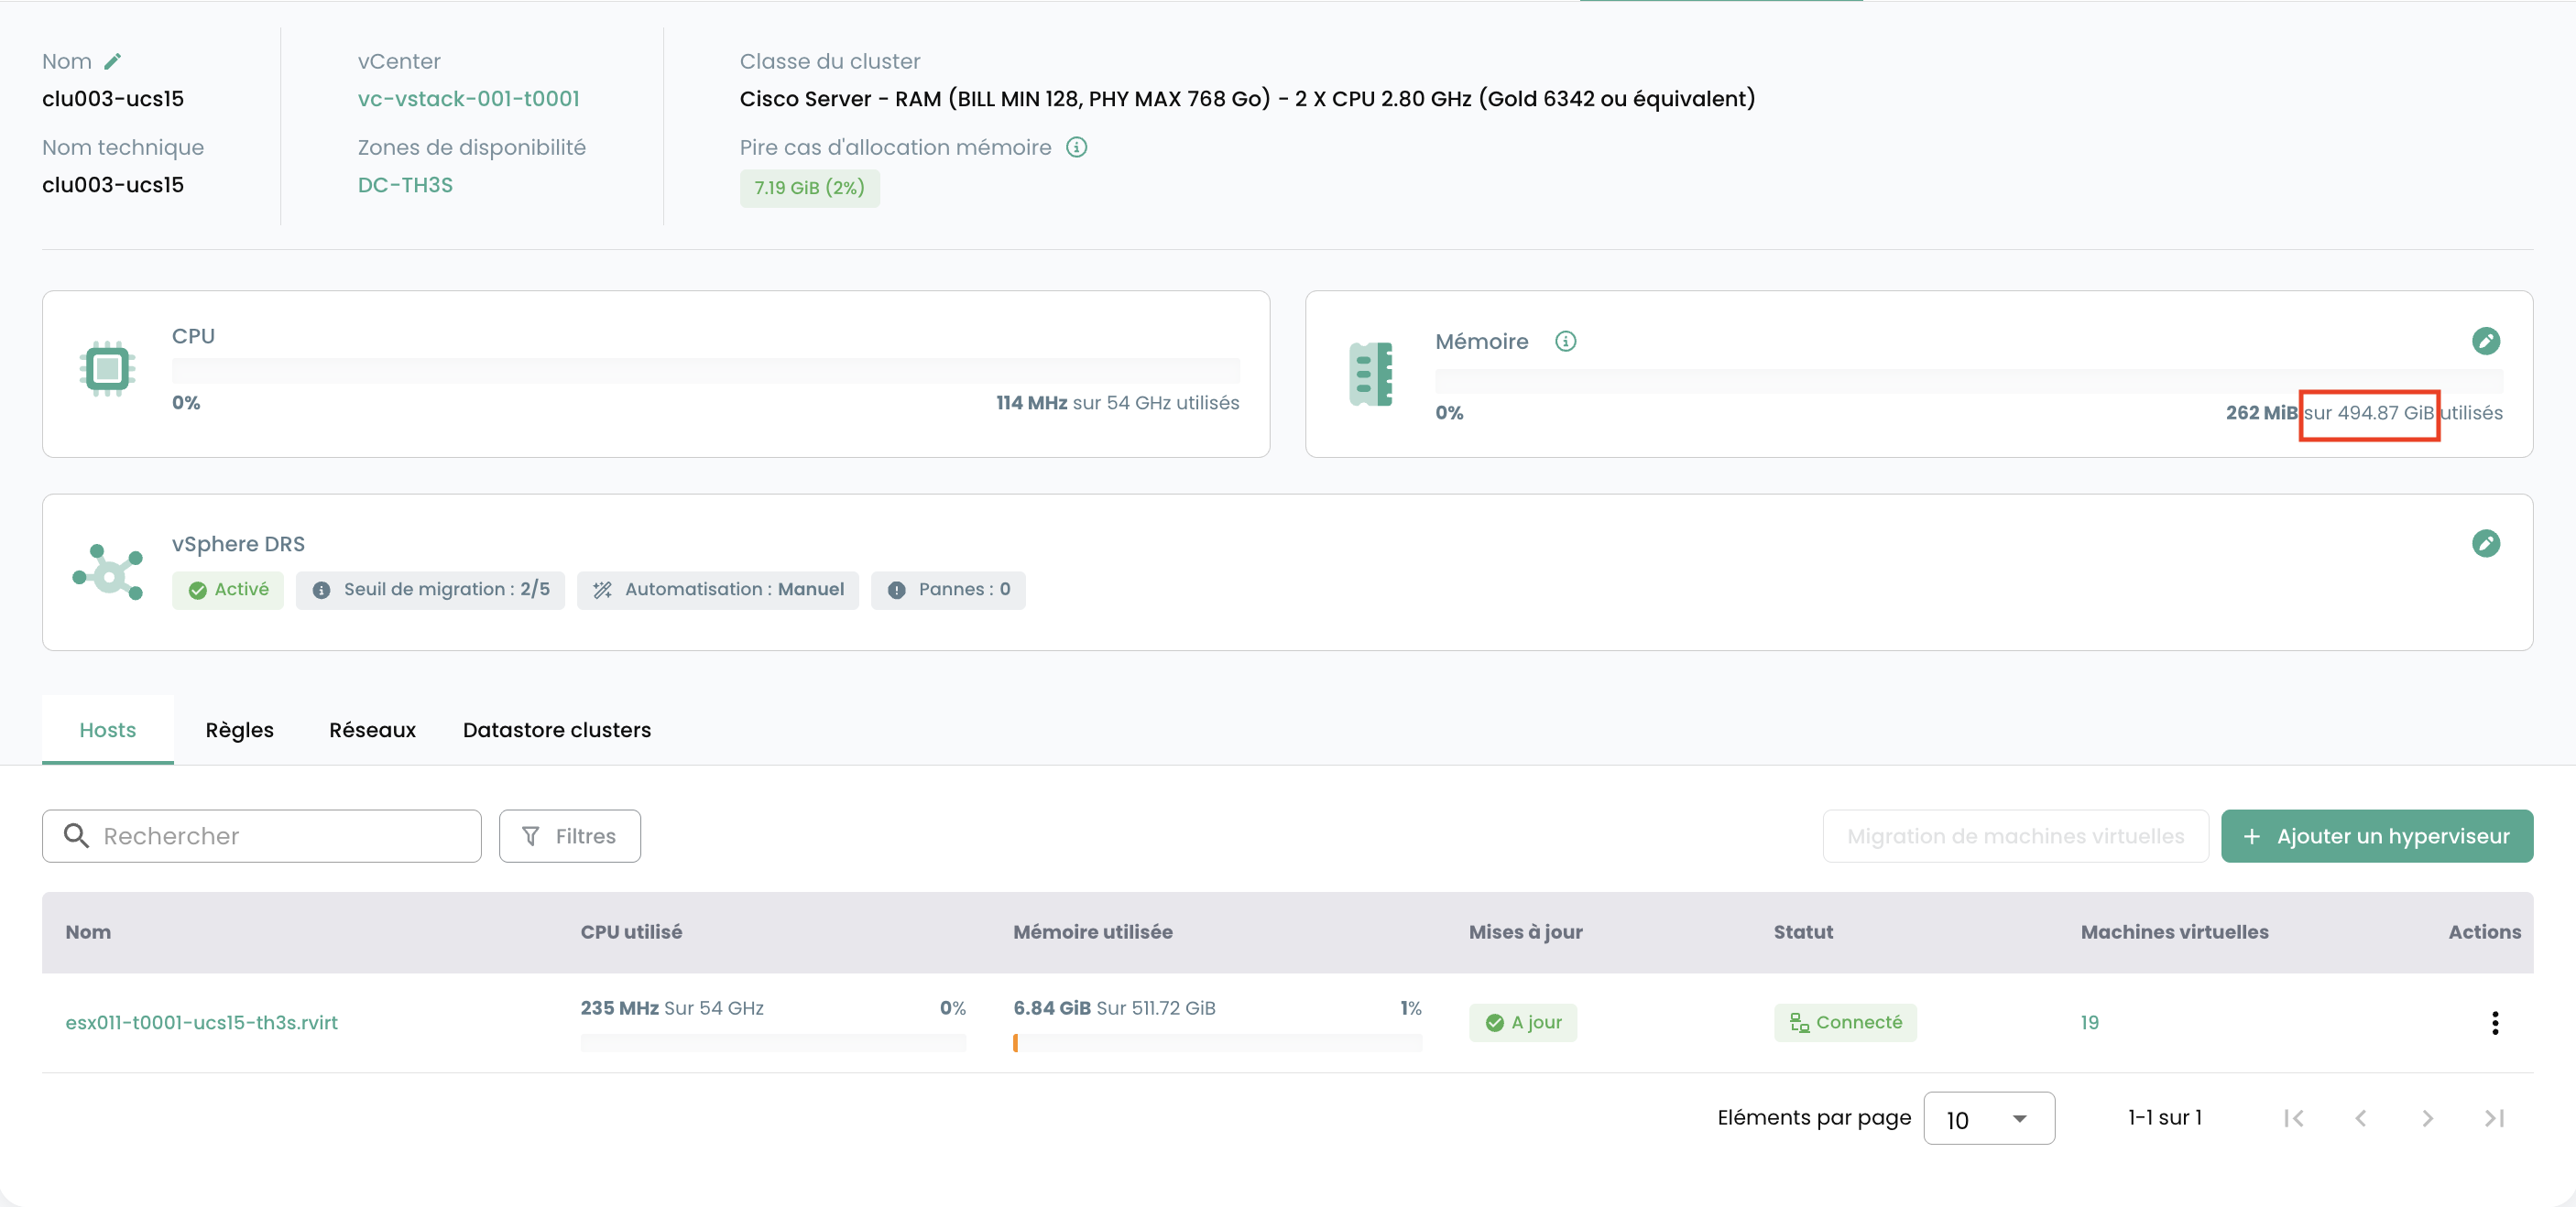
Wenn Sie auf einen Cluster klicken, wird eine Zusammenfassung seiner Zusammensetzung angezeigt :
- Die gesamte Rechenleistung in GHz,
- Der gesamte verfügbare Arbeitsspeicher und der Nutzungsgrad,
- Der gesamte Speicherplatz (tous types confondus) sowie der genutzte Anteil,
- Automatisierungsmechanismen bei Ausfall einer Rechenlame ('Vsphere DRS'),
- Die Anzahl der virtuellen Maschinen,
- Die Anzahl der Hypervisor.
Angezeigte Verbrauchsdaten interpretieren
Zugewiesener Speicher (Cluster) : Dieses Diagramm zeigt die dem Cluster insgesamt zugewiesene Speichermenge.
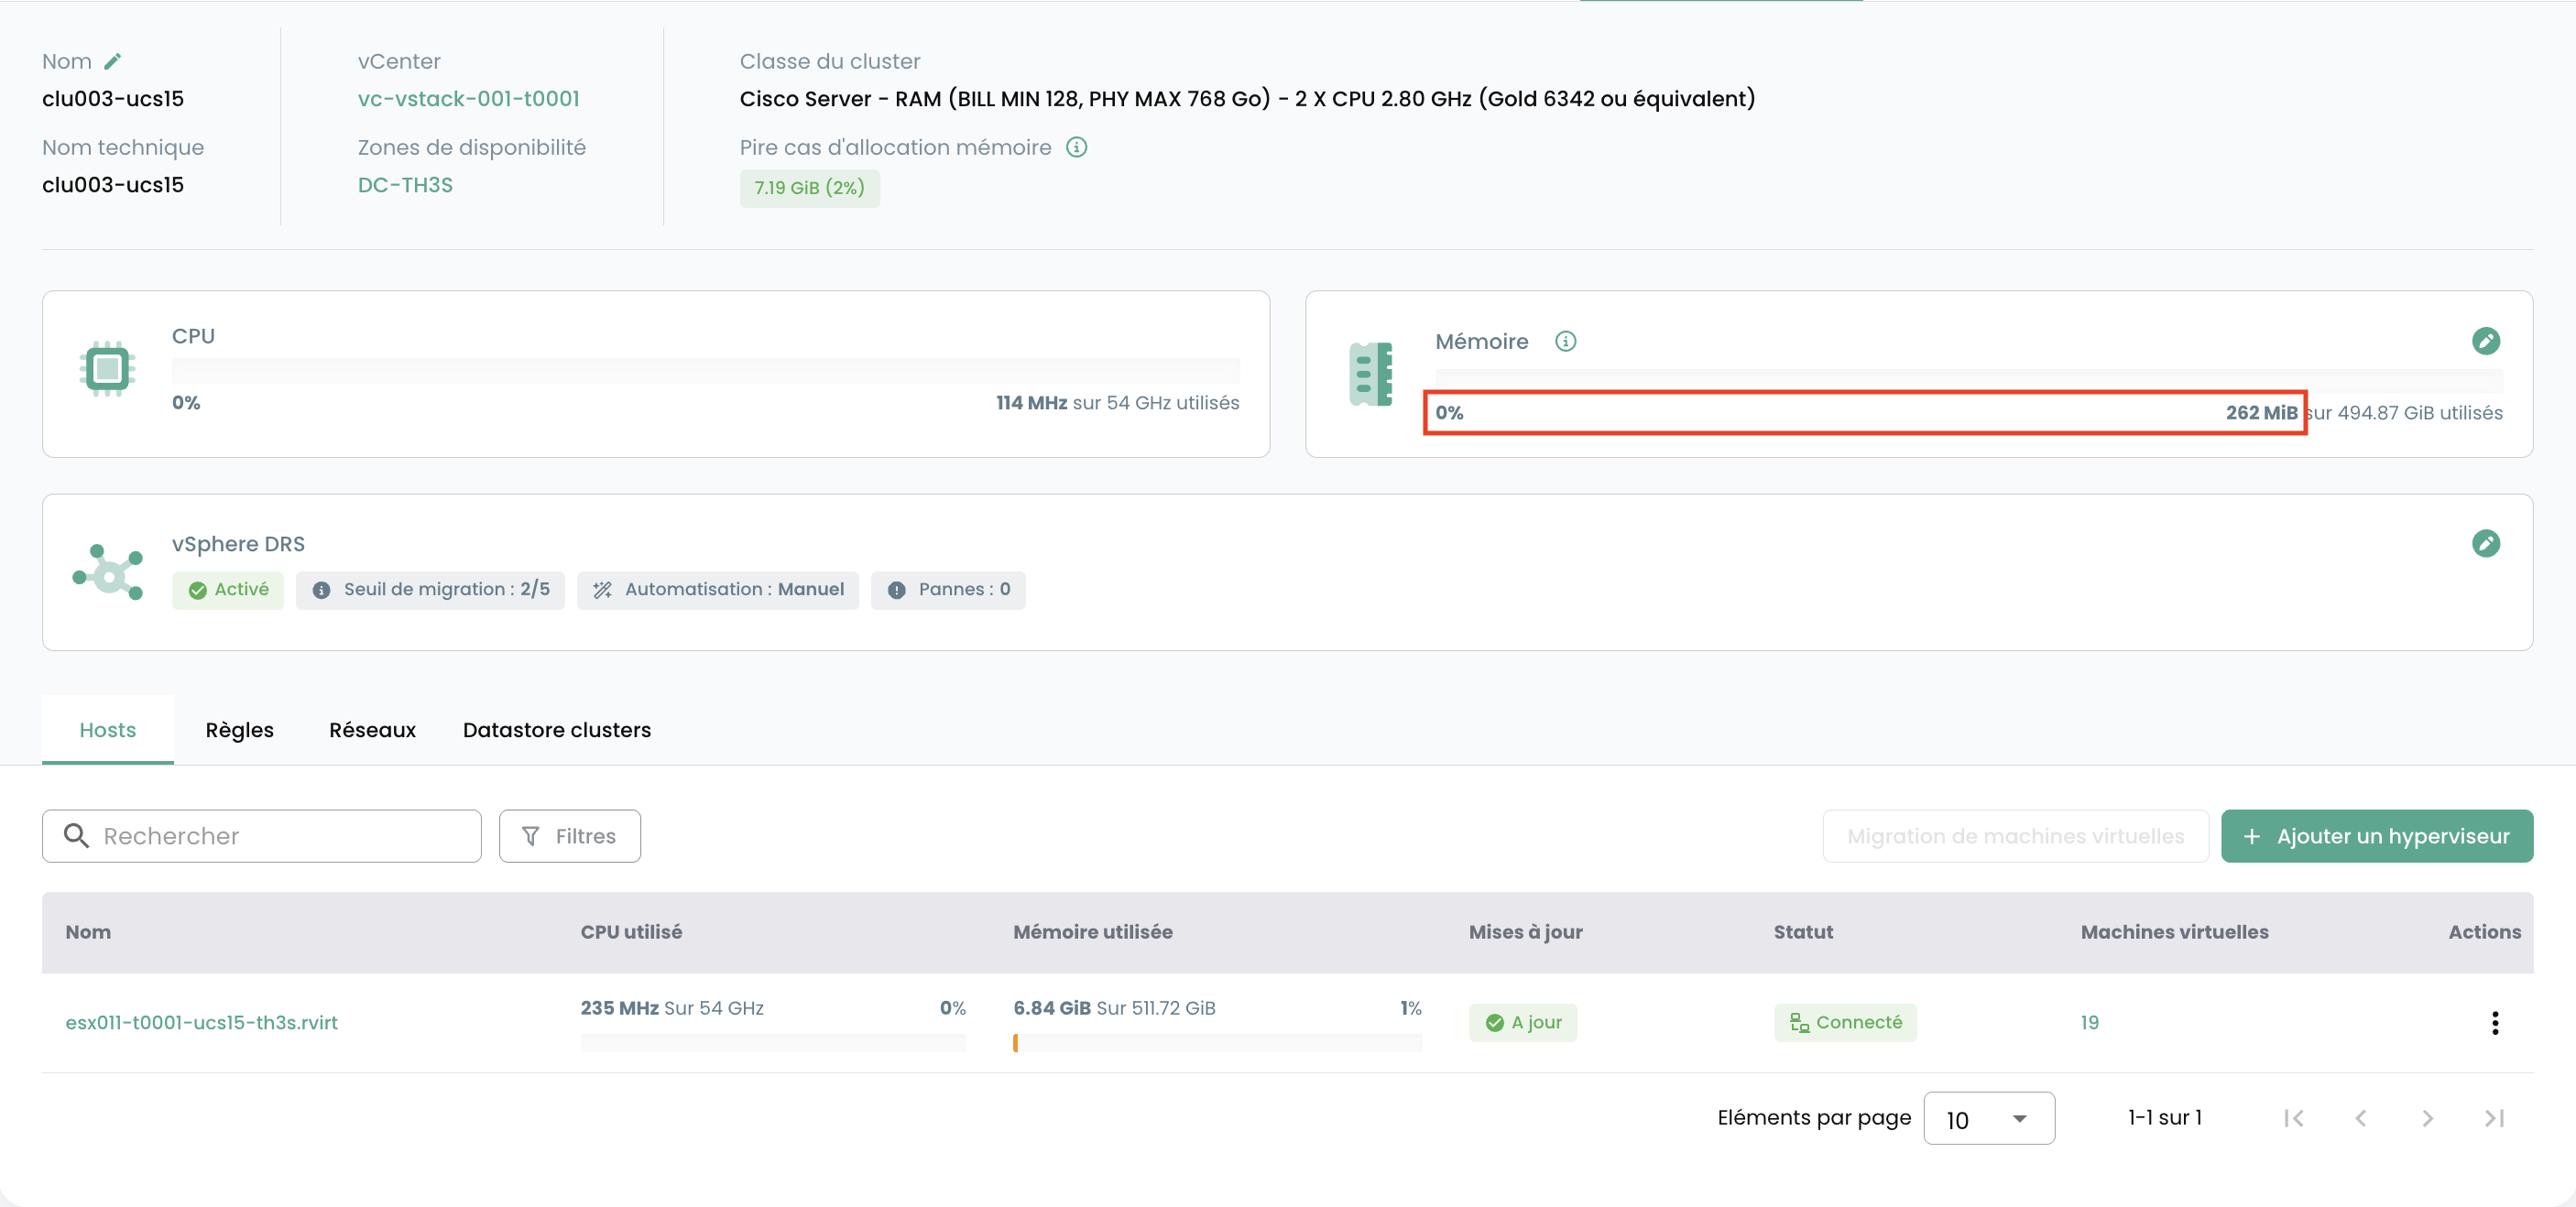
Verbrauchter Speicher (Cluster) : Diese Ansicht zeigt den Speicher, der aktiv ausschließlich von den virtuellen Maschinen des Clusters verbraucht wird. Dies entspricht dem physischen Speicher, der von den VMs tatsächlich für ihre Operationen genutzt wird, und ist ein Schlüsselindikator für die aktuelle Arbeitslast.
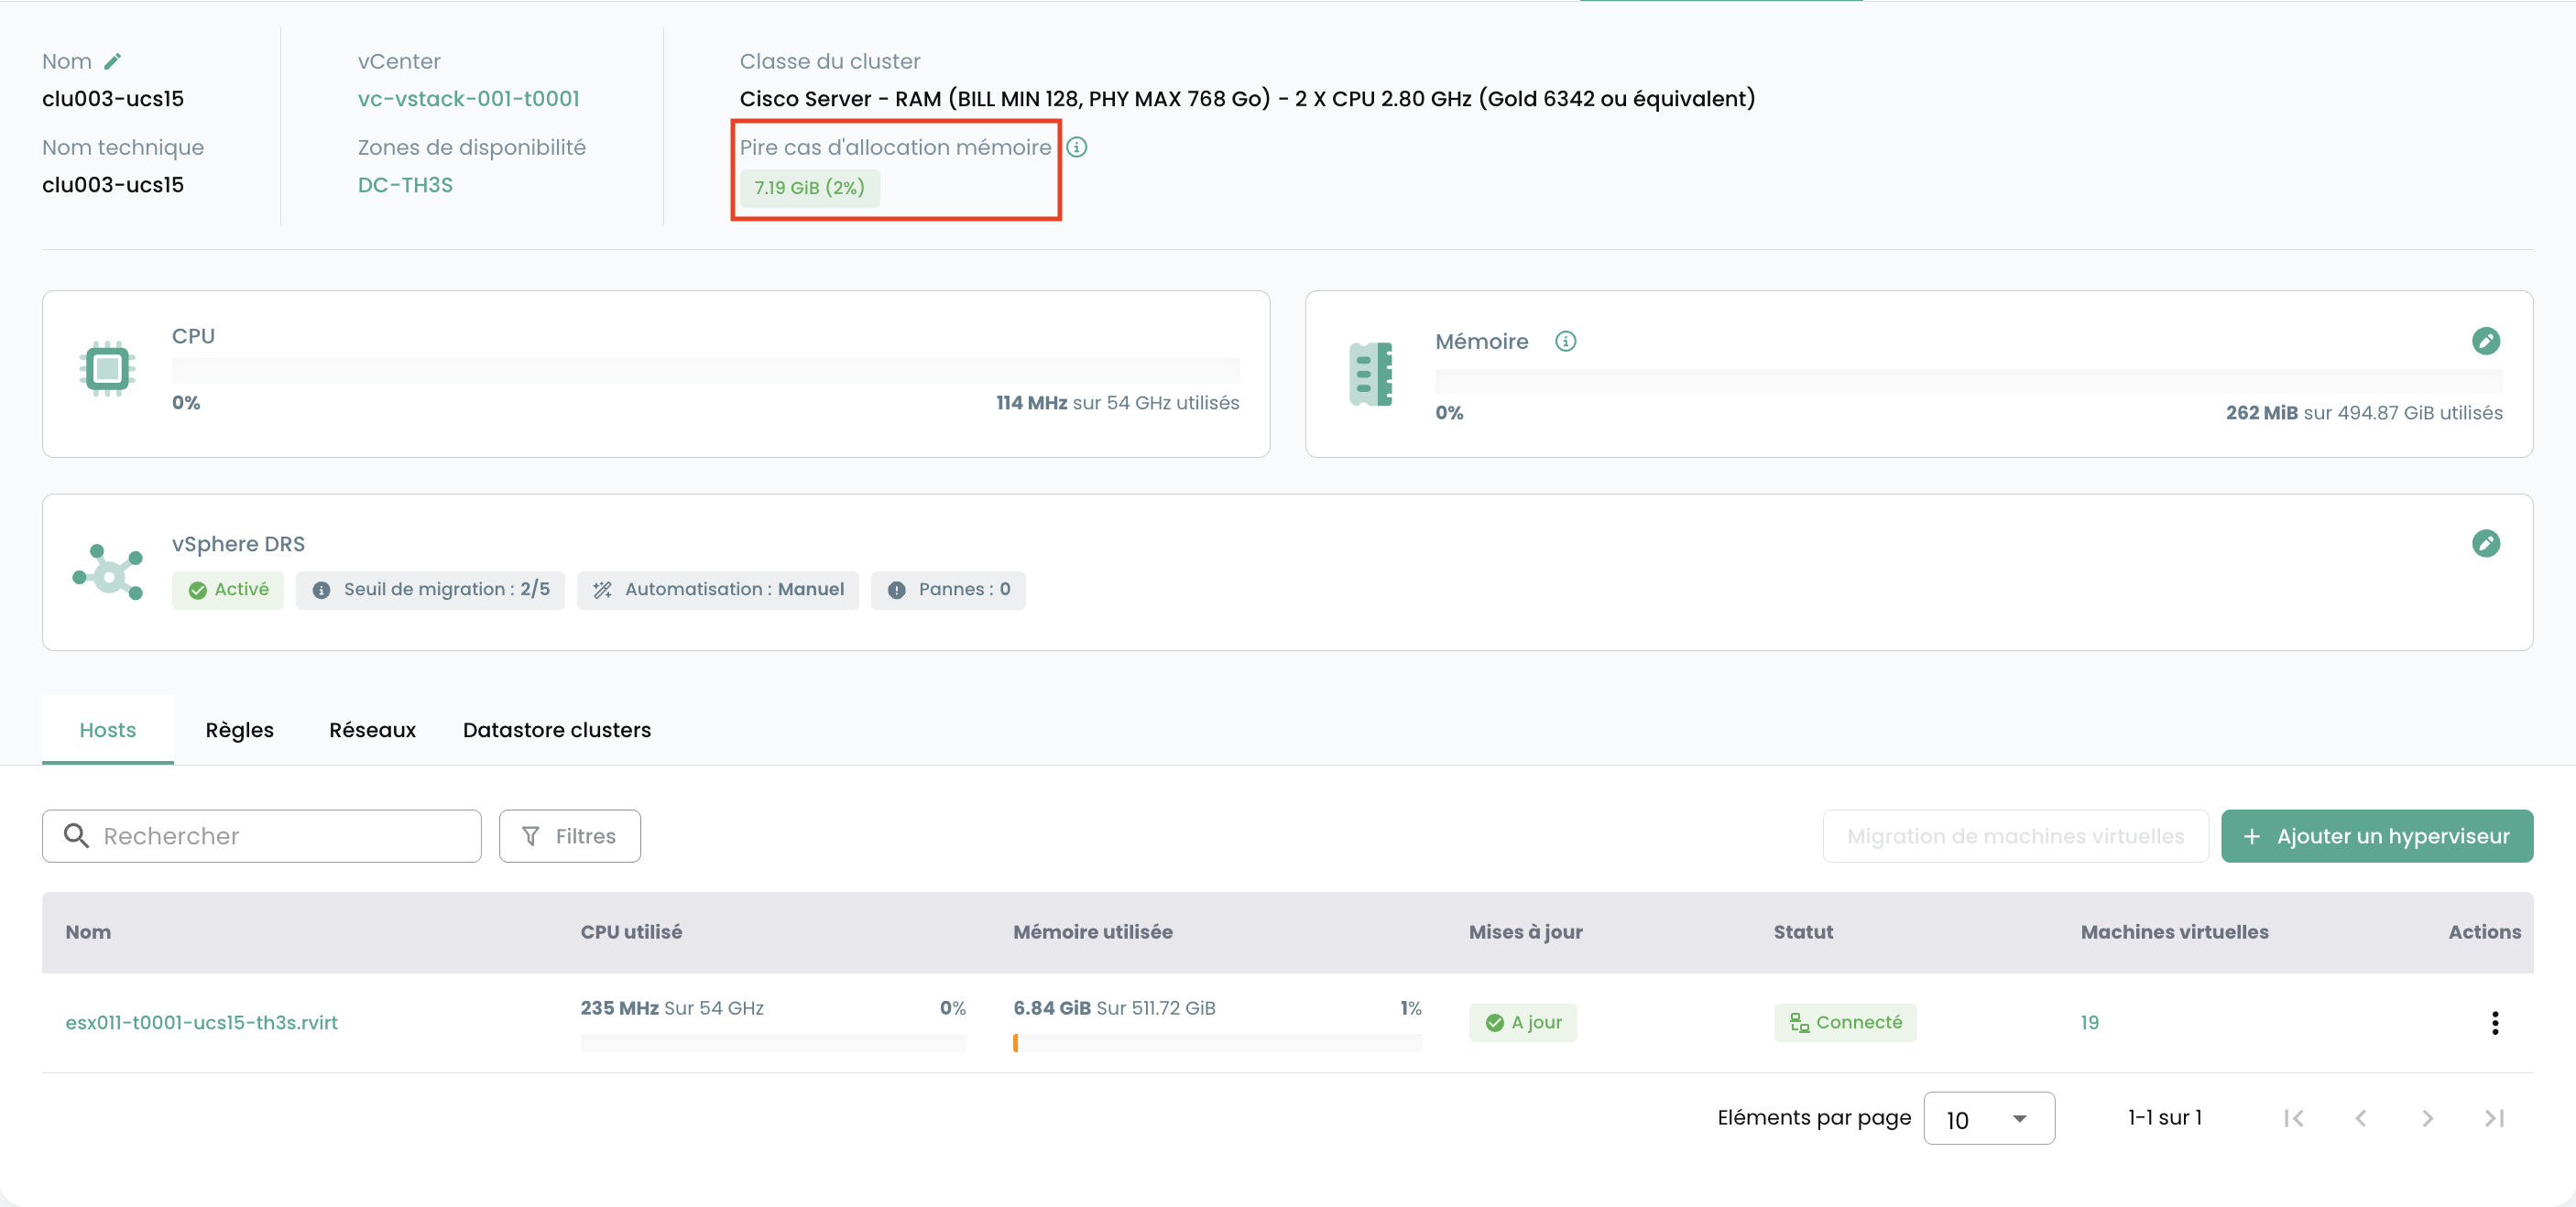
Worst-Case-Zuweisung (Cluster) : Dieses Diagramm veranschaulicht den Speicherbedarf, falls alle virtuellen Maschinen des Clusters gleichzeitig den ihnen zugewiesenen Gesamtspeicher verbrauchen würden (le scénario de consommation maximale). Das Ergebnis berücksichtigt auch den für den Clusterbetrieb erforderlichen Speicher sowie verschiedene VMware-spezifische Parameter (le calcul n'est pas simplement égal à la somme de la RAM de toutes les machines virtuelles). Dies ermöglicht die Vorhersage kritischer Ressourcenbedarfe und verhindert ein Aufbrauchen des Speichers.
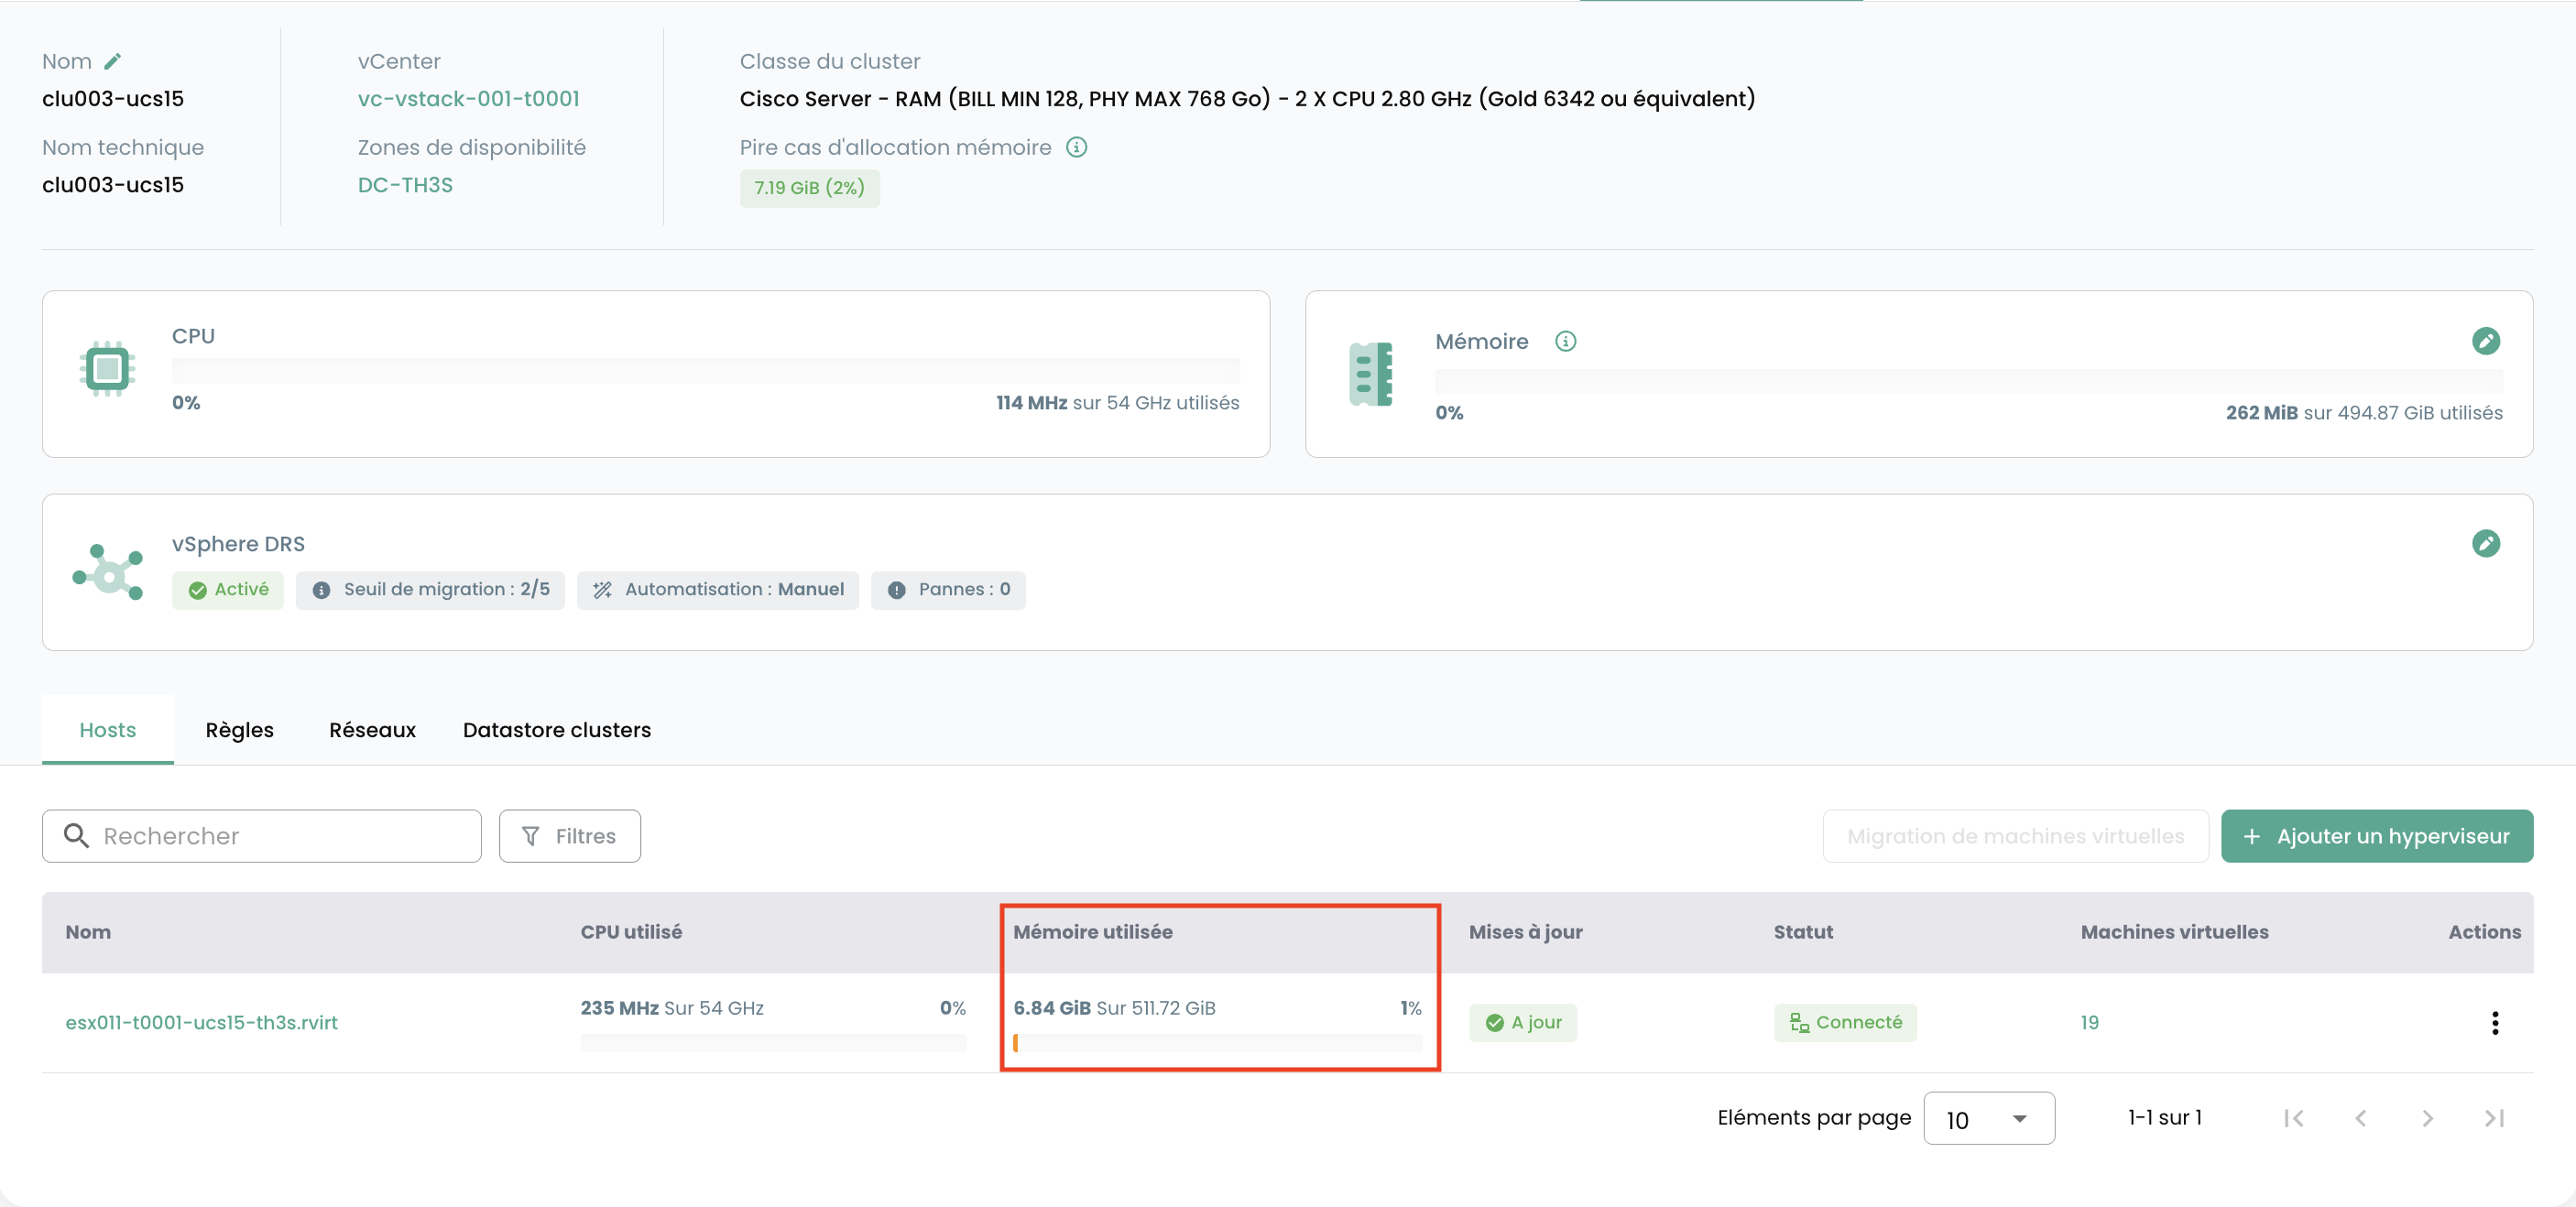
Verbrauchter Speicher (ESX) : Im Gegensatz zu den Cluster-Diagrammen zeigt dieses den gesamten auf einem bestimmten ESX-Host verbrauchten Speicher. Dies umfasst nicht nur den von den auf diesem Host gehosteten virtuellen Maschinen genutzten Speicher, sondern auch den vom Hypervisor-System selbst verbrauchten Speicher (overhead de l'ESXi).
Für jeden Hypervisor im Reiter 'Hosts' werden folgende Informationen angezeigt:
- Die CPU- und __Speicher__auslastung,
- Die Anzahl der zugewiesenen virtuellen Maschinen,
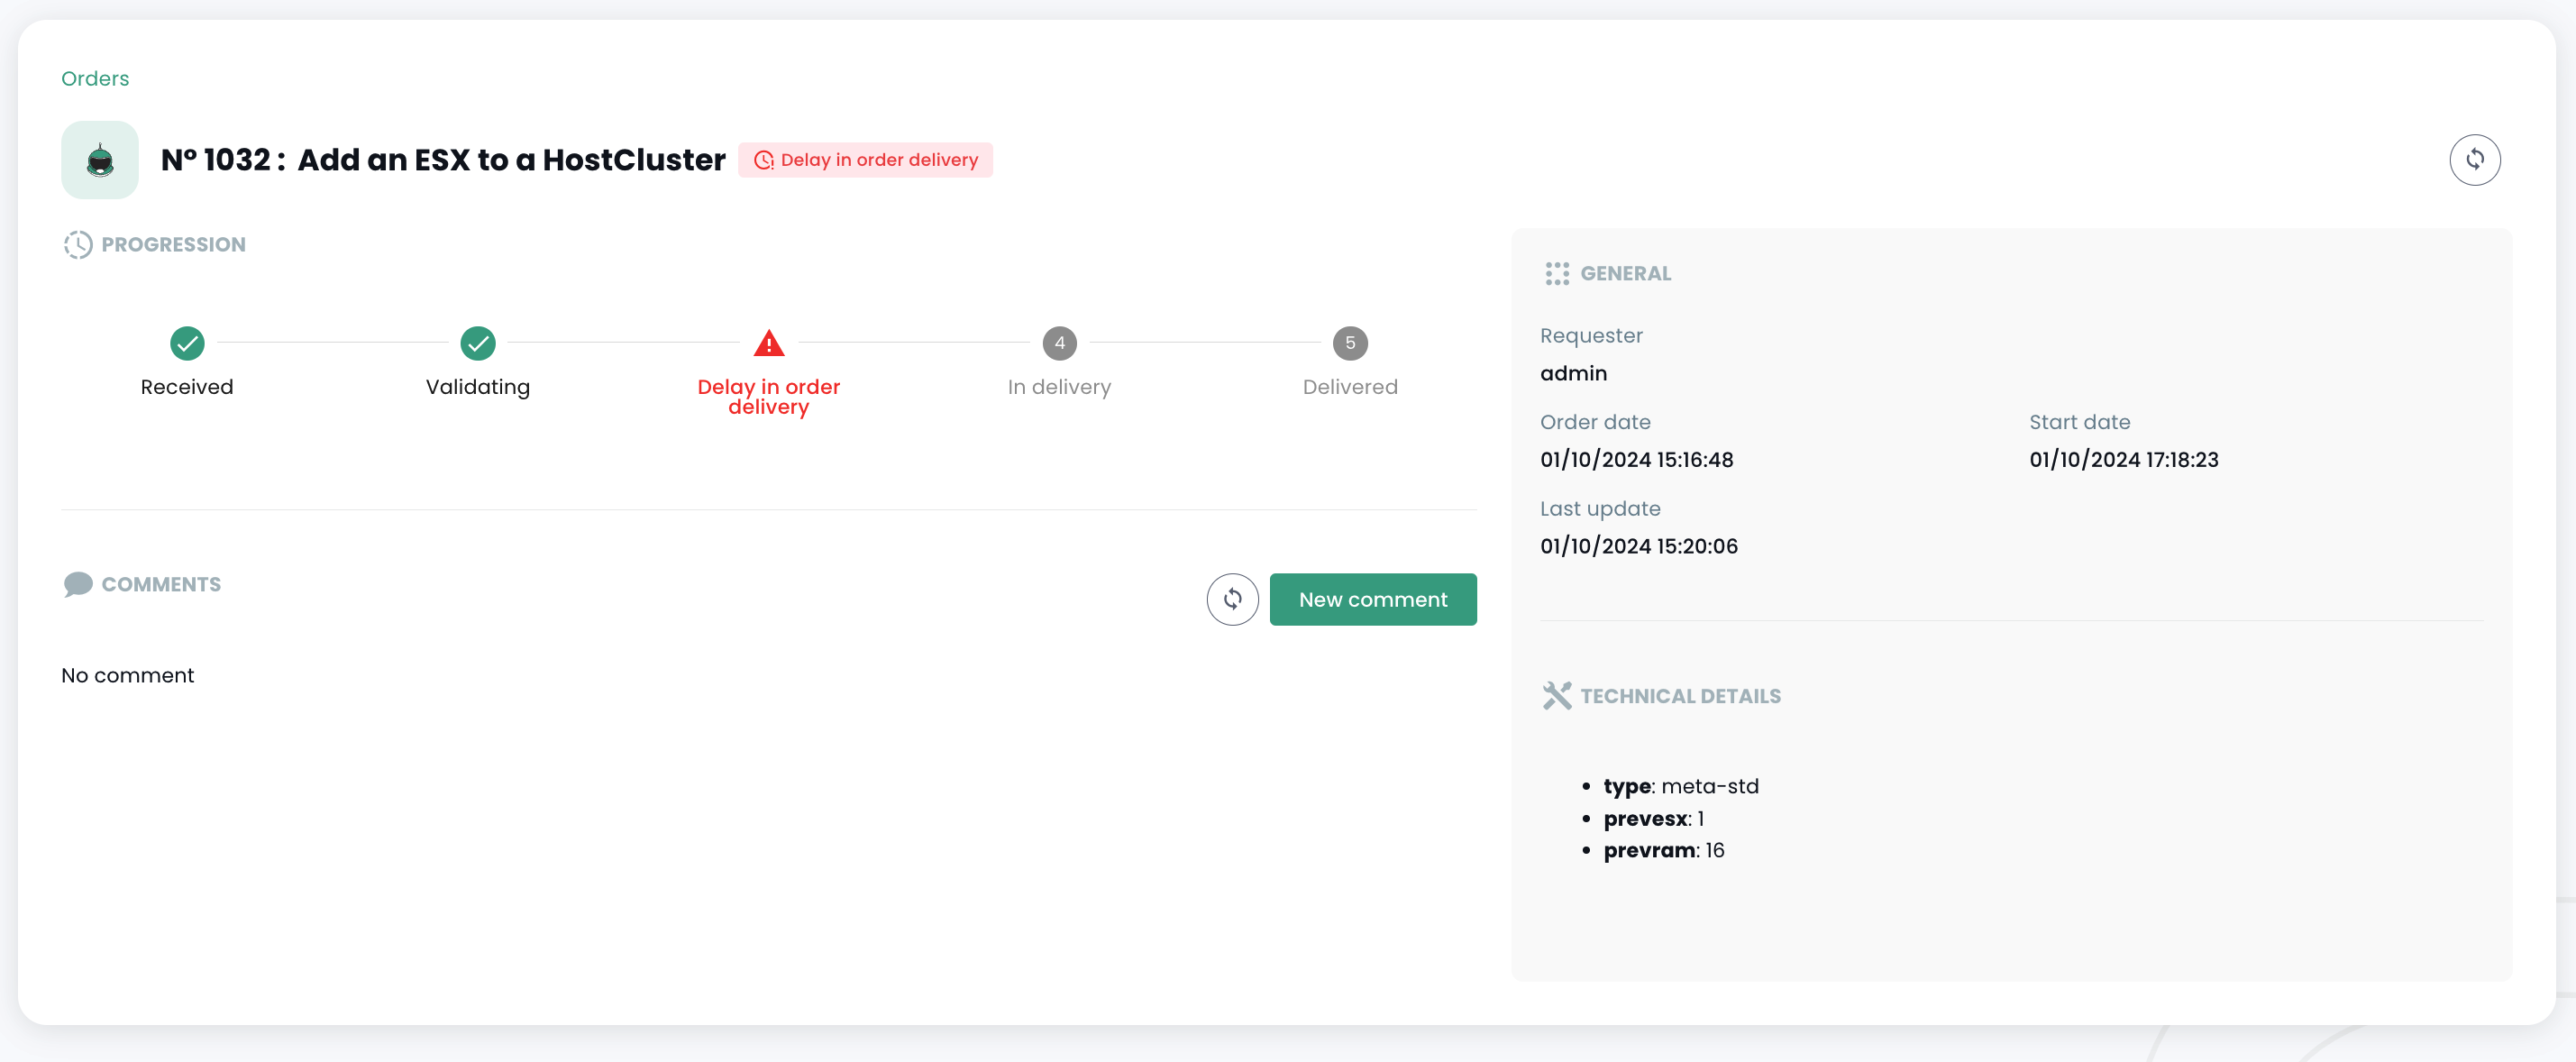
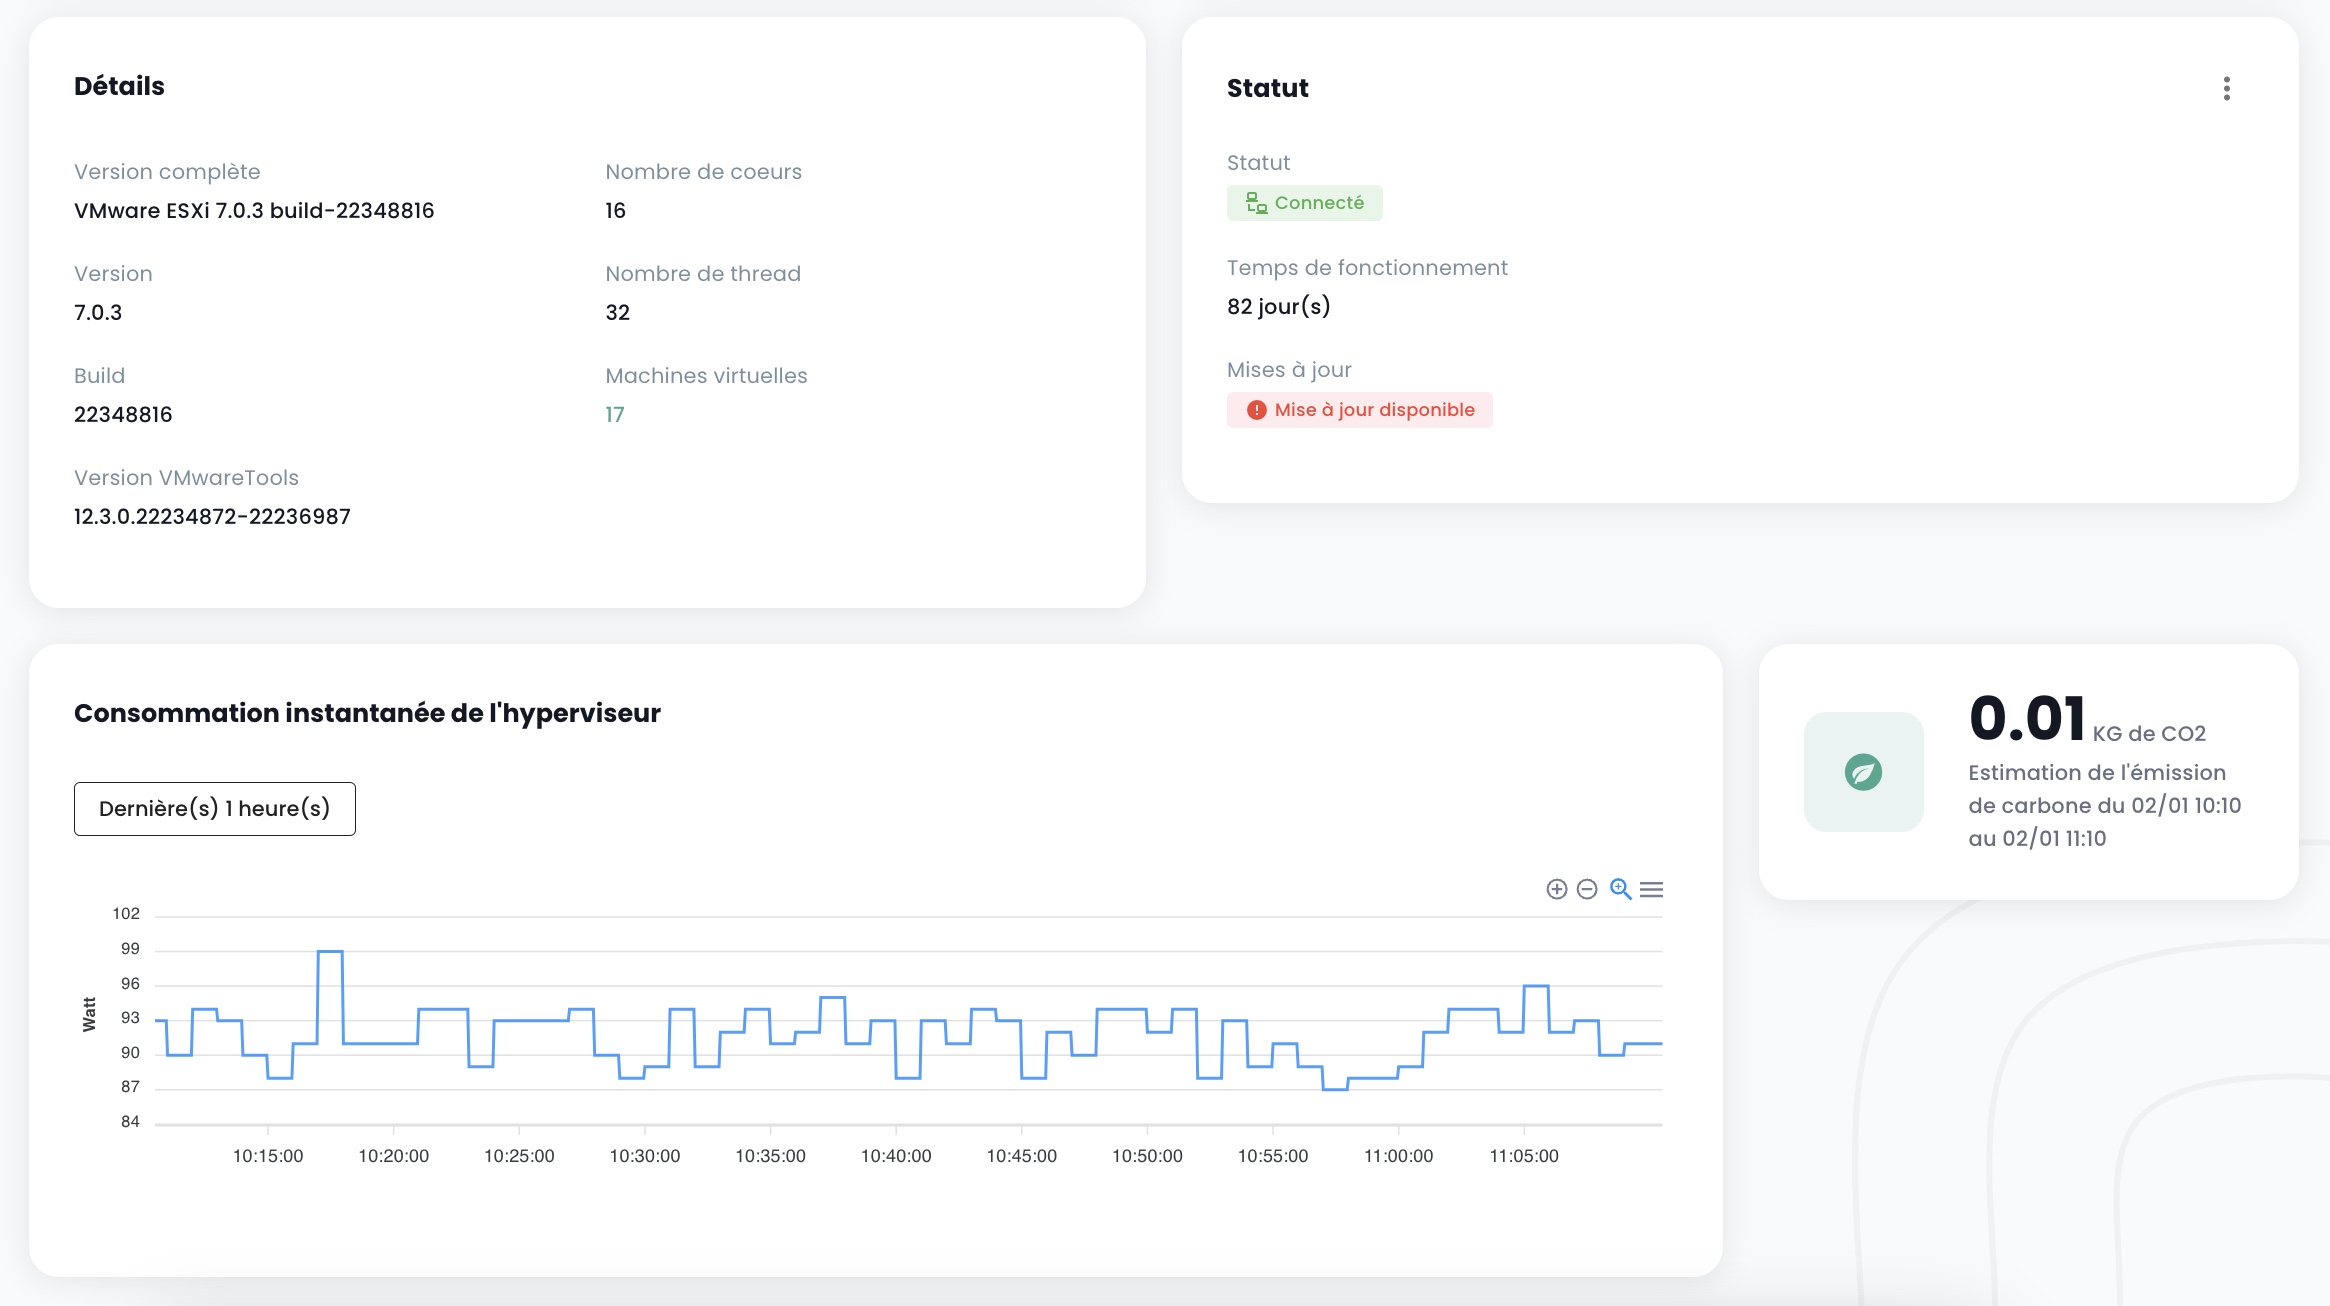
- Die Verfügbarkeit eines neuen Builds für das Hypervisor-Betriebssystem, falls vorhanden,
- Der Status des Hypervisors (connecté en production, en maintenance, éteint, ...),
- Ein Aktionsmenü.
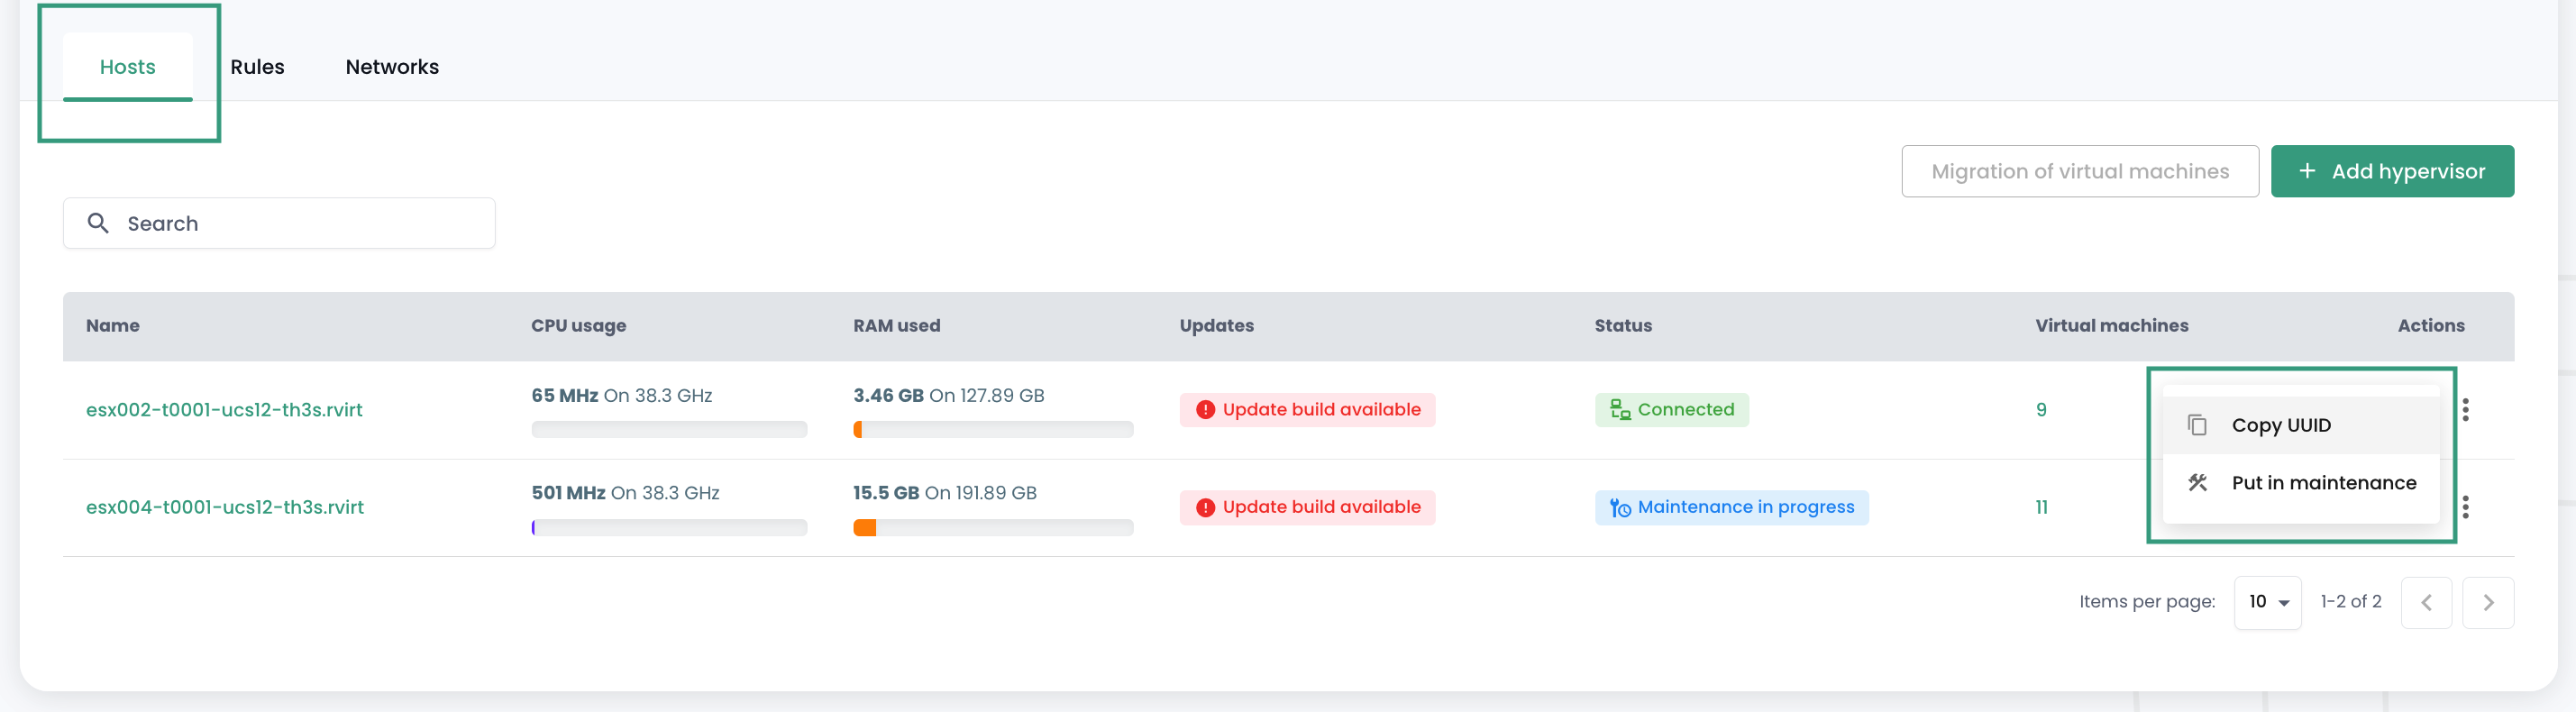
Mehrere Aktionen sind über den Reiter 'Hosts' möglich :
- Neue Hypervisor über die Schaltfläche 'Host hinzufügen' bestellen :
- Möglichkeit, die Details eines Hypervisors einzusehen :
- einen Hypervisor in den Wartungsmodus zu versetzen oder diesen zu verlassen,
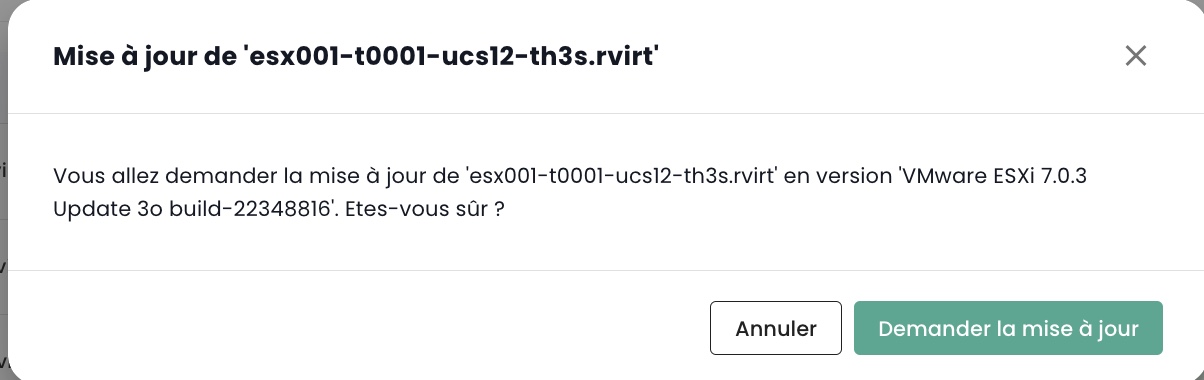
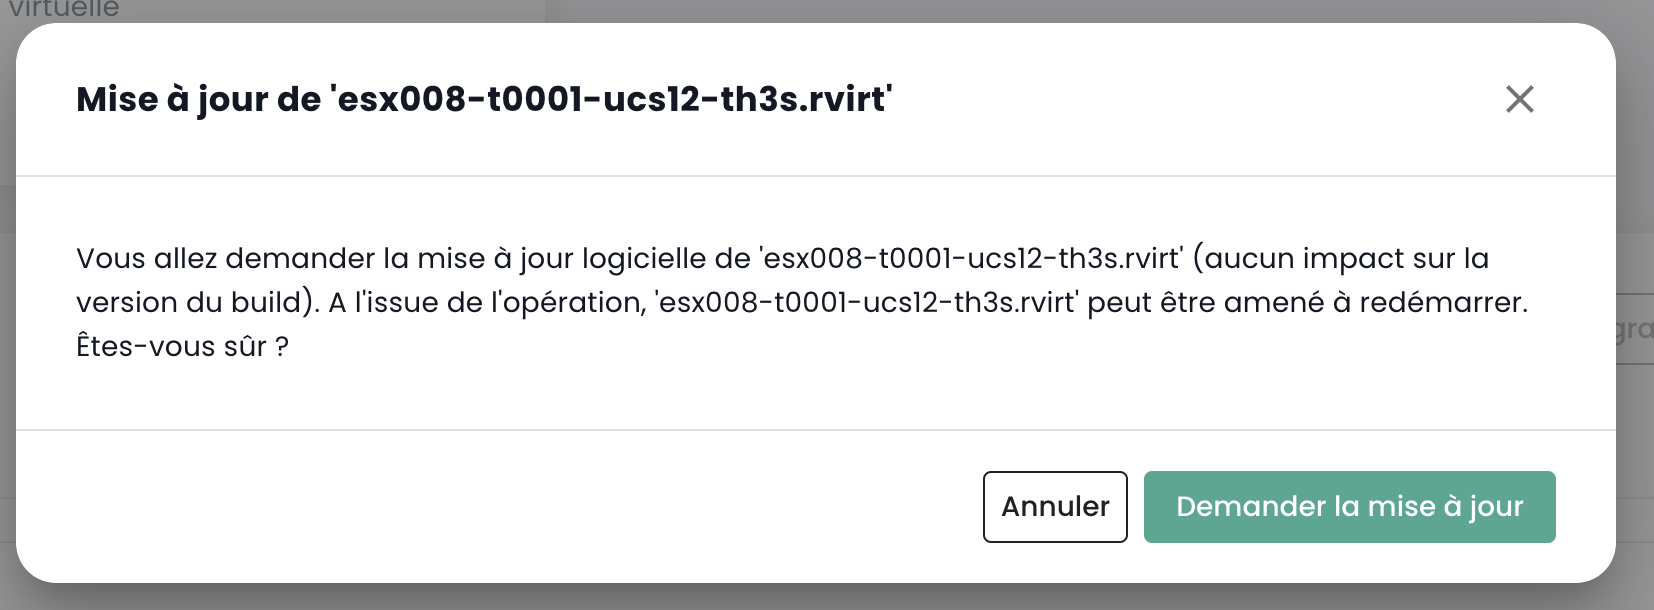
- diesen Hypervisor gegebenenfalls zu aktualisieren ; dazu muss er sich zwingend im Wartungsmodus befinden. Es gibt zwei Arten von Updates :
- VMware-Builds (les nouvelles versions de l'hyperviseur):
- Das Aktualisieren der Firmware Ihrer Compute-Blade (bios et firmware cartes filles):
Hinweis :
- Cloud Temple stellt regelmäßig Builds für Hypervisor zur Verfügung. Es ist wichtig, Ihre Hypervisor regelmäßig zu aktualisieren, insbesondere um die Anwendung von Sicherheitspatches zu ermöglichen. Allerdings aktualisieren wir Ihre Hypervisor nicht eigenständig. Cloud Temple hat keinen Einblick in die Verfügbarkeitsvereinbarungen Ihrer Workloads. Wir überlassen es Ihnen daher, Ihr Change-Management durchzuführen und die neuen Builds zum optimalen Zeitpunkt anzuwenden.
- Der Aktualisierungsprozess ist vollständig automatisiert. Sie müssen mindestens zwei Hypervisor in Ihrem Cluster vorhalten, um ein Update ohne Dienstunterbrechung zu ermöglichen.
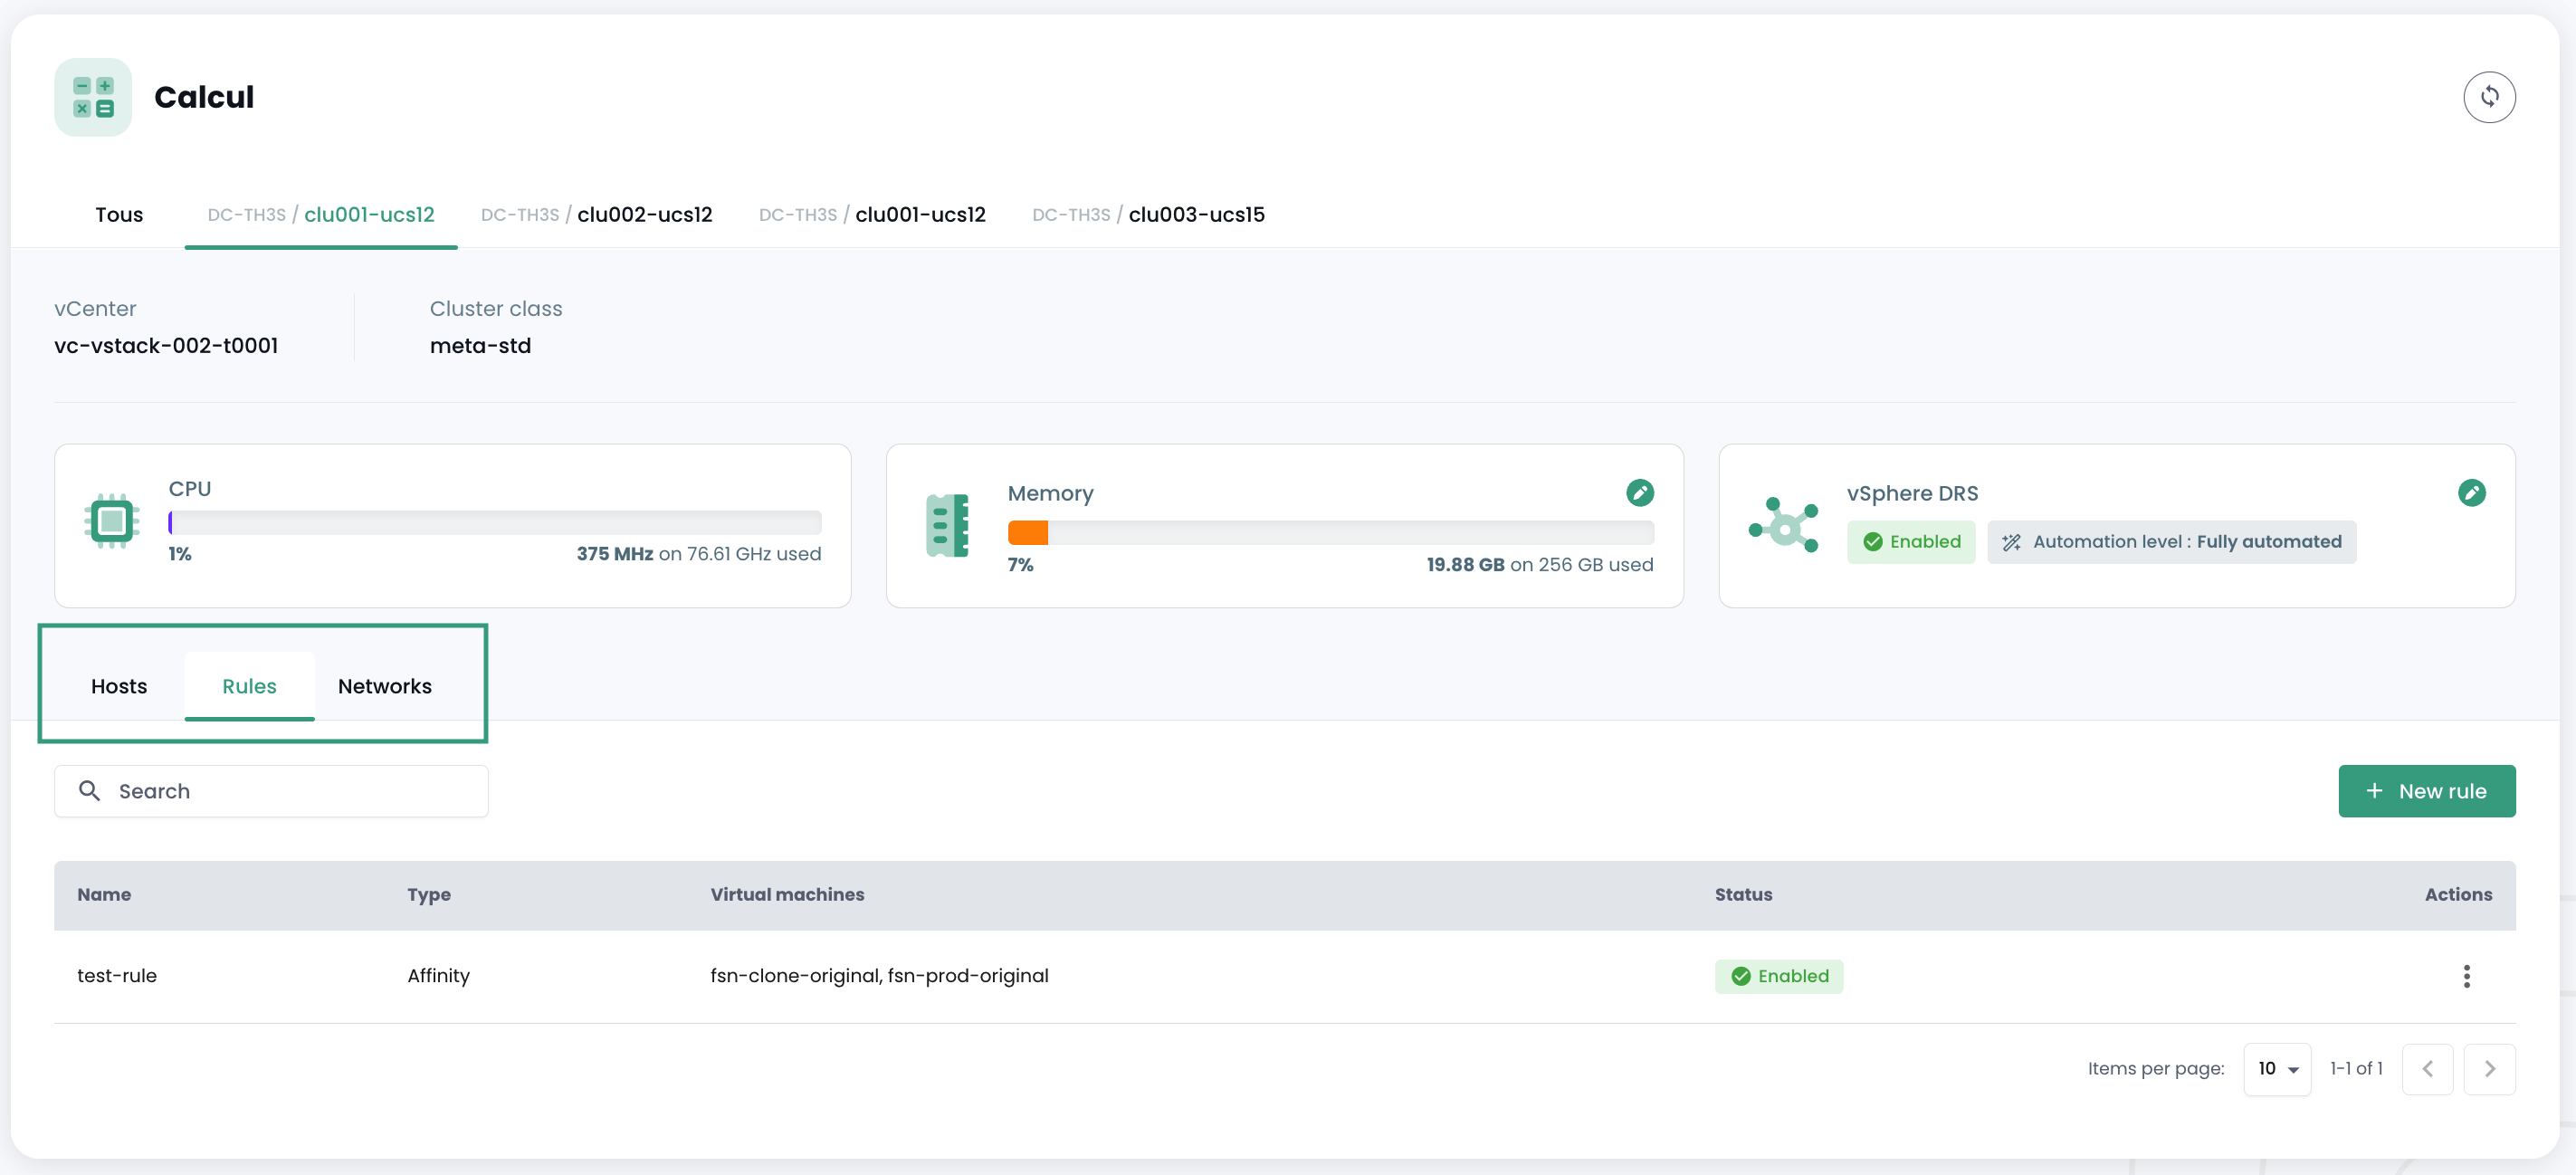
Sie sehen außerdem alle Affinitäts-/Anti-Affinitätsregeln für Ihren Hypervisor-Cluster im Bereich 'Regeln'.
Verwaltung der Affinität Ihrer virtuellen Maschinen
Die Affinitäts- und Anti-Affinitätsregeln ermöglichen die Steuerung des Standorts Ihrer virtuellen Maschinen auf Ihren Hypervisoren. Sie können zur Verwaltung der Ressourcennutzung Ihres 'Cpool' eingesetzt werden. Beispielsweise können sie dabei helfen, die Workloads zwischen den Servern zu verteilen oder ressourcenintensive Workloads zu isolieren. In einem 'Cpool' VMware werden diese Regeln häufig verwendet, um das Verhalten der virtuellen Maschinen im Zusammenhang mit vMotion zu steuern. vMotion ermöglicht das Verschieben virtueller Maschinen von einem Host auf einen anderen ohne Dienstunterbrechung.
Über die Regelverwaltung können Sie Folgendes konfigurieren:
-
Affinitätsregeln: Diese Regeln stellen sicher, dass bestimmte virtuelle Maschinen auf demselben physischen Host ausgeführt werden. Sie werden zur Leistungsverbesserung eingesetzt, indem häufig kommunizierende virtuelle Maschinen auf demselben Server gehalten werden, um die Netzwerklatenz zu reduzieren. Affinitätsregeln sind in Szenarien nützlich, in denen die Leistung kritisch ist, wie beispielsweise bei Datenbanken oder Anwendungen, die eine schnelle Kommunikation zwischen den Servern erfordern.
-
Anti-Affinitätsregeln: Im Gegensatz dazu stellen diese Regeln sicher, dass bestimmte virtuelle Maschinen nicht auf demselben physischen Host ausgeführt werden. Sie sind wichtig für Verfügbarkeit und Resilienz, beispielsweise um zu verhindern, dass kritische Maschinen bei einem einzelnen Serverausfall alle betroffen sind. Anti-Affinitätsregeln sind entscheidend für Anwendungen, die eine hohe Verfügbarkeit erfordern, wie in Produktionsumgebungen, in denen Ausfalltoleranz Priorität hat. Beispielsweise möchten Sie nicht, dass sich Ihre beiden Active Directory-Instanzen auf demselben Hypervisor befinden.
Bei der Erstellung einer Regel definieren Sie den Regeltyp (affinité / anti-affinité), den Namen der Regel, ihren Aktivierungszustand ('Status') und die betroffenen Maschinen Ihres Hypervisor-Clusters.
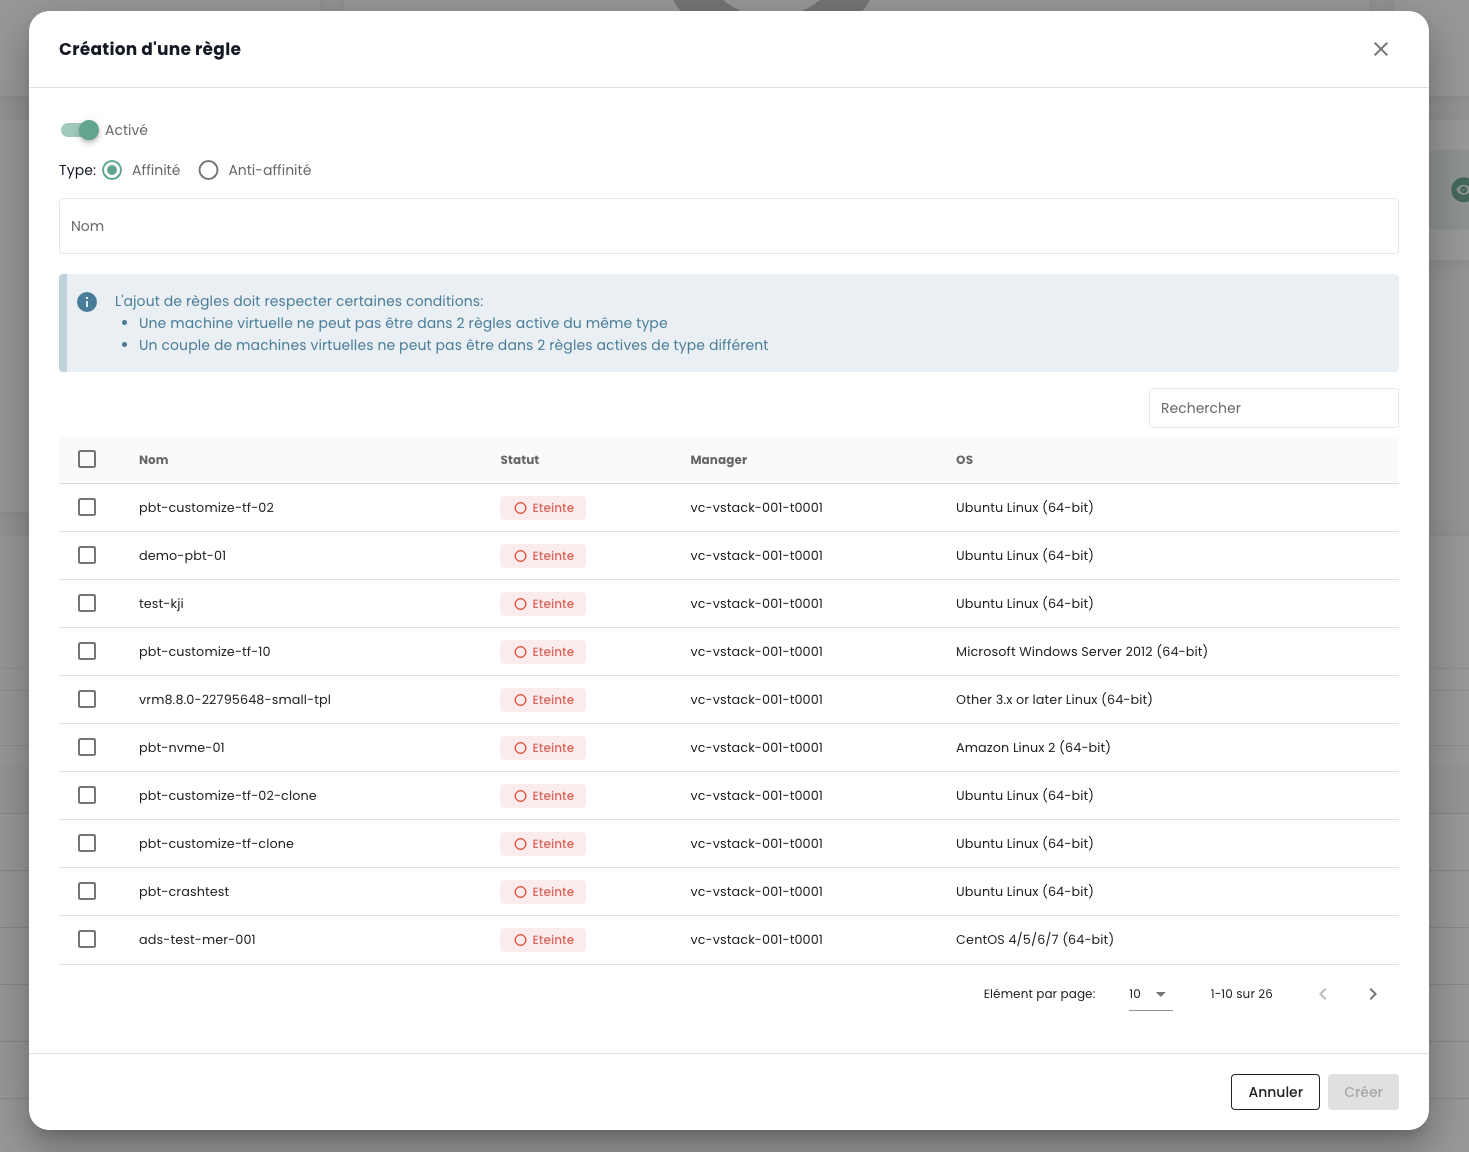
Hinweis: Die in der Konsole angebotenen Affinitäts-/Anti-Affinitätsregeln gelten für die Kommunikation zwischen den virtuellen Maschinen untereinander (keine Regeln zwischen Hypervisoren und virtuellen Maschinen).
Backup
Eine Sicherungsrichtlinie erstellen
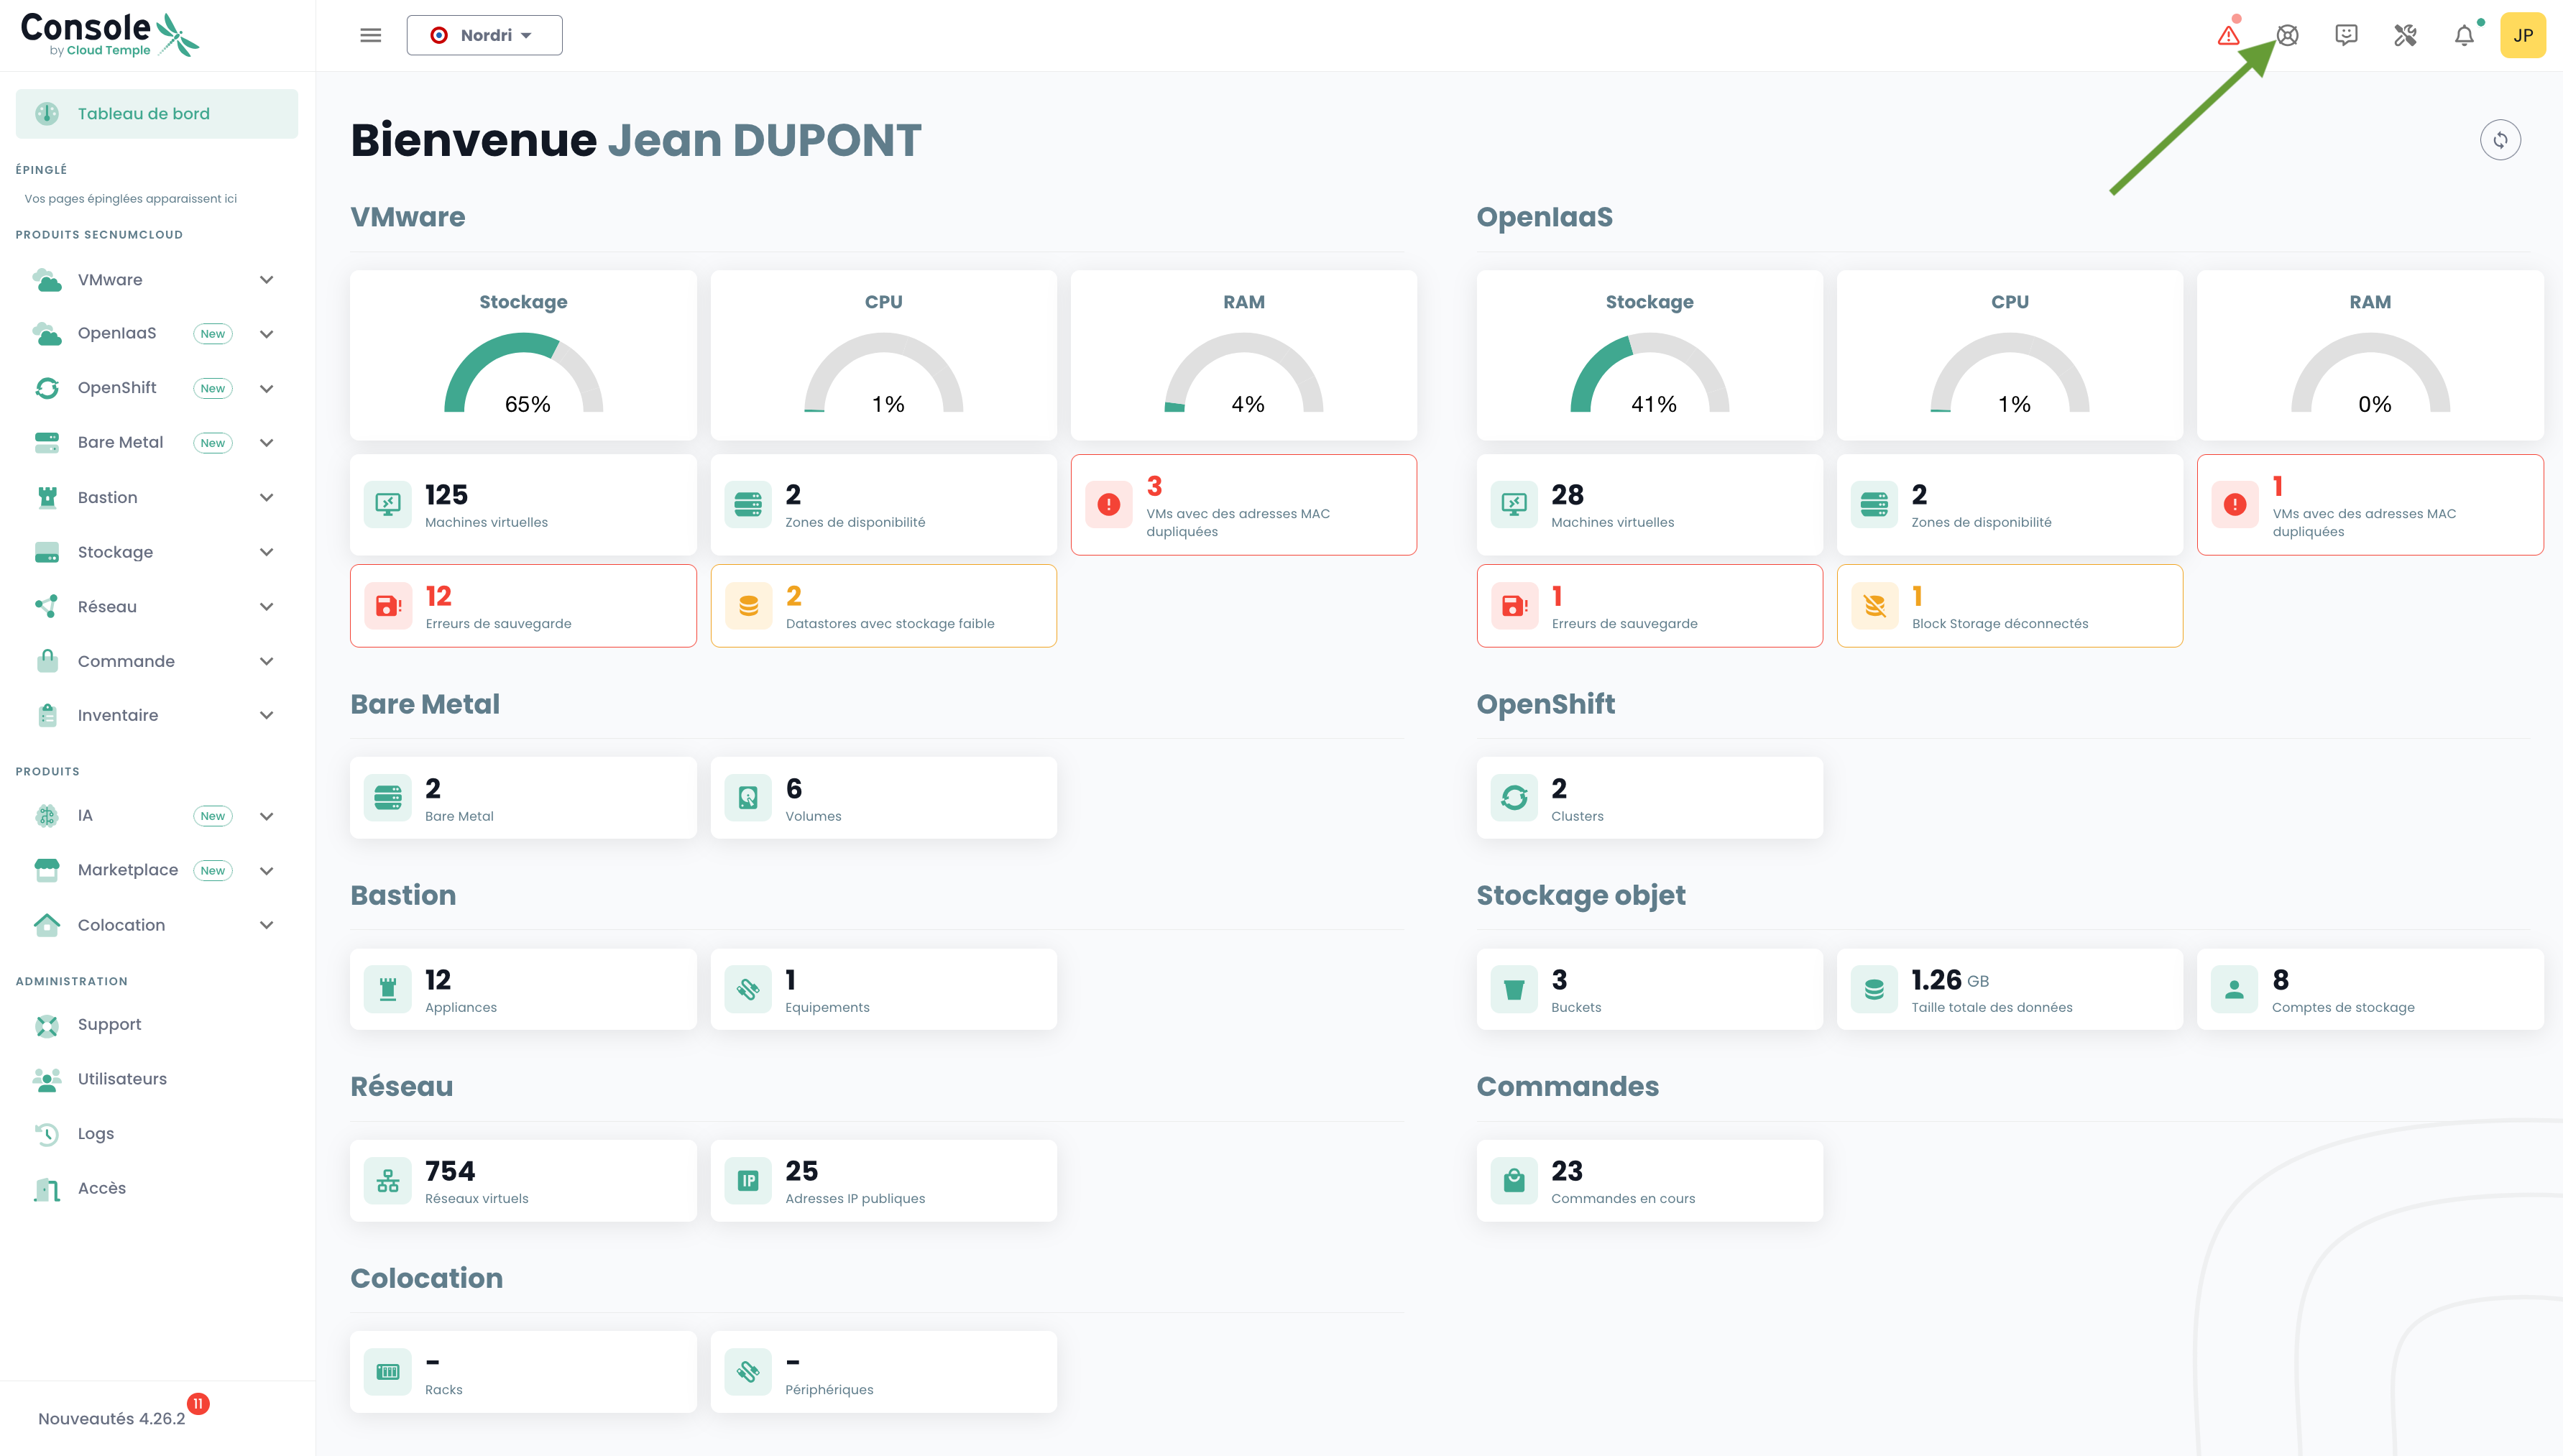
Um eine neue Sicherungsrichtlinie hinzuzufügen, muss eine Anfrage an den Support gestellt werden. Der Support ist über das Rettungsring-Symbol oben rechts im Fenster erreichbar.
Die Erstellung einer neuen Sicherungsrichtlinie erfolgt über eine Serviceanfrage mit folgenden Angaben:
Der Name Ihrer Organisation Der Name eines Ansprechpartners mit E-Mail-Adresse und Telefonnummer zur Fertigstellung der Konfiguration Der Name des Tenants Der Name der Sicherungsrichtlinie Die Eigenschaften (x Tage, y Wochen, z Monate, ...)
Sicherungsrichtlinie einer virtuellen Maschine zuweisen
Wenn einer virtuellen Maschine (VM) eine SLA zugewiesen wird, übernehmen alle mit dieser VM zugeordneten Festplatten automatisch dieselbe SLA. Anschließend kann die Sicherung manuell über die Registerkarte "Sicherungsrichtlinien" gestartet werden. Falls keine manuelle Ausführung erfolgt, wird die Sicherung automatisch gemäß dem von der SLA konfigurierten Zeitplan ausgeführt.
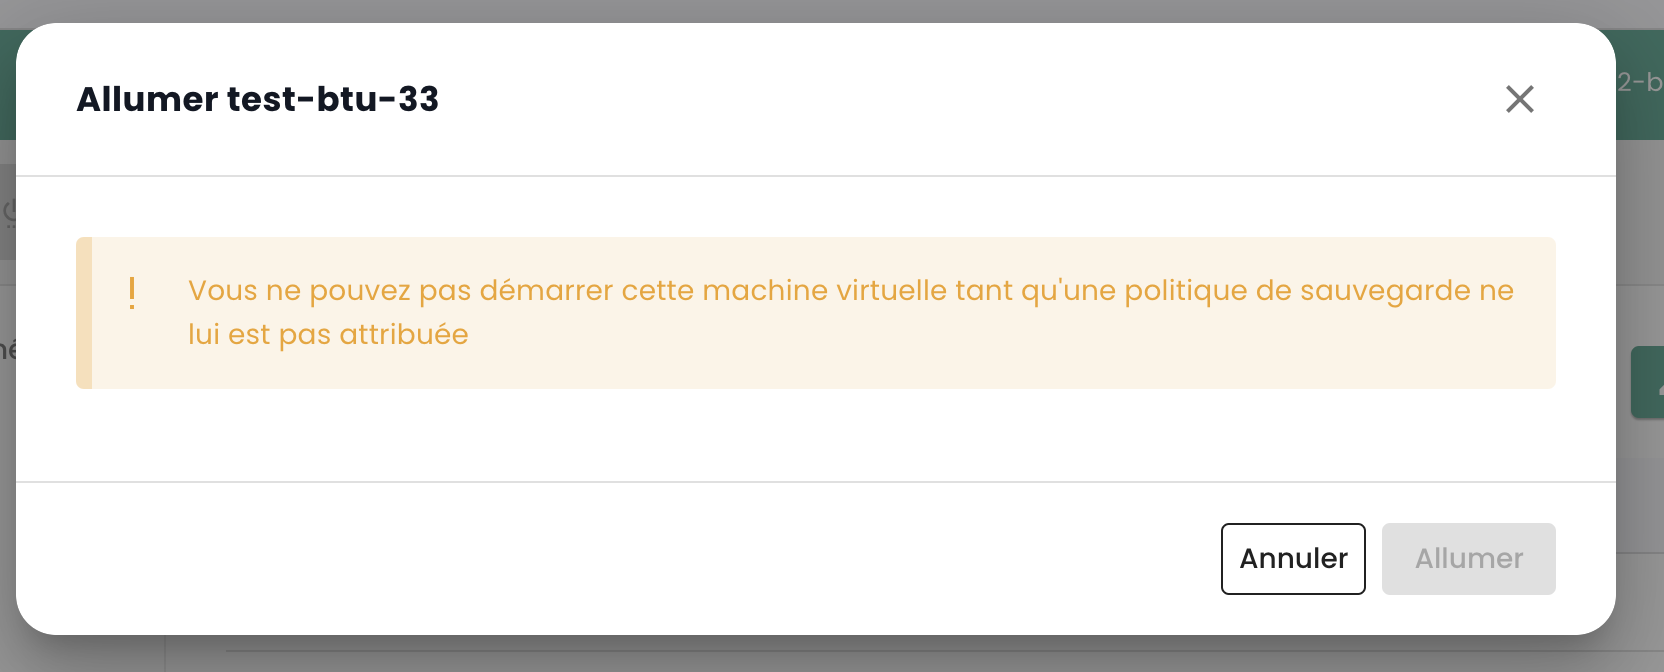
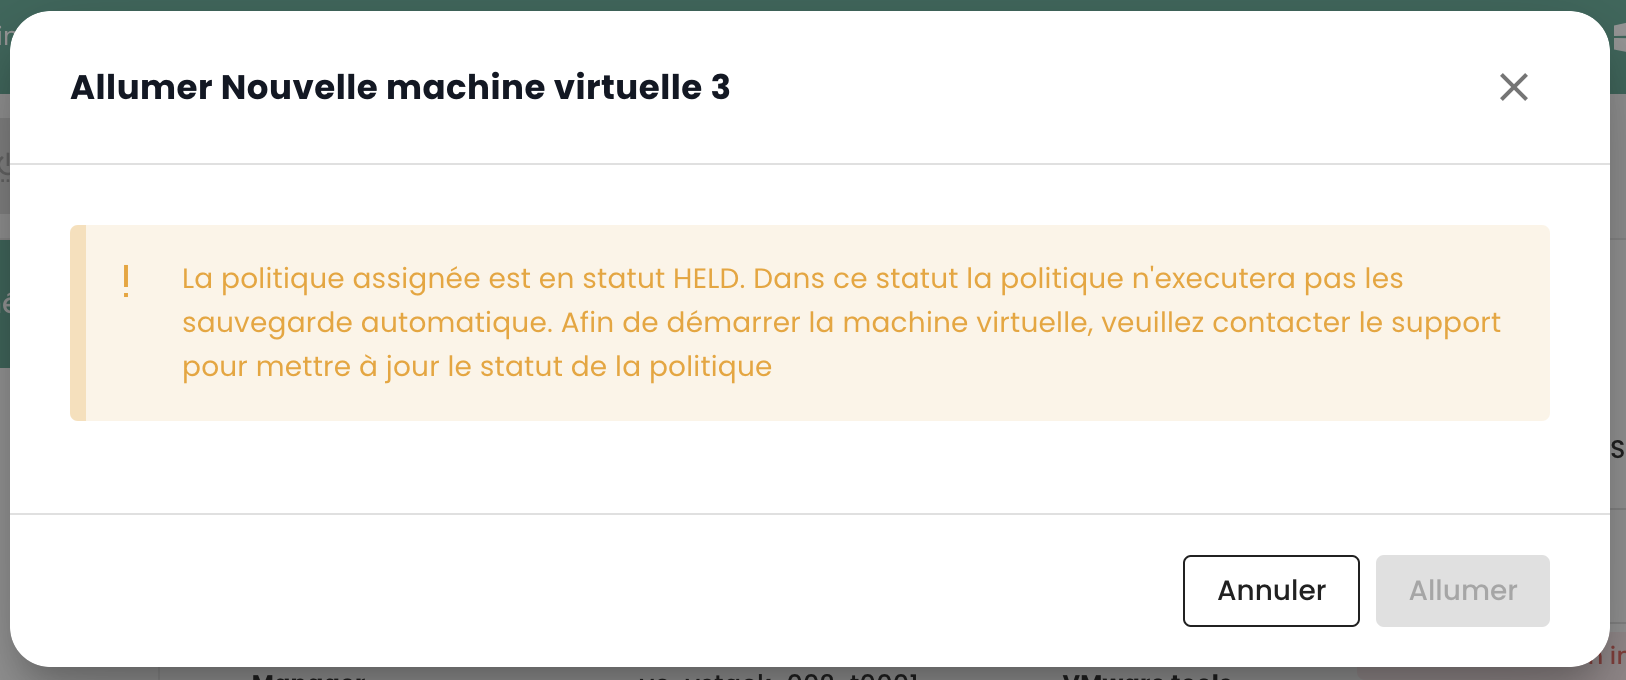
SecNumCloud macht die Zuweisung einer Sicherungsrichtlinie an eine virtuelle Maschine vor deren Start obligatorisch. Andernfalls erhalten Sie die folgende Meldung:
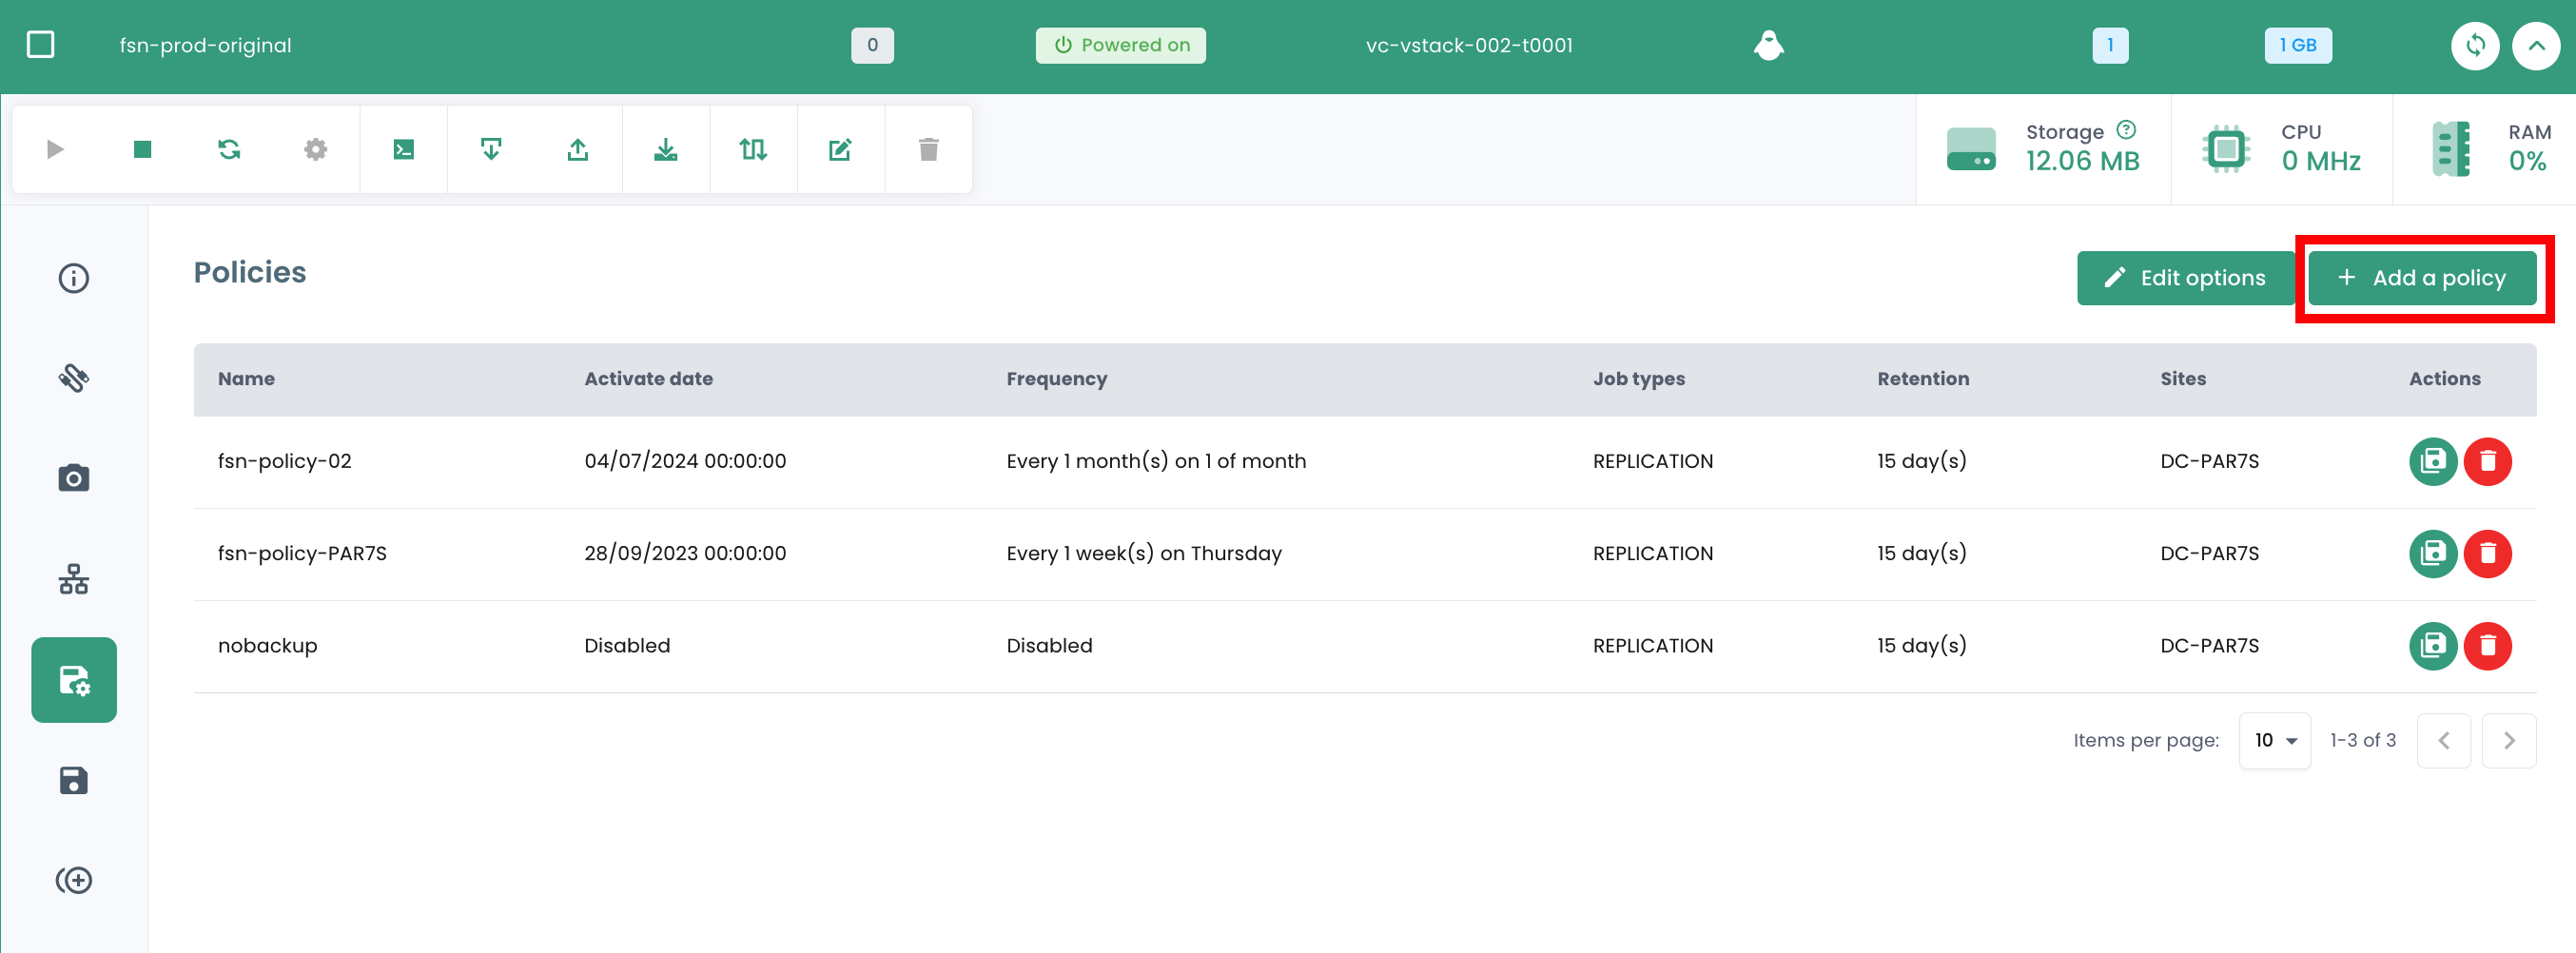
Klicken Sie auf die Registerkarte 'Sicherungsrichtlinien' im Menü Ihrer virtuellen Maschine. Dort können Sie die dieser Maschine zugewiesenen Sicherungsrichtlinien einsehen.
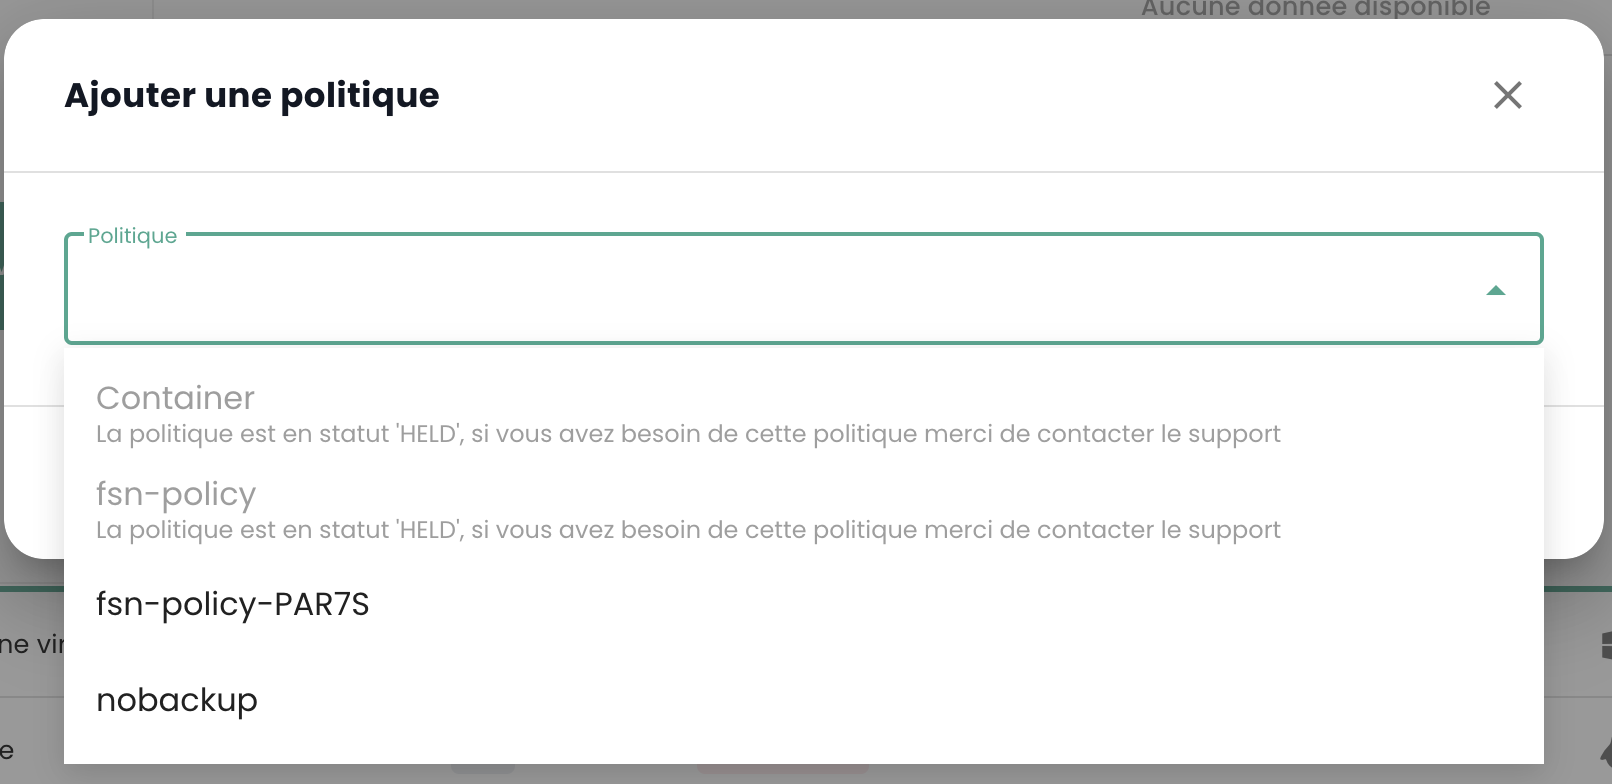
Um der virtuellen Maschine eine neue Sicherungsrichtlinie zuzuweisen, klicken Sie auf die Schaltfläche 'Richtlinie hinzufügen' und wählen Sie die gewünschte Sicherungsrichtlinie aus.
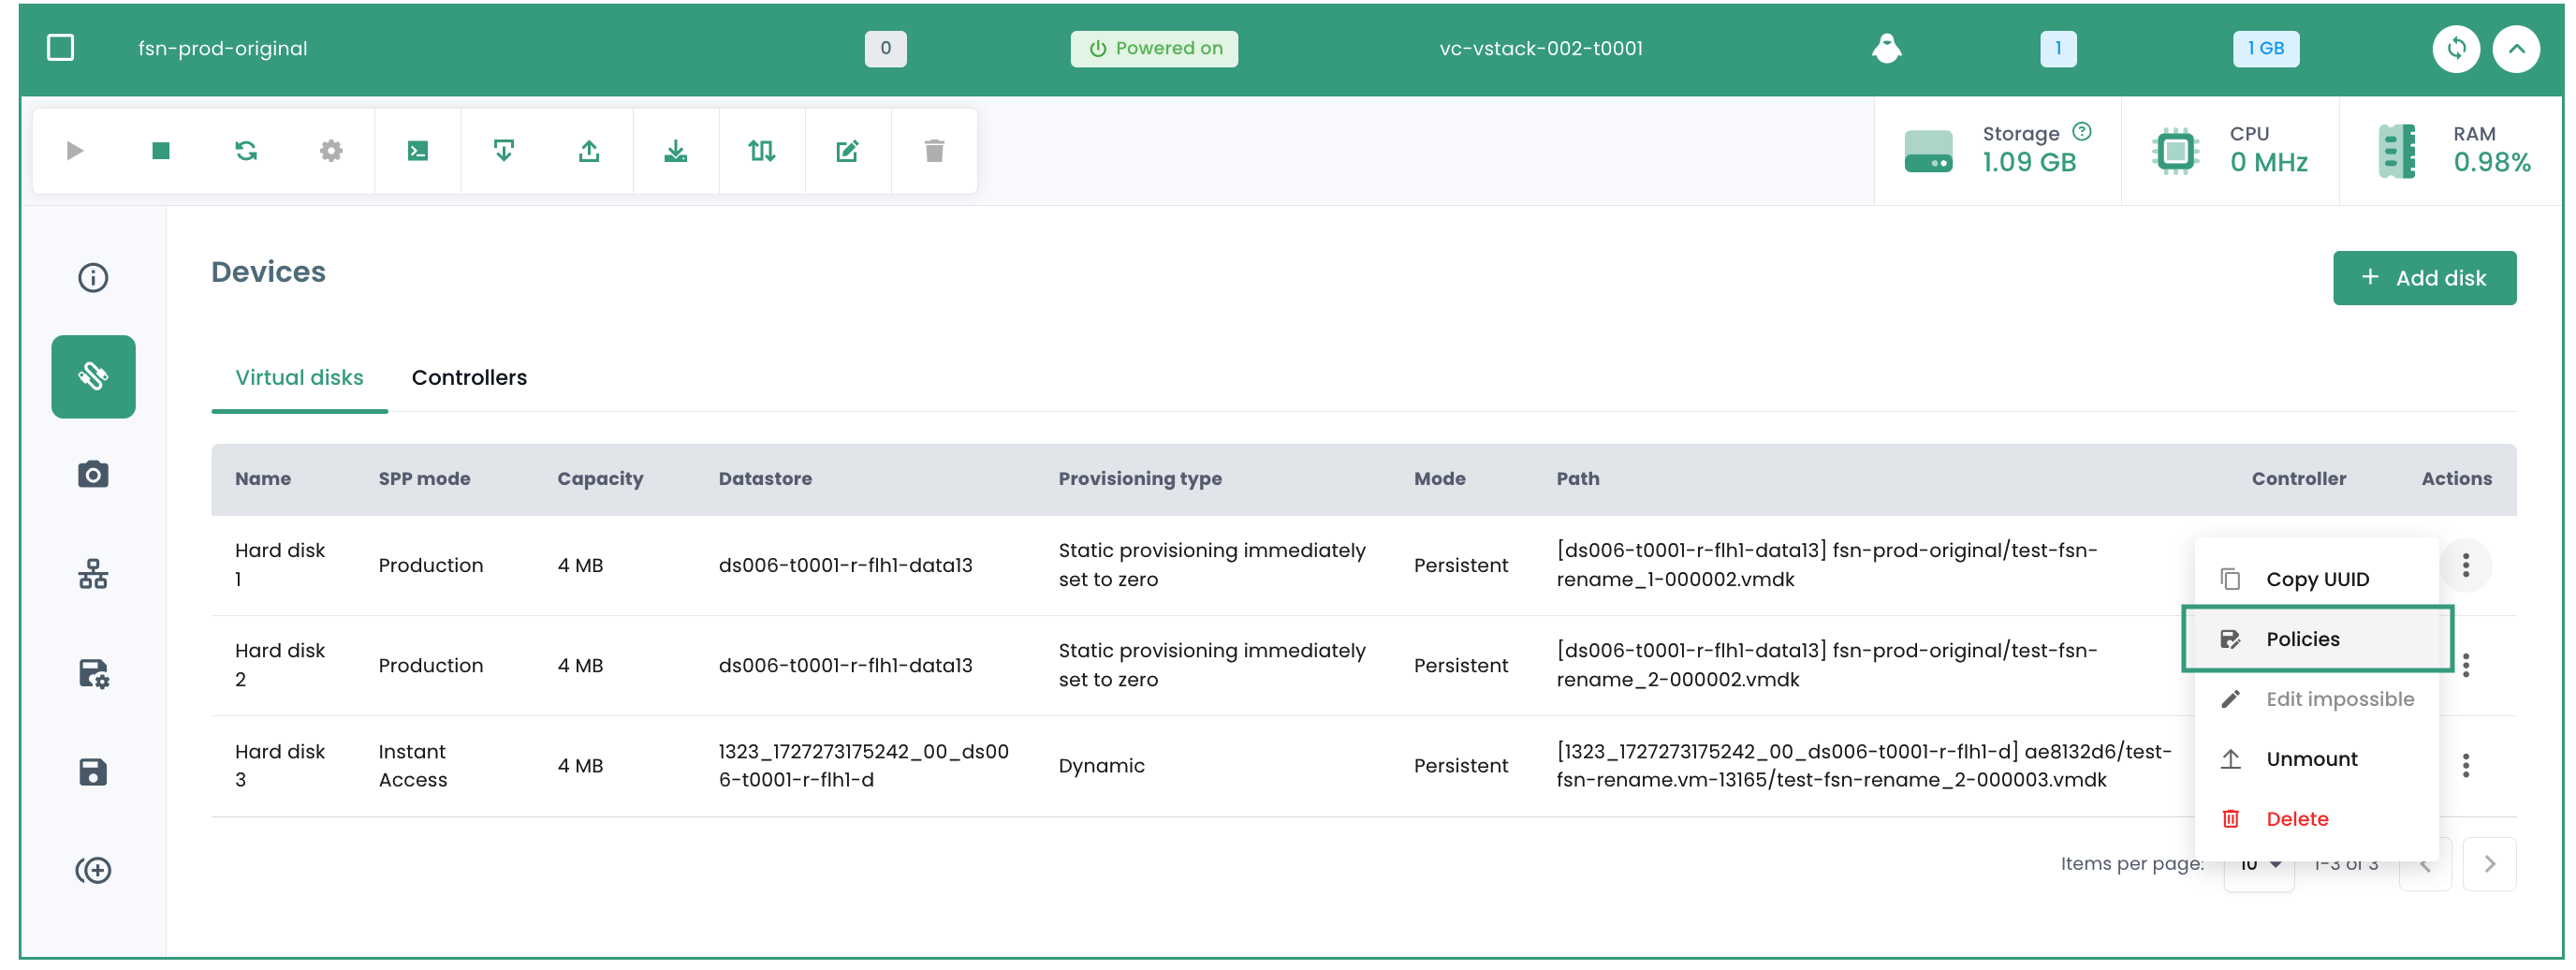
Zuweisen einer Sicherungsrichtlinie an eine virtuelle Festplatte
Es ist auch möglich, eine SLA direkt einer bestimmten virtuellen Festplatte einer Maschine zuzuweisen. In diesem Fall erbt die virtuelle Maschine diese SLA nicht, die individuell der Festplatte zugewiesen wurde. Allerdings ist es nicht möglich, die Sicherung auf Festplattenebene manuell auszuführen, da diese Funktion in Spectrum Protect Plus nicht unterstützt wird.
Umgekehrt ist es möglich, bestimmte Festplatten von einer oder mehreren Sicherungsrichtlinien (SLA) der VM auszuschließen, wodurch die Zuweisung einer oder mehrerer SLA(s) festplattenweise aufgehoben werden kann. Dieser Ansatz bietet die Flexibilität, die Sicherung einer SLA manuell auszuführen, ohne alle Festplatten der virtuellen Maschine zu beeinflussen, und ermöglicht so ein feineres Backup-Management.
Klicken Sie auf die Aktionsleiste der Festplatte, der Sie eine Sicherungsrichtlinie zuweisen möchten. Klicken Sie anschließend auf 'Richtlinien' und wählen Sie die gewünschte Sicherungsrichtlinie aus.
Hinweis: Die hinzuzufügende Richtlinie muss sich in einer anderen Verfügbarkeitszone als die virtuelle Maschine befinden.
Backup-Richtlinie ausführen
Im Menü 'Backup-Richtlinien' Ihrer virtuellen Maschine klicken Sie auf die Schaltfläche 'Ausführen' in der Spalte 'Aktionen' der Backup-Richtlinie, die Sie ausführen möchten.
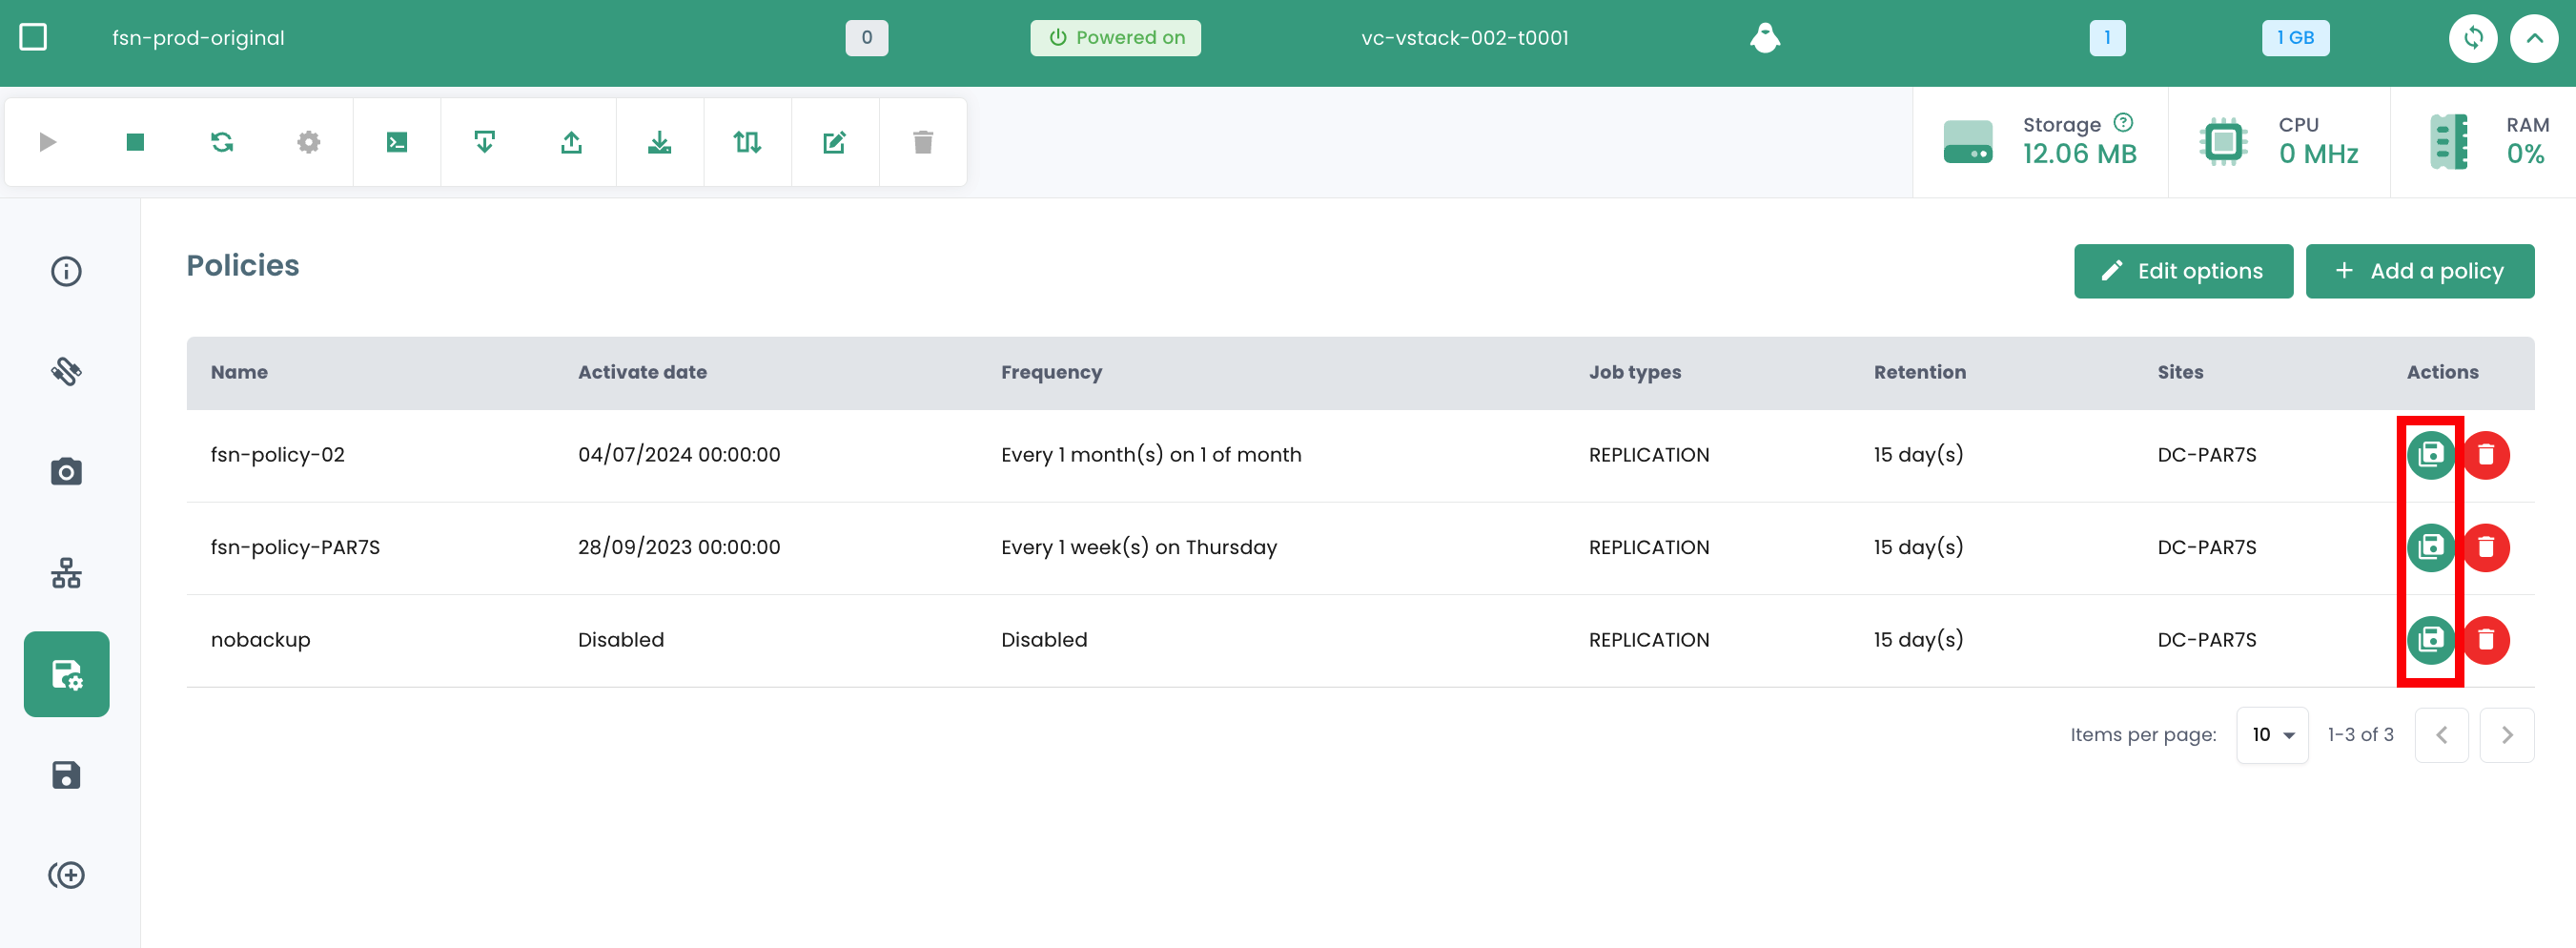
Um eine Backup-Richtlinie auszuführen, können Sie auch im Menü Ihrer virtuellen Maschine in den Bereich 'Backups' wechseln. Klicken Sie auf die Schaltfläche 'Backup ausführen' und wählen Sie dann das Backup aus der Dropdown-Liste aus, das Sie ausführen möchten.

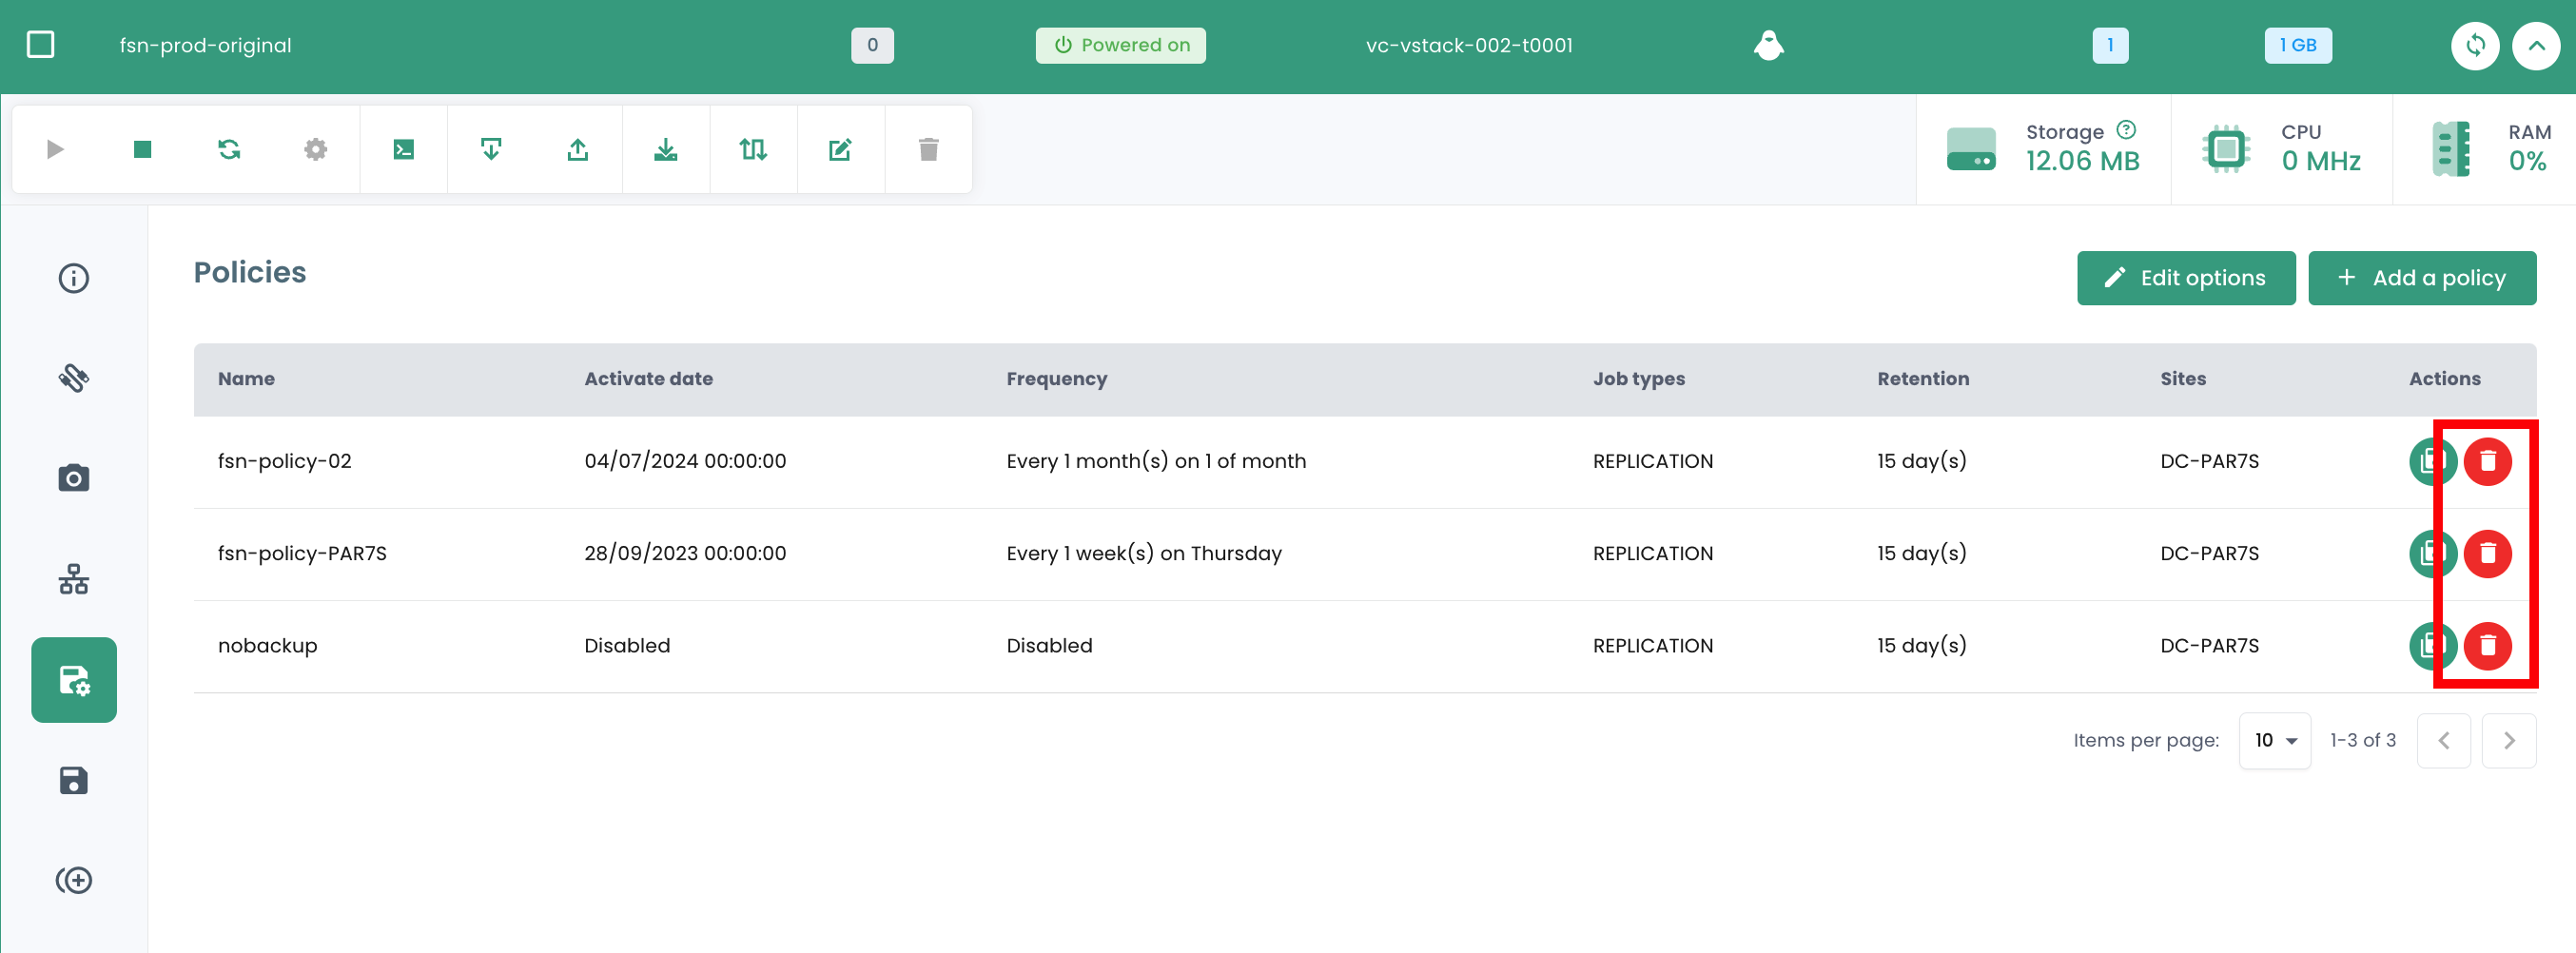
Backup-Richtlinie entfernen
Im Menü 'Backup-Richtlinien' Ihrer virtuellen Maschine klicken Sie auf die Schaltfläche 'Entfernen' in der Spalte 'Aktionen' der Backup-Richtlinie, die Sie entfernen möchten.
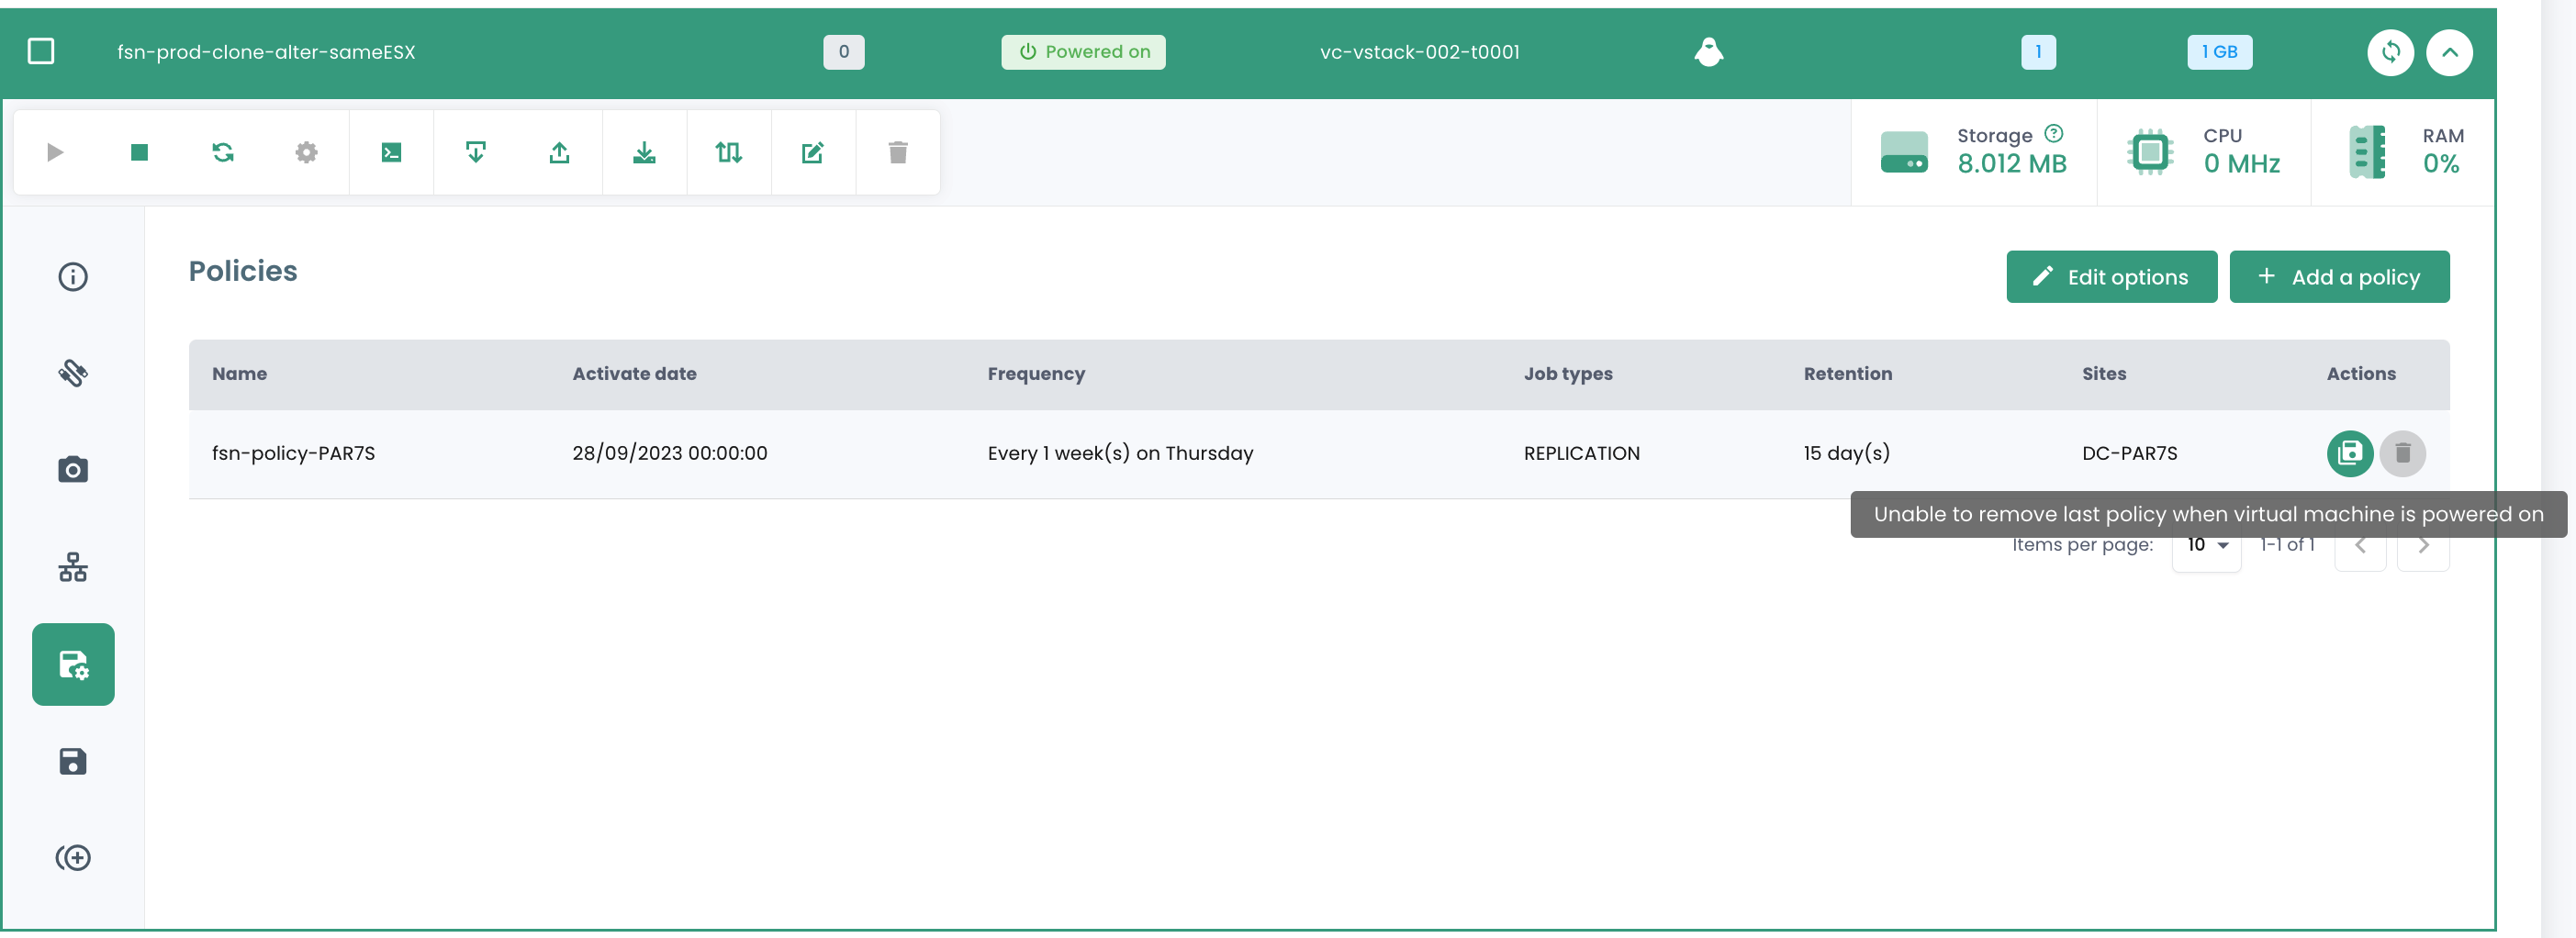
Achtung: Es ist nicht möglich, die letzte SLA auf einer gestarteten virtuellen Maschine zu entfernen:
Löschen einer Sicherungsrichtlinie: Fall einer angehaltenen ("held") Sicherungsrichtlinie
Wenn die letzte Ressource von einer SLA-Richtlinie getrennt wird, erkennt das System diesen Zustand automatisch. Infolgedessen wechseln alle mit dieser SLA-Richtlinie verknüpften Jobs automatisch in den Status "Angehalten" ("Held"). Es ist wichtig zu beachten, dass das direkte Löschen der SLA-Richtlinie zu diesem Zeitpunkt aufgrund vorhandener abhängiger Jobs nicht möglich ist. Um die Richtlinie zu löschen, muss eine Reihe von Schritten befolgt werden.
Es muss überprüft werden, ob die betreffenden Jobs tatsächlich den Status "Angehalten" aufweisen. Nach Abschluss dieser Überprüfung können diese Jobs gelöscht werden. Erst nach dem Löschen dieser abhängigen Jobs kann die SLA-Richtlinie endgültig aus dem System entfernt werden.
Ein Sonderfall erfordert besondere Aufmerksamkeit: das Hinzufügen einer neuen Ressource zu einer SLA-Richtlinie, deren abhängige Jobs nicht gelöscht wurden. In diesem Fall werden die Job-IDs beibehalten. Es ist jedoch entscheidend zu beachten, dass Jobs im Status "Angehalten" nicht automatisch fortgesetzt werden. Es ist ein manueller Eingriff erforderlich, um sie wieder zu aktivieren und ihre Ausführung zu ermöglichen.
Hinweis: Für weitere Informationen zu dieser Situation wenden Sie sich an den Cloud Temple Support.
Die Cloud Temple-Konsole verhindert die Zuweisung einer virtuellen Maschine an eine angehaltene Richtlinie:
Ebenso ist es nicht möglich, eine virtuelle Maschine zu starten, die einer angehaltenen Sicherungsrichtlinie zugeordnet ist:
Backup wiederherstellen
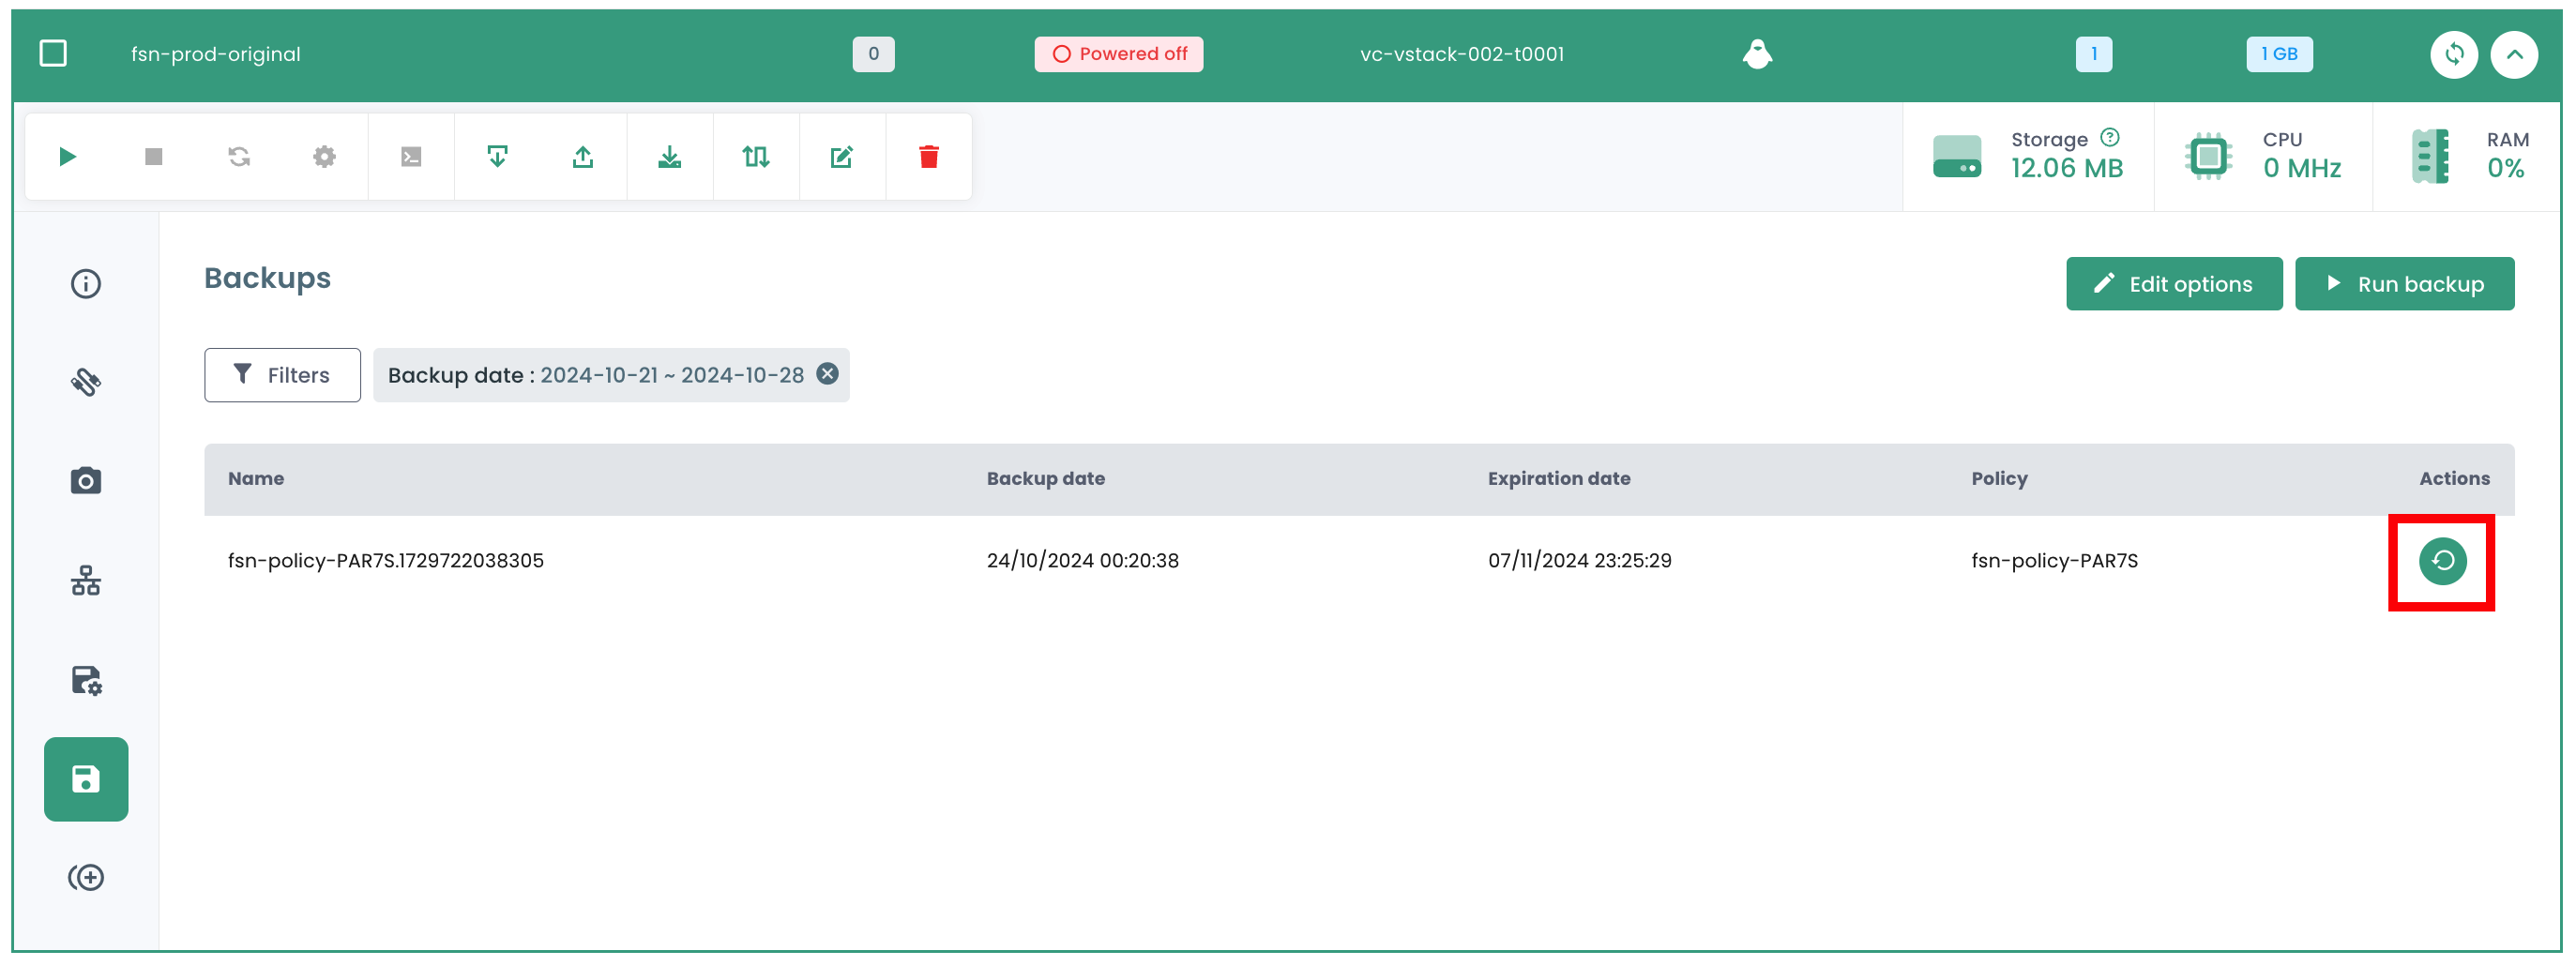
Über die Registerkarte 'Backups' im Menü Ihrer virtuellen Maschinen können Sie auf die Liste der Backups dieser Maschinen zugreifen. Um ein Backup wiederherzustellen, klicken Sie auf die Schaltfläche 'Wiederherstellen' in der Zeile, die dem wiederherzustellenden Backup entspricht.
-
Produktionsmodus: Der Produktionsmodus ermöglicht die Wiederherstellung nach einem Ausfall am lokalen Standort vom primären Speicher oder einem entfernten Disaster-Recovery-Standort aus, indem die ursprünglichen Maschinen-Images durch Wiederherstellungs-Images ersetzt werden. Alle Konfigurationen werden im Rahmen der Wiederherstellung übertragen, einschließlich der Namen und Kennungen, und alle mit der virtuellen Maschine verbundenen Datenkopierjobs werden weiterhin ausgeführt. Im Rahmen einer Wiederherstellung im Produktionsmodus können Sie wählen, ob der Speicher in der virtuellen Maschine durch eine virtuelle Festplatte aus einem vorherigen virtuellen Maschinen-Backup ersetzt werden soll.
-
Testmodus: Der Testmodus erstellt temporäre virtuelle Maschinen für Entwicklung, Tests, Snapshot-Überprüfungen und Disaster-Recovery-Tests gemäß einem wiederholbaren Zeitplan, ohne Auswirkungen auf Produktionsumgebungen. Die Testmaschinen werden so lange ausgeführt, wie für den Test und die Überprüfung erforderlich, und anschließend bereinigt. Über ein isoliertes Netzwerk können Sie eine sichere Umgebung einrichten, um Ihre Jobs zu testen, ohne die für die Produktion verwendeten virtuellen Maschinen zu beeinträchtigen. Die im Testmodus erstellten virtuellen Maschinen verfügen über eindeutige Namen und Kennungen, um Konflikte in Ihrer Produktionsumgebung zu vermeiden.
-
Klonmodus: Der Klonmodus erstellt Kopien der virtuellen Maschinen für Anwendungsfälle, die permanente oder langlaufende Kopien zur Datenerkundung oder zur Duplizierung einer Testumgebung in einem isolierten Netzwerk erfordern. Die im Klonmodus erstellten virtuellen Maschinen verfügen über eindeutige Namen und Kennungen, um Konflikte in Ihrer Produktionsumgebung zu vermeiden. Im Klonmodus müssen Sie auf den Ressourcenverbrauch achten, da der Klonmodus permanente oder langlaufende Maschinen erstellt.
Die Wiederherstellung erfolgt standardmäßig im "TEST"-Modus, um die Produktion zu schützen und Sie können den Namen der wiederhergestellten VM wählen:
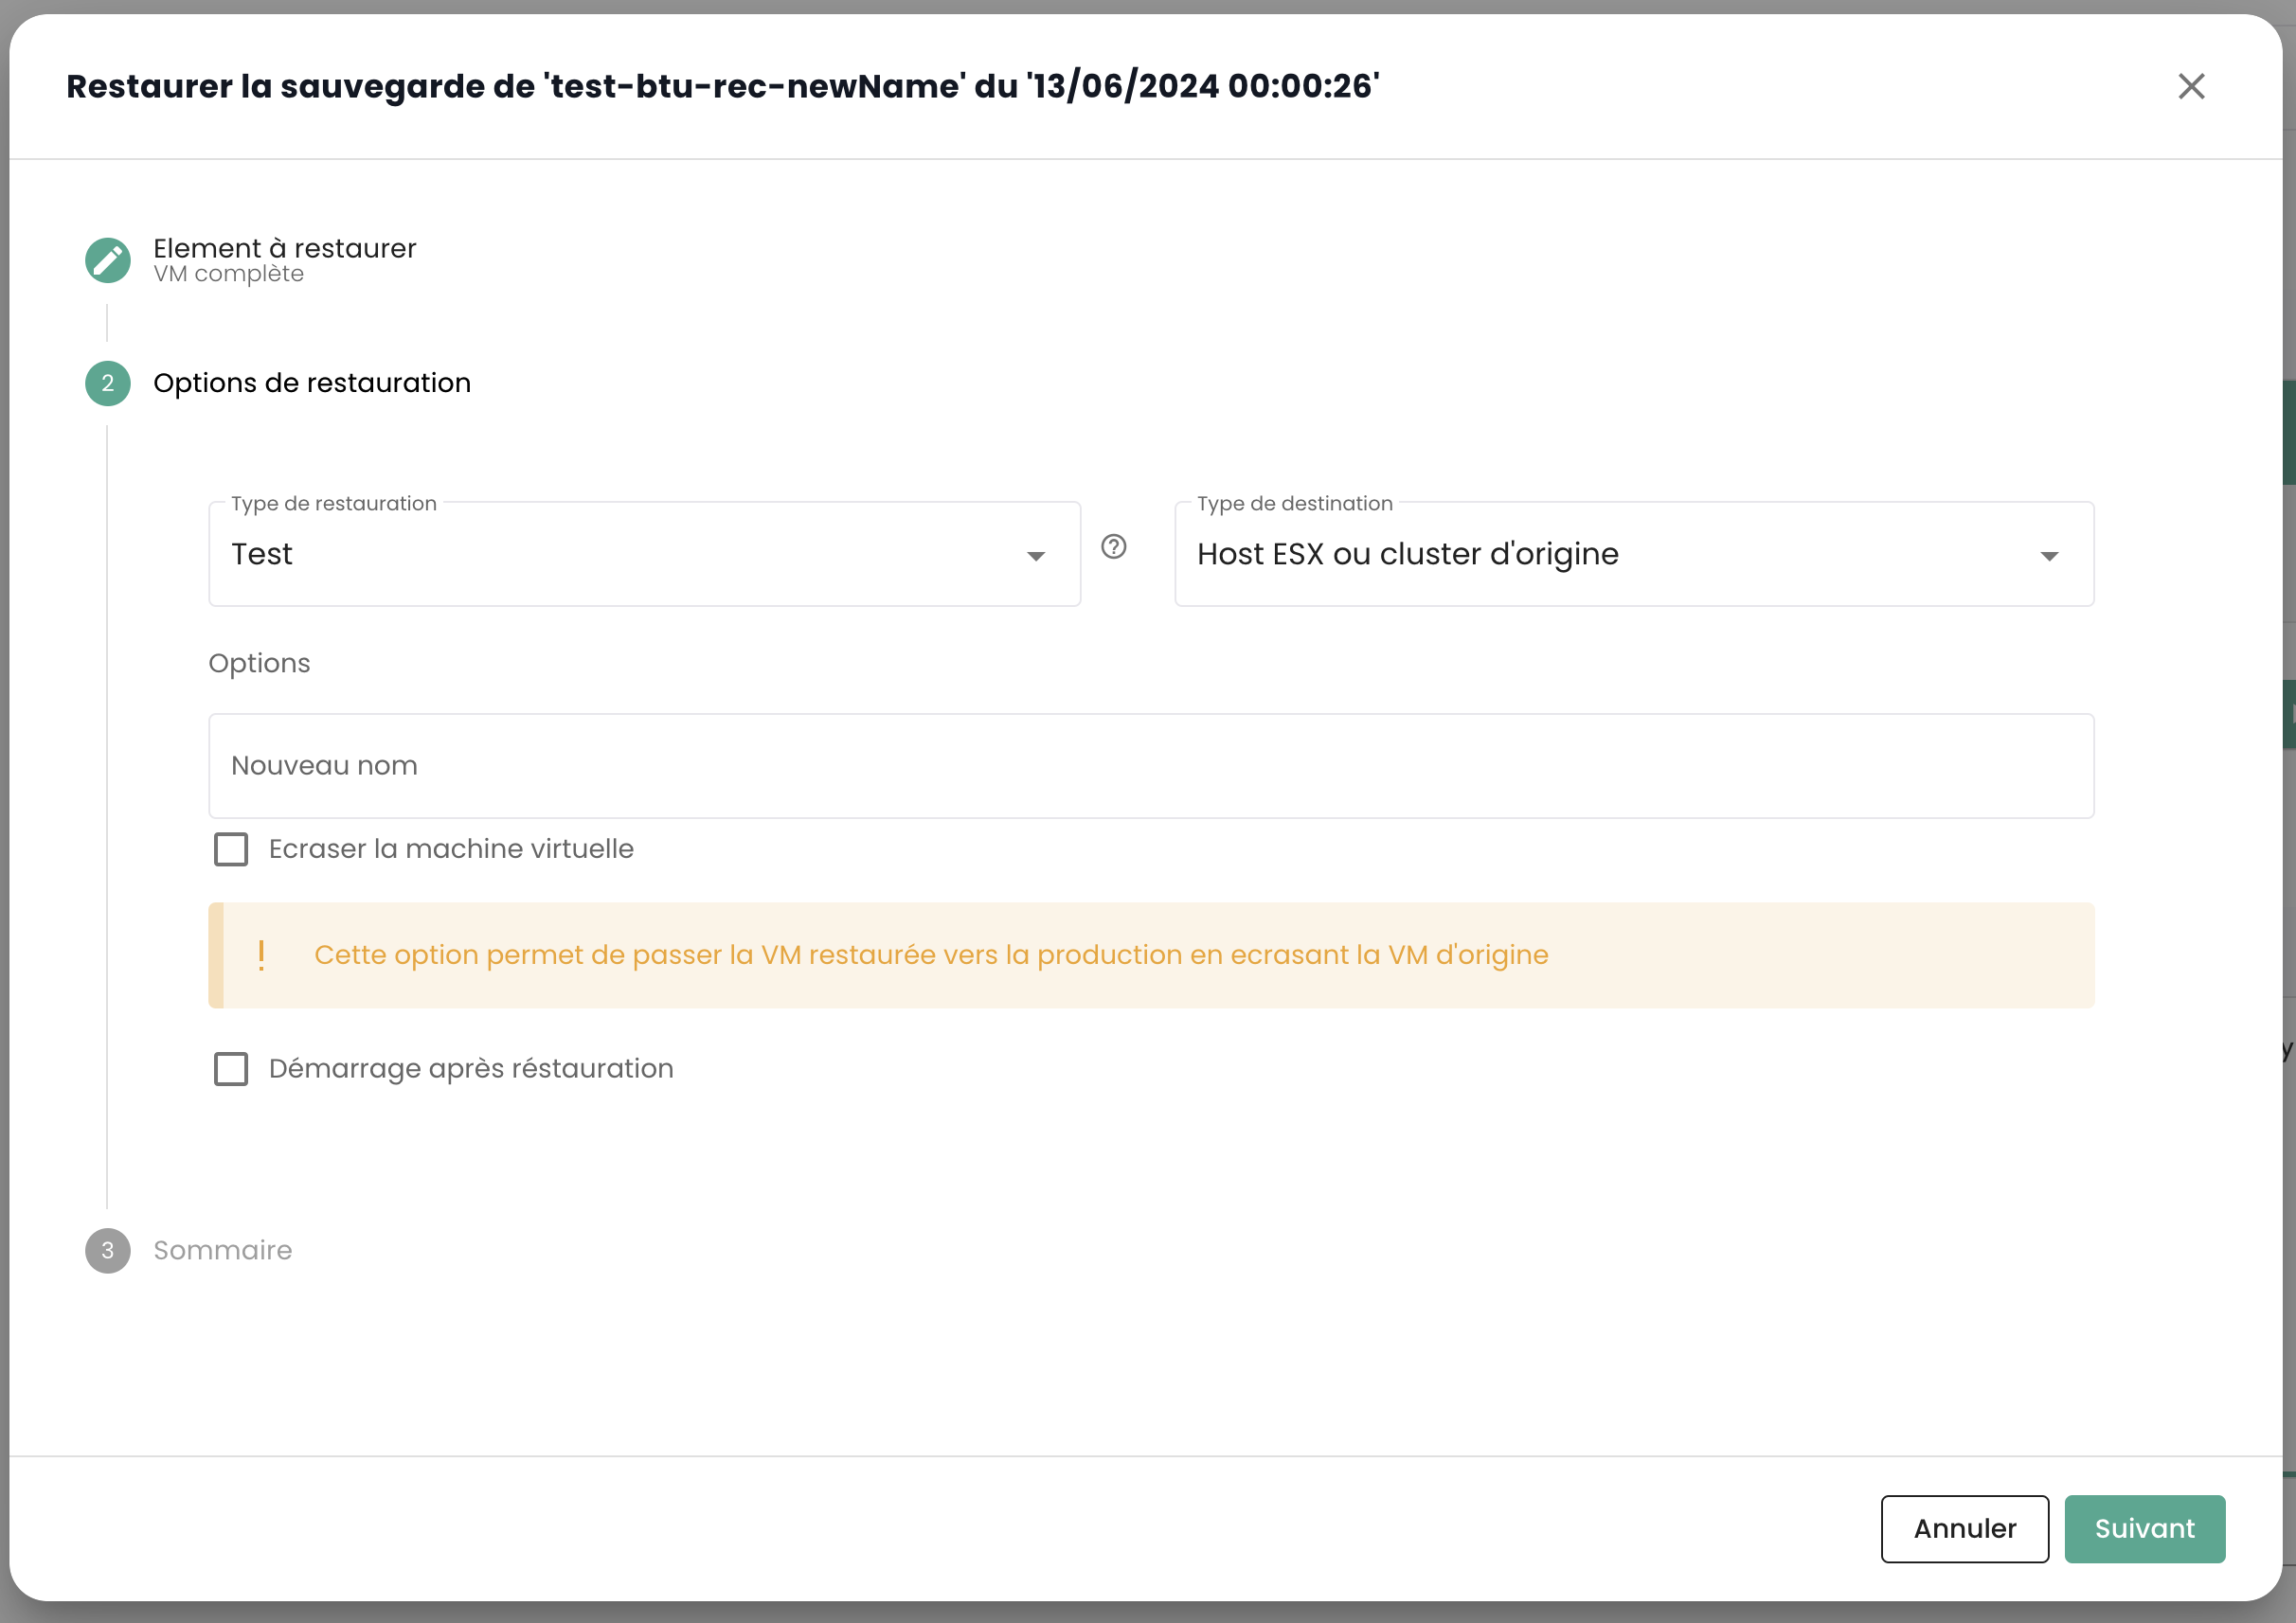
Beachten Sie, dass es möglich ist, eine virtuelle Maschine vom Testmodus in den Produktionsmodus zu überführen, wenn die Tests erfolgreich waren: