Schnellstartanleitung
Berechnung
Verwaltung virtueller Maschinen
Die Verwaltungsoberfläche Ihrer virtuellen Maschinen ist in der Konsole im Menü 'OpenIaaS' verfügbar, das sich auf der grünen Leiste links auf dem Bildschirm befindet.
Liste der virtuellen Maschinen
Im Bereich 'Virtuelle Maschinen' haben Sie Zugriff auf die Liste Ihrer virtuellen Maschinen, die in Ihrer vertrauenswürdigen Cloud gehostet werden.
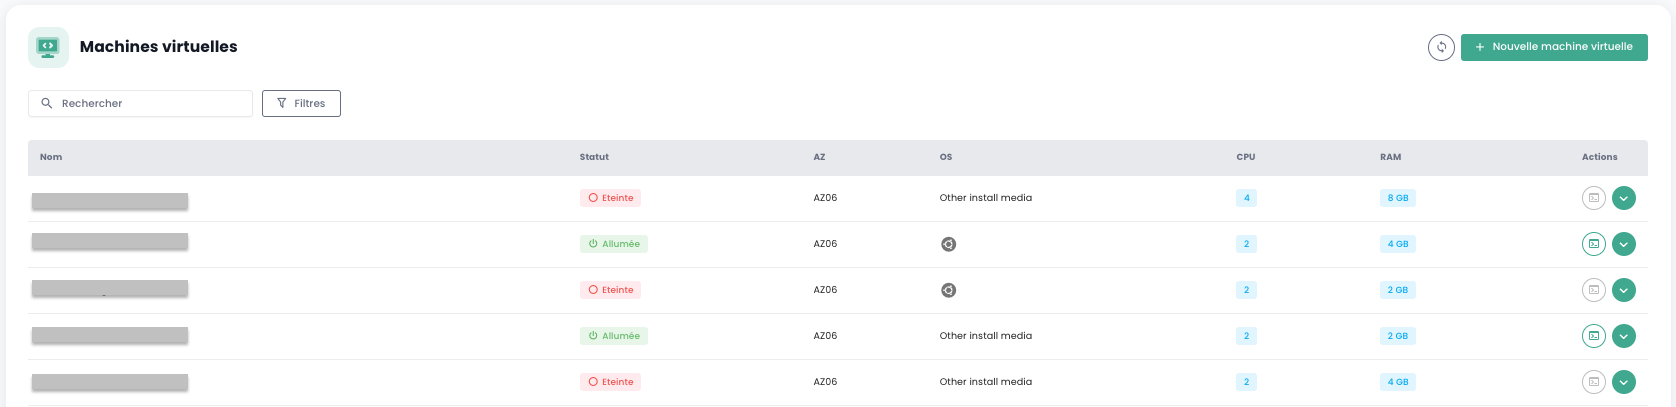
Für jede virtuelle Maschine stehen Ihnen die folgenden Informationen zur Verfügung:
- Der Name.
- Der Status (ausgeschaltet, eingeschaltet).
- Die Verfügbarkeitszone (AZ).
- Das Betriebssystem.
- Die Anzahl der virtuellen CPUs (vCPU).
- Die Größe des virtuellen Arbeitsspeichers (vRAM).
Aktionen für virtuelle Maschinen
Die folgenden Aktionen sind über diese Schnittstelle möglich:
- Liste der virtuellen Maschinen aktualisieren.
- Liste filtern.
- Eine virtuelle Maschine nach ihrem Namen suchen.
- Eine neue virtuelle Maschine erstellen.
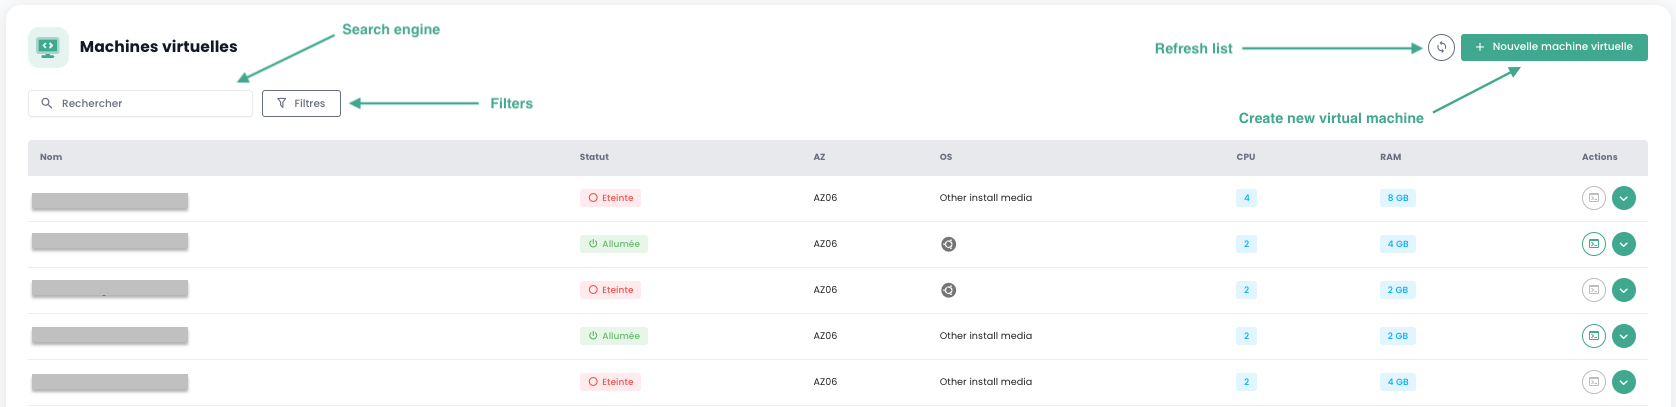
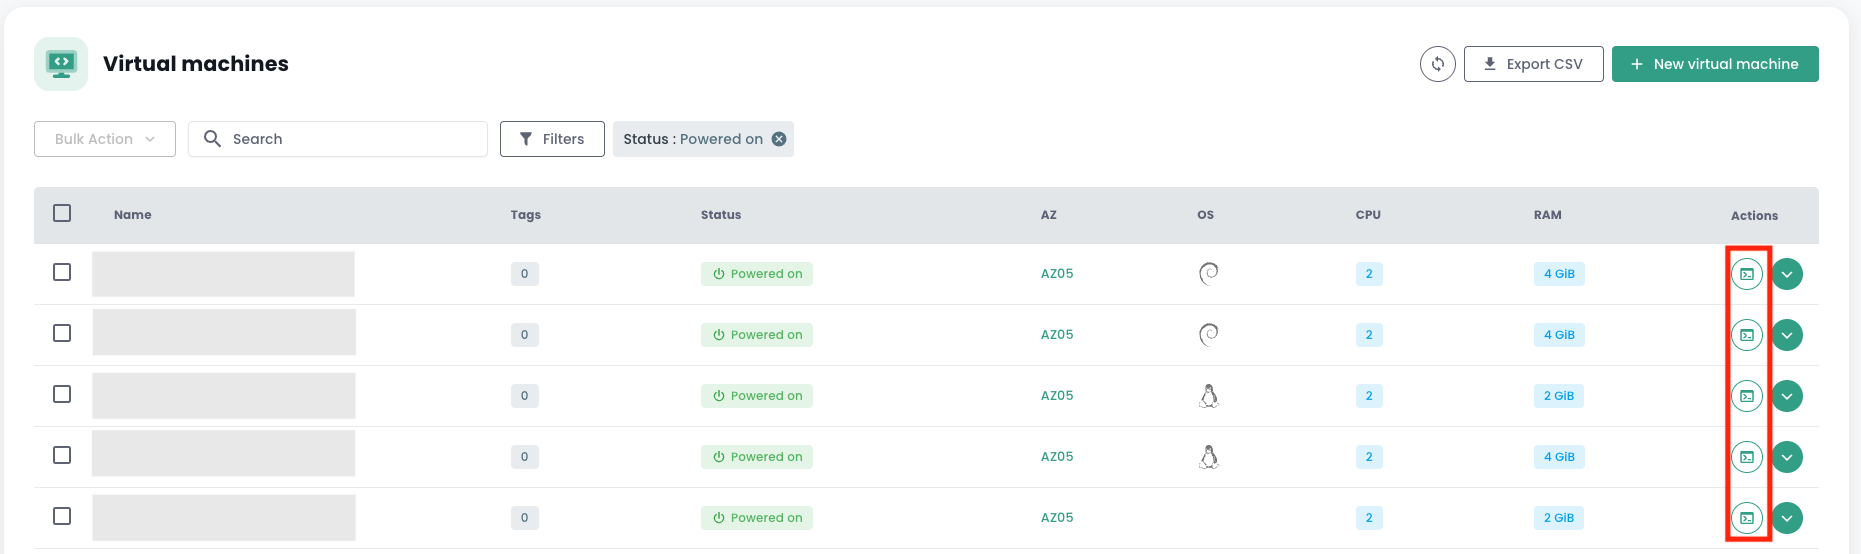
Wenn Sie auf den grünen Dropdown-Pfeil rechts der Liste für eine virtuelle Maschine klicken, erhalten Sie Zugriff auf alle Informationen zu dieser Maschine.
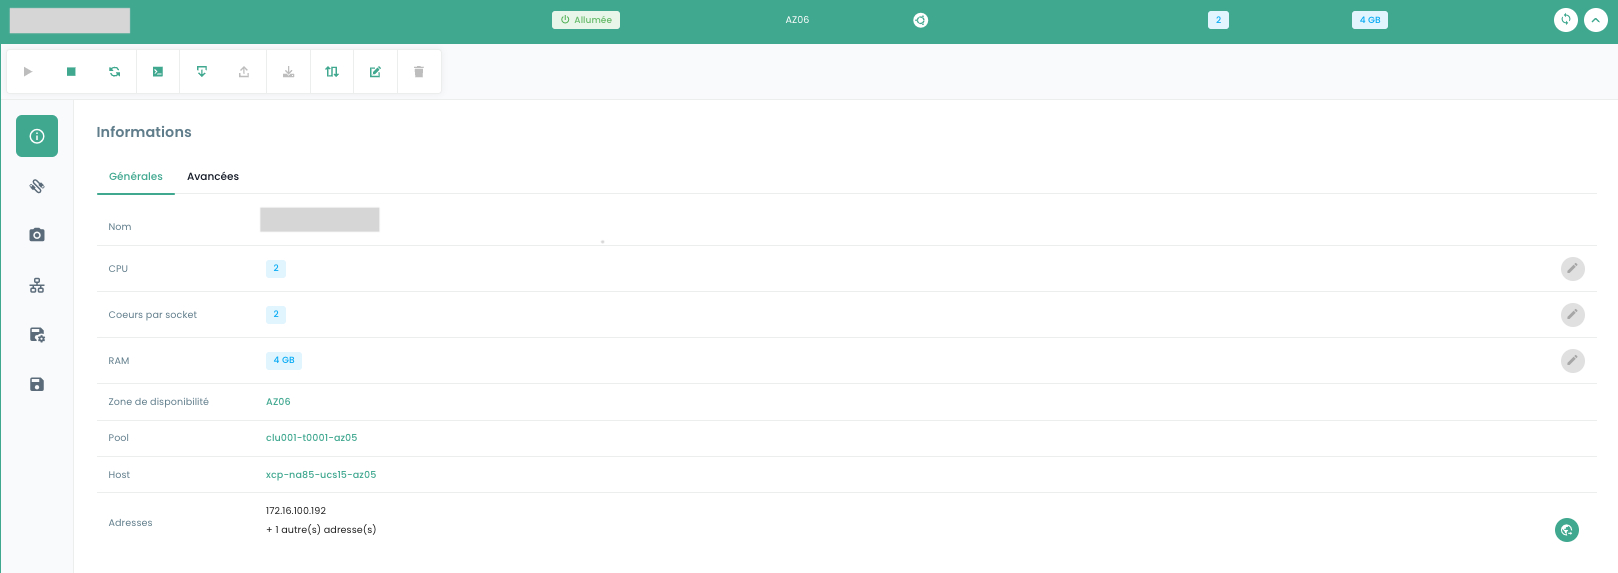
Eine Schnellleiste ermöglicht die folgenden Aktionen:

- Virtuelle Maschine einschalten.
- Sie ausschalten.
- Sie neu starten.
- Konsole öffnen.
- ISO-Image einbinden.
- ISO-Image aushängen.
- Virtuelle Maschine in eine Vorlage konvertieren.
- Sie verschieben.
- Sie umbenennen.
- Sie löschen.
Im Reiter 'Allgemein' finden Sie detaillierte Informationen zu Ihrer virtuellen Maschine, wie z. B. den physischen Standort (AZ, Pool, Host), den RAM, den CPU, die IP-Adressen und weitere.
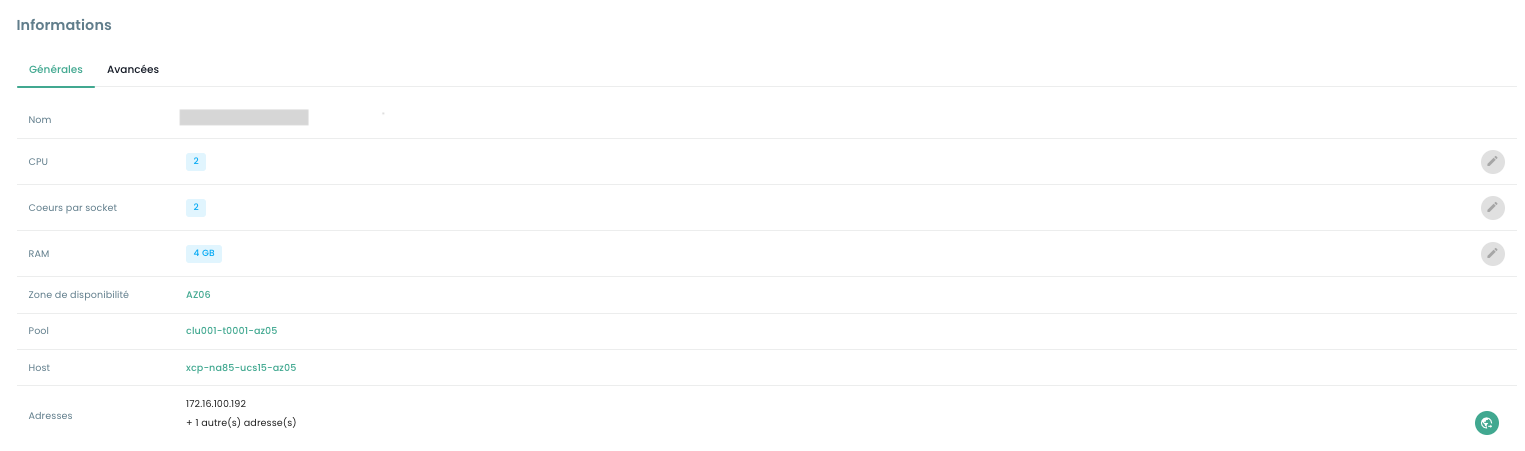
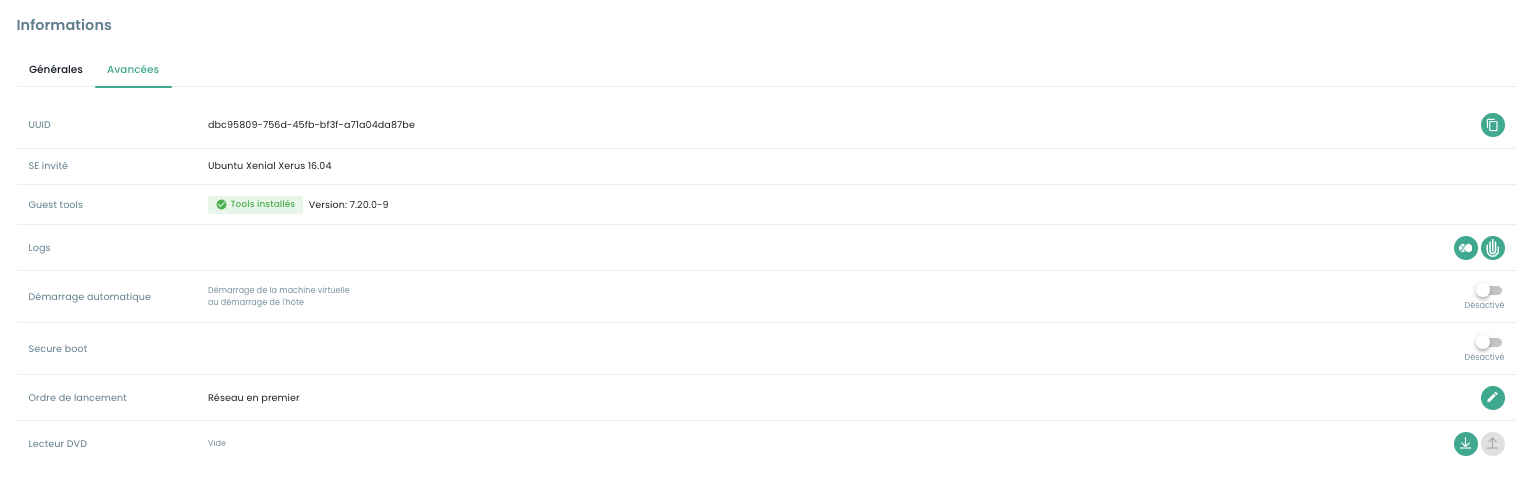
Ein Reiter 'Erweitert' ermöglicht den Zugriff auf spezifischere Informationen:
- UUID der virtuellen Maschine
- Guest Tools
- Gast-Betriebssystem
- DVD-Laufwerk
Sowie das Ändern bestimmter Optionen, wie z. B.:
- Die Startreihenfolge
- Secure Boot
- Der automatische Start (nicht möglich, wenn keine Sicherungsrichtlinie mit der VM verknüpft ist)
Konsole einer virtuellen Maschine
Die Konsole einer virtuellen Maschine ist über die Liste der virtuellen Maschinen zugänglich, indem Sie auf das Symbol 'Konsole' klicken:
Ein neuer Browser-Tab öffnet sich und zeigt die Konsole Ihrer Maschine, die auf einem VNC-Client basiert:
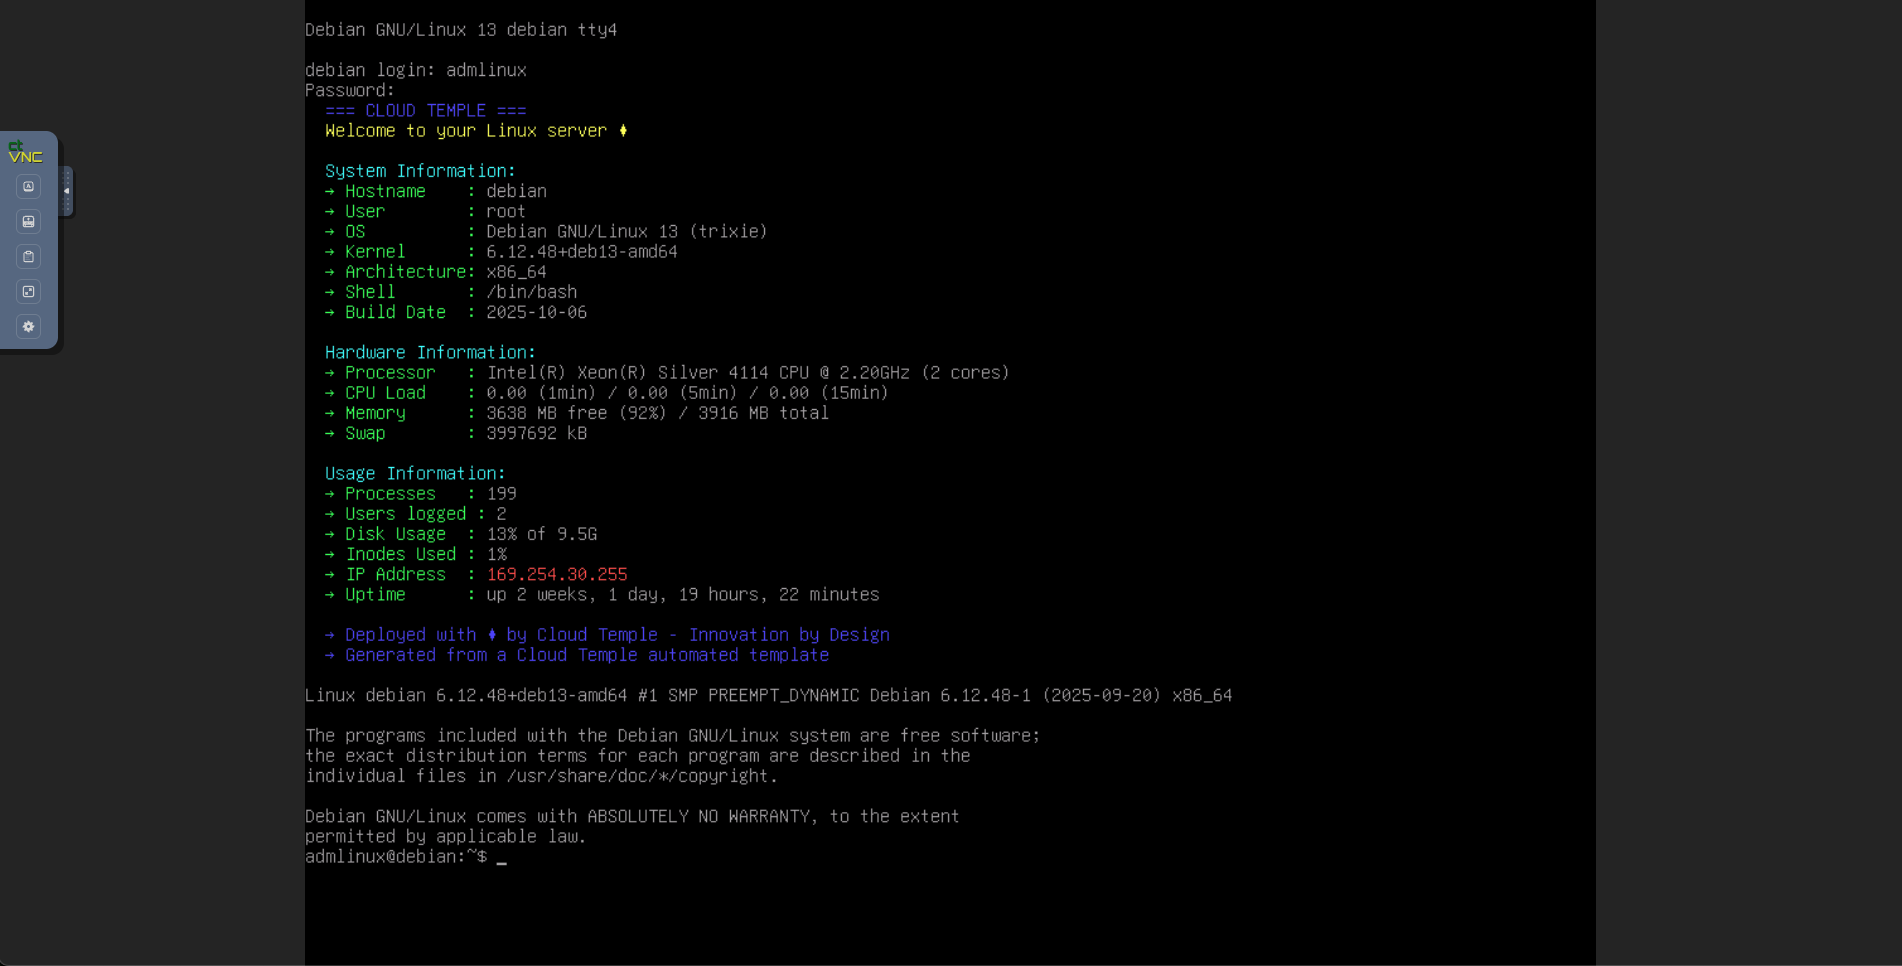
Im VNC-Menü ist es möglich:
- bestimmte Tasten zu senden,
- ein Tastaturlayout zu erzwingen (falls Ihre virtuelle Maschine nicht über dasselbe Tastaturlayout wie Ihr Webbrowser verfügt),
- ein Textfeld zu öffnen, das an die Maschine gesendet werden kann. Diese Methode ersetzt den alten, nicht funktionierenden Zwischenablage-Modus,
- in den Vollbildmodus zu wechseln,
- die Fenstergröße zu ändern (Skalierung).
Unterstützung von Tastaturlayouts
Die in der Konsole eingegebene Eingabe hängt von der Tastatursprache Ihres Webbrowsers, der Tastatursprache der virtuellen Maschine sowie der Aktivierung oder Deaktivierung der Option 'enforce keyboard' links auf dem Bildschirm ab. Nachfolgend eine Übersicht der möglichen Situationen:
| Tastatursprache der physischen Maschine (Eingabe) | Tastatursprache der virtuellen Maschine | Option 'enforce keyboard' ausgewählt | Ergebnis (Ausgabe) |
|---|---|---|---|
| Französisch | Französisch | Nein | ✅ |
| Französisch | Französisch | Ja | Nicht empfohlen |
| Französisch | Englisch | Nein | Englisch |
| Französisch | Englisch | Ja | ✅ |
| Englisch | Französisch | Nein | Französisch |
| Englisch | Französisch | Ja | ✅ |
| Englisch | Englisch | Nein | ✅ |
| Englisch | Englisch | Ja | Nicht empfohlen |
Hinweis :
- Falls bestimmte Zeichen bei der manuellen Eingabe nicht übernommen werden, können Sie es über die Zwischenablage versuchen.
Funktionsweise der Zwischenablage
Diese Funktion ermöglicht es Ihnen, eine gesamte Zeichenkette an Ihre virtuelle Maschine zu senden. Es ist wichtig zu beachten, dass die Schaltfläche "enforce keyboard" beeinflusst, wie diese Zeichenkette
an Ihre virtuelle Maschine übermittelt wird. Falls Sie bei der Eingabe in der Konsole feststellen, dass die Option "enforce keyboard" erforderlich ist, denken Sie daran, sie vor der Nutzung der Zwischenablage zu aktivieren.
Diese Funktion kann beispielsweise zum Senden eines Passworts, eines Befehls oder des Inhalts einer Konfigurationsdatei verwendet werden:
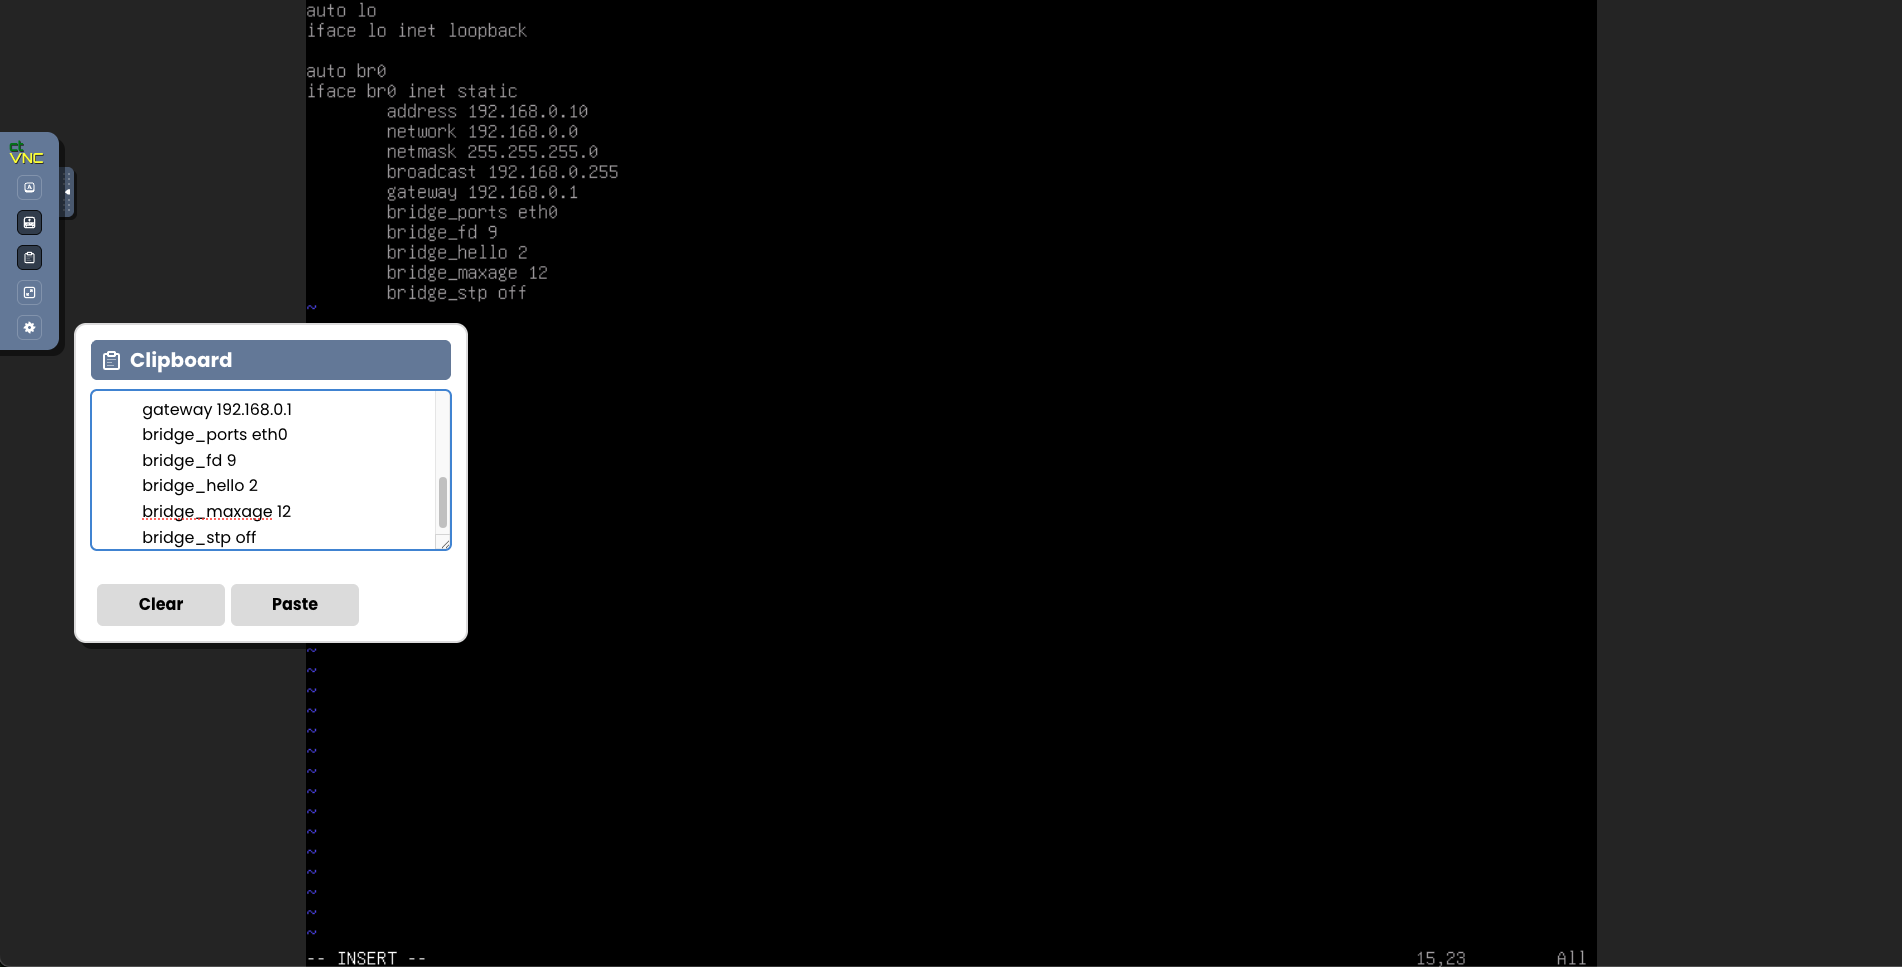
Nach einem Klick auf die Schaltfläche "Paste" wird der Inhalt Ihres Textfelds an Ihre virtuelle Maschine gesendet.
Replikation
Zugriff auf die Replikationsverwaltung
Die Verwaltungsoberfläche für die Replikation ist in der Konsole im Menü 'OpenIaaS' > 'Replikation' auf der grünen Leiste links auf dem Bildschirm verfügbar.
Erstellen einer Replikationsrichtlinie
Im Bereich 'Replikation' können Sie Richtlinien erstellen, die die Schutzparameter Ihrer virtuellen Maschinen definieren.
Um eine neue Richtlinie zu erstellen, klicken Sie auf die Schaltfläche 'Richtlinie hinzufügen'. Es öffnet sich ein Formular mit den folgenden Schritten:
Schritt 1: Allgemeine Informationen
- Name : Geben Sie Ihrer Richtlinie einen eindeutigen Namen
- Häufigkeit : Wählen Sie das Replikationsintervall (1–59 Minuten oder 1–24 Stunden)
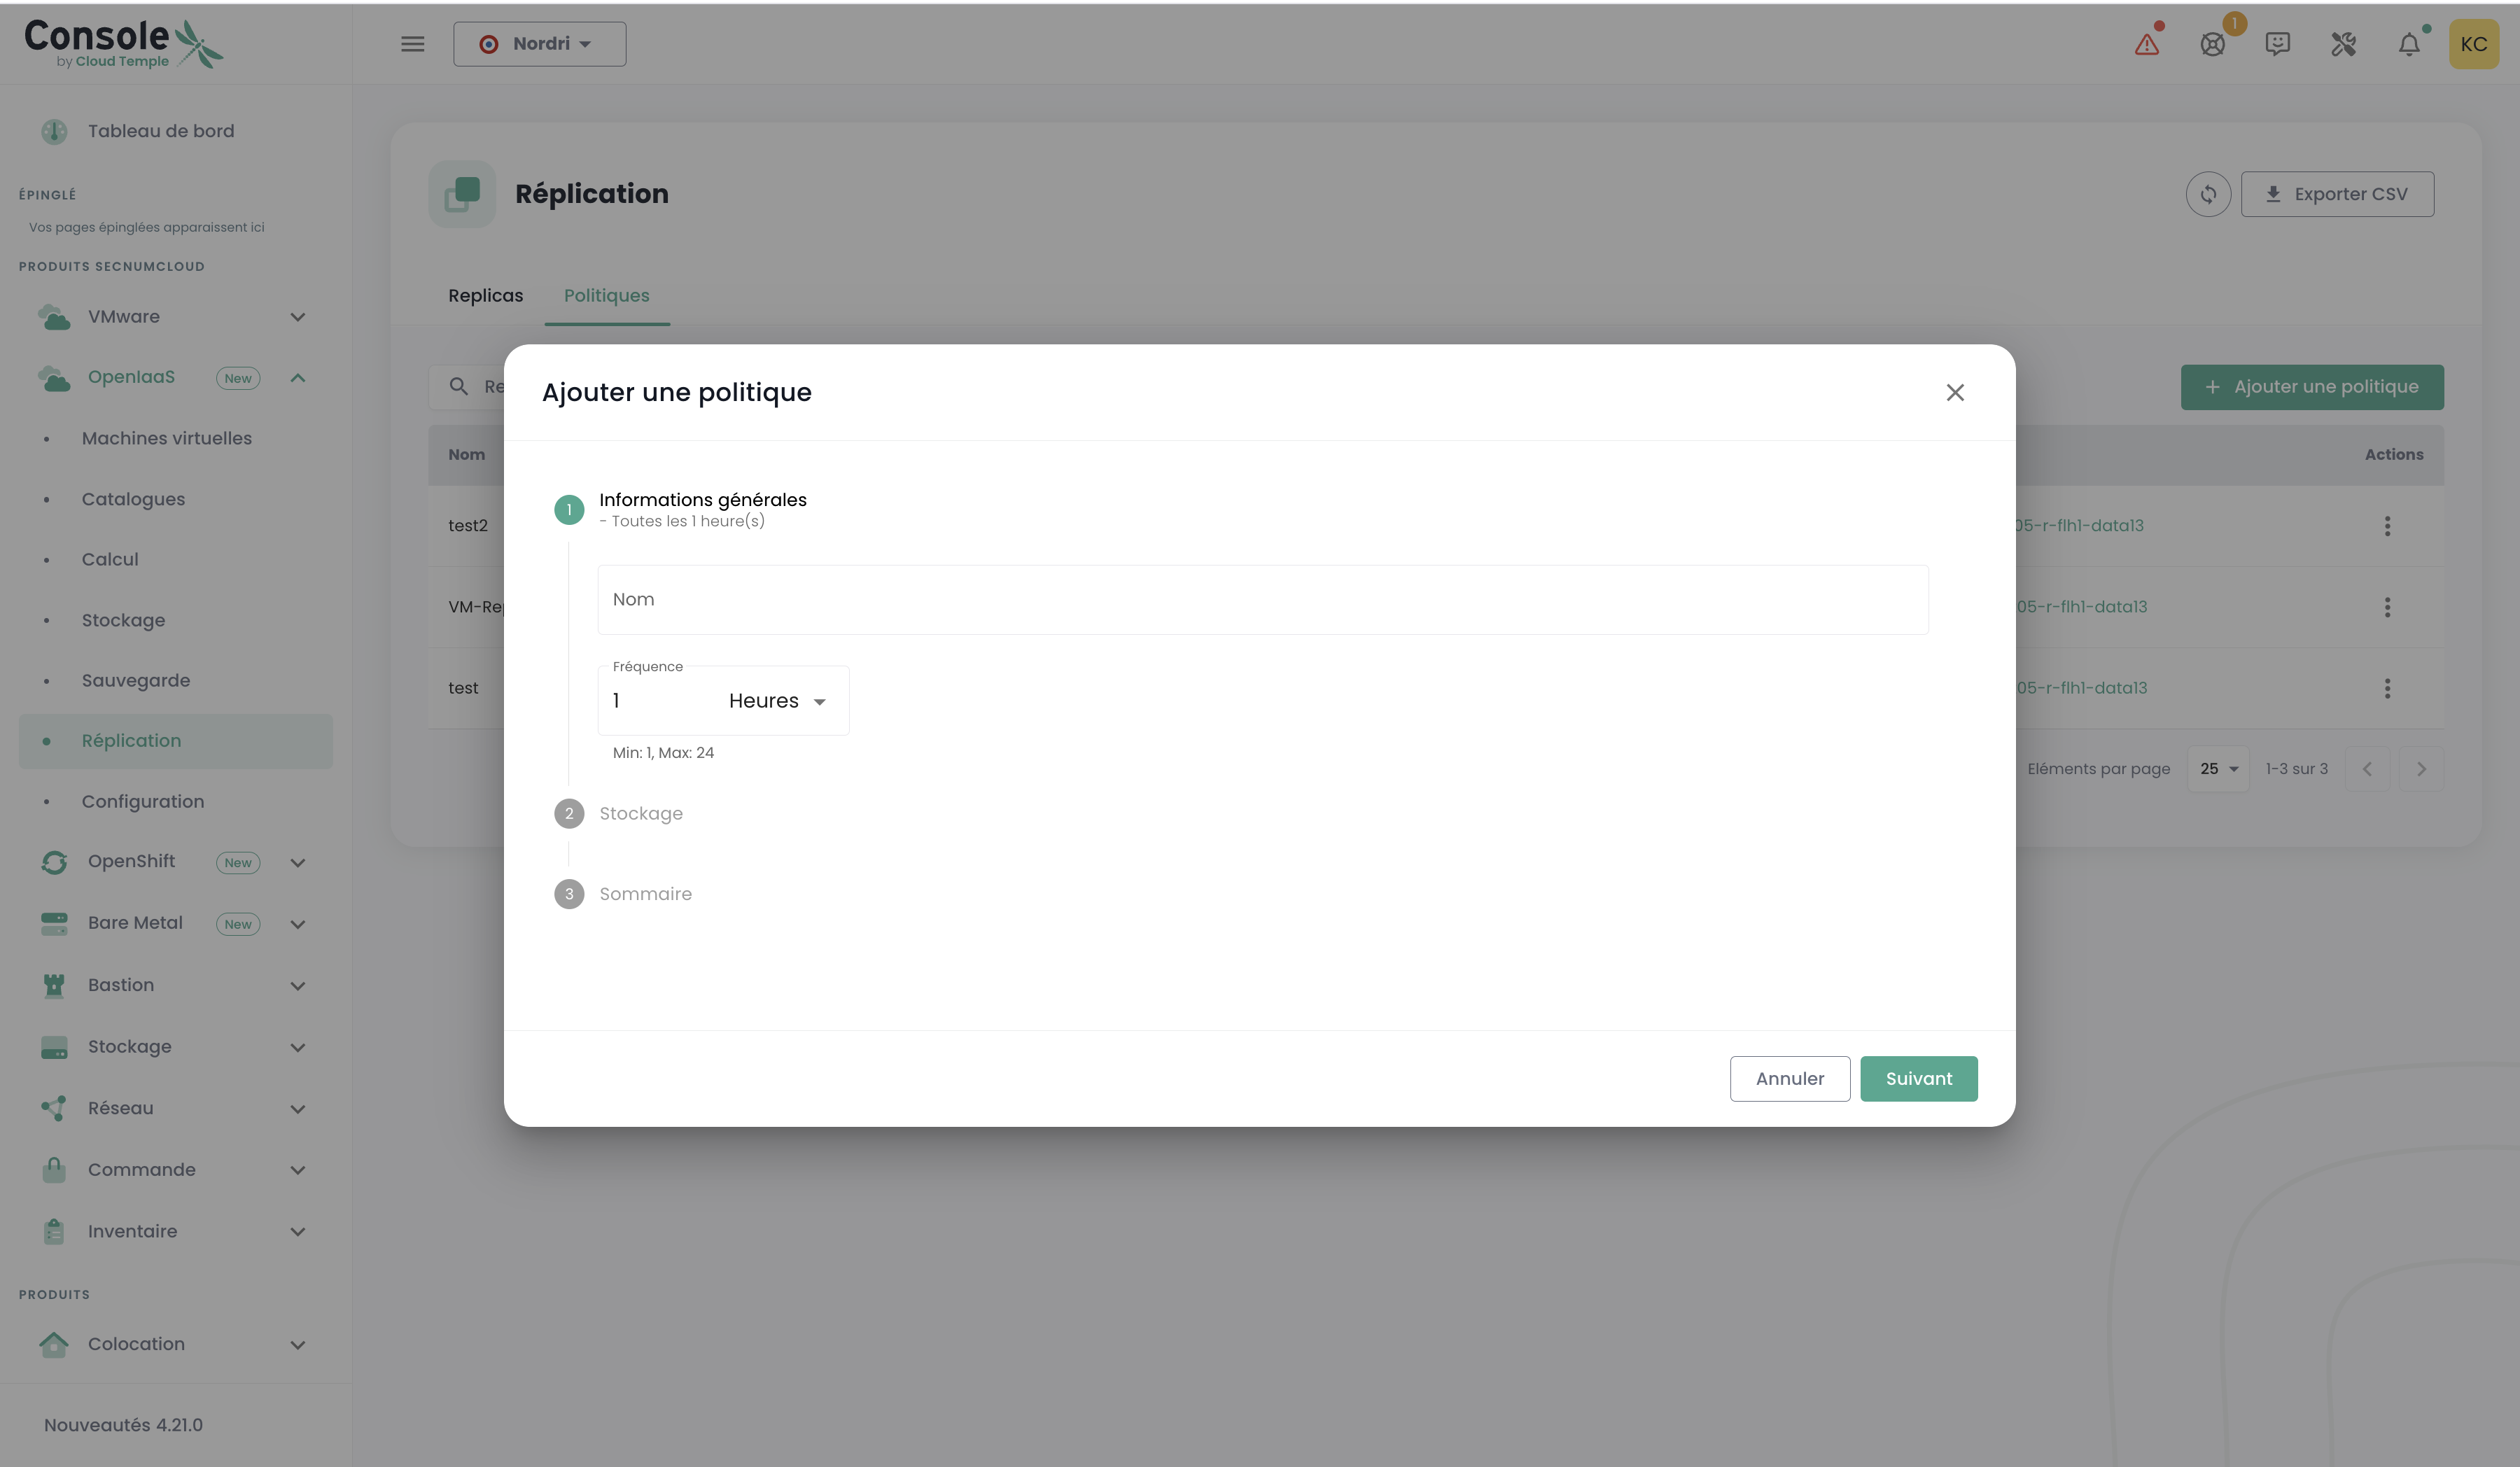
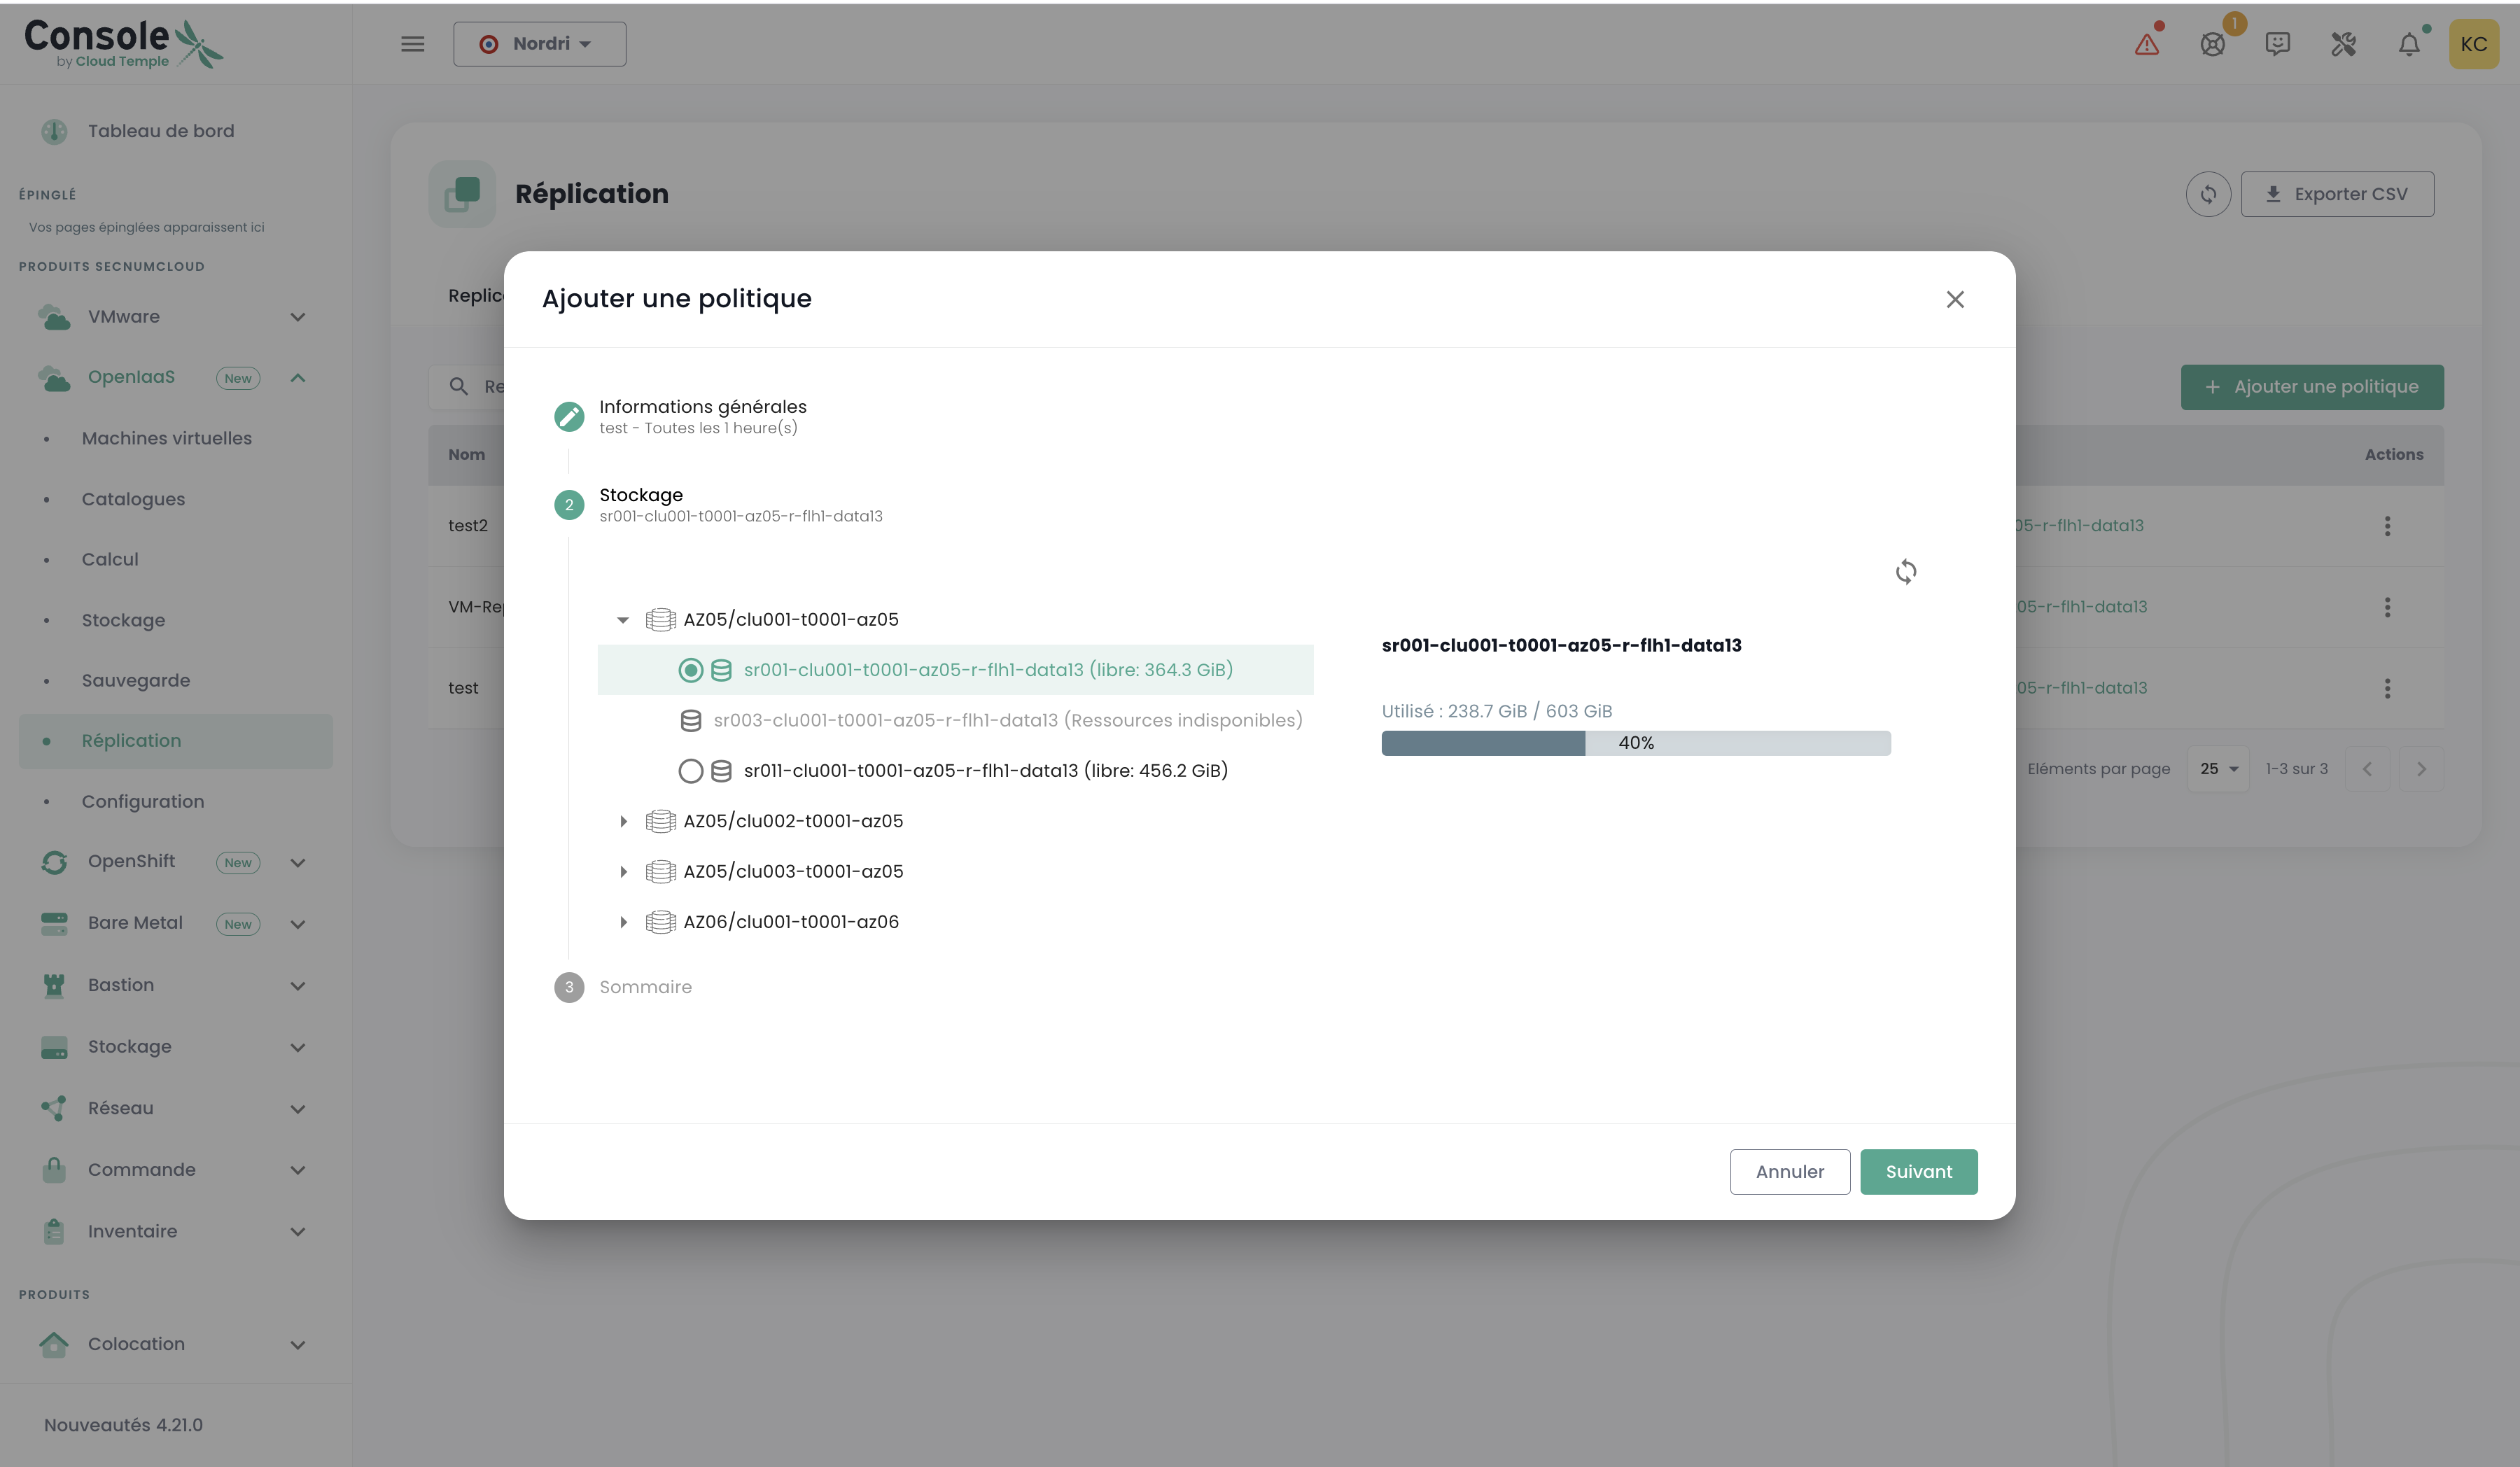
Schritt 2 : Speicherauswahl
- Verfügbarkeitszone : Wählen Sie die Zielzone aus
- Pool : Wählen Sie den Ressourcenpool aus
- Block Storage : Wählen Sie den Zielspeicher aus
Schritt 3 : Validierung
Überprüfen Sie die Parameter und klicken Sie auf 'Hinzufügen', um die Richtlinie zu erstellen.
Zuordnung einer VM zur Replikation
Um eine virtuelle Maschine zu schützen, rufen Sie die Details Ihrer VM aus der Liste der virtuellen Maschinen auf.
In der Detailansicht der VM finden Sie einen Abschnitt 'Replikation' :
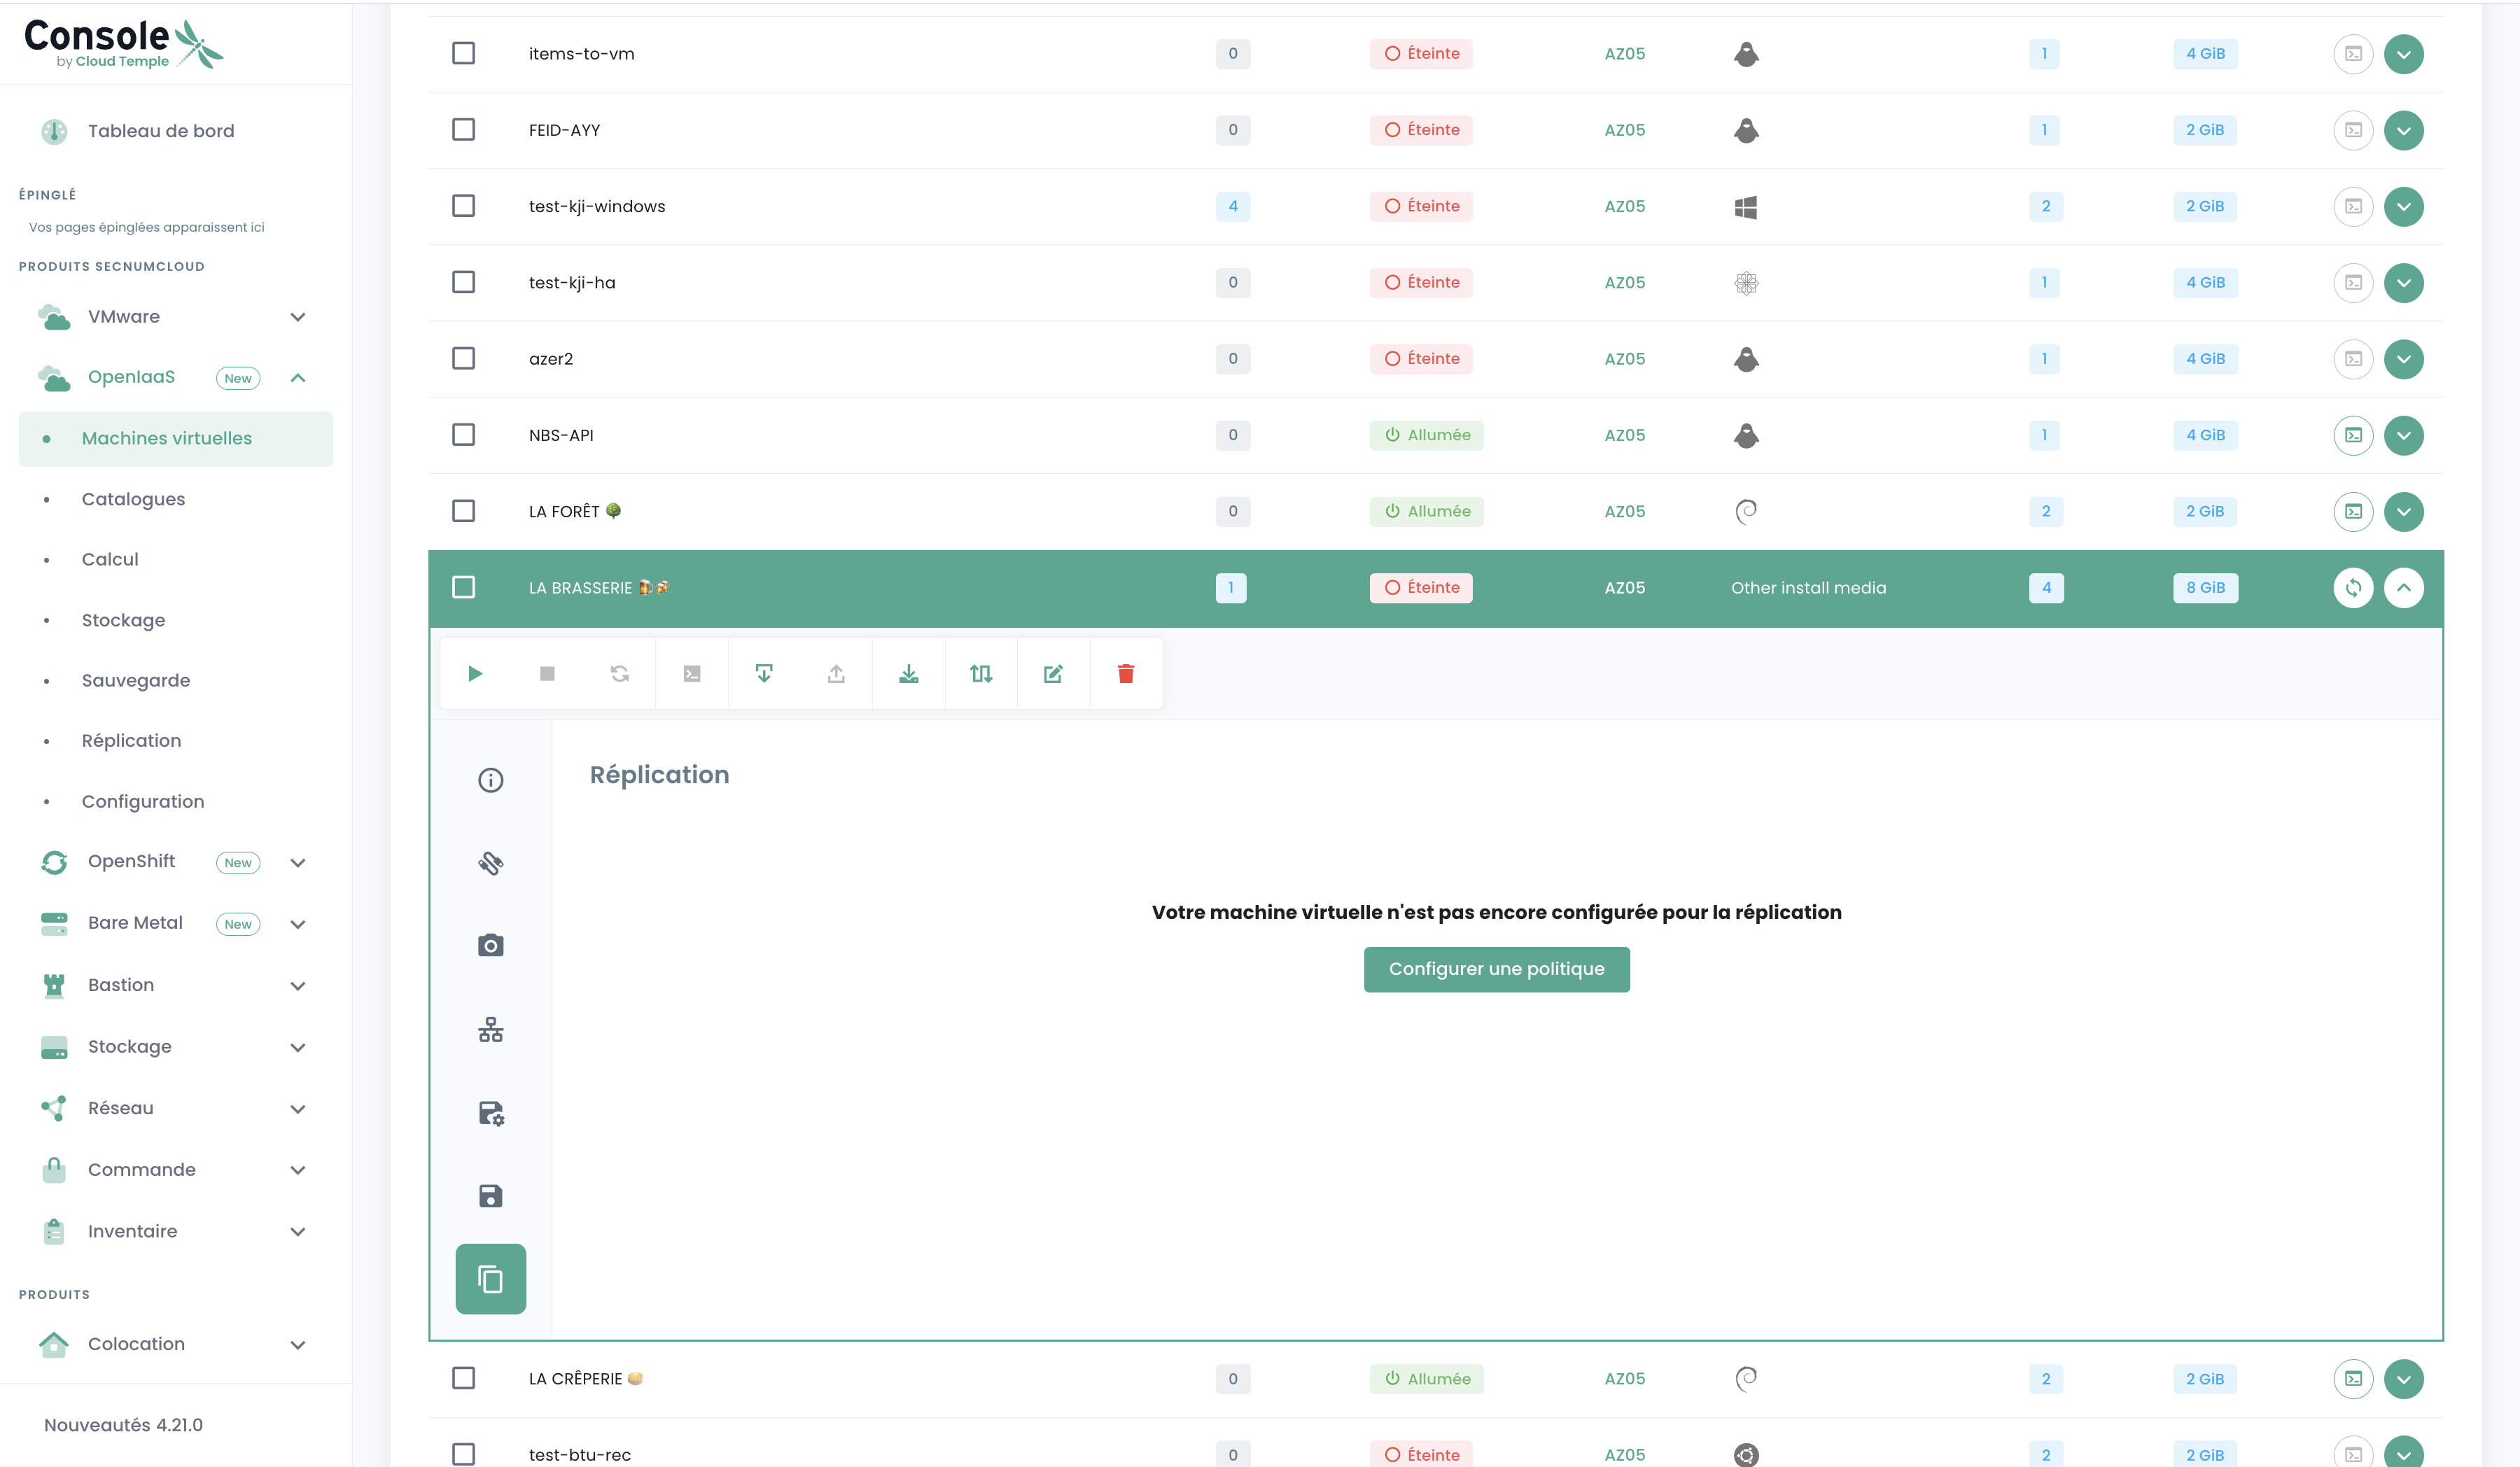
Die Schritte zum Zuordnen einer VM zur Replikation:
- Klicken Sie auf 'Richtlinie konfigurieren'
- Wählen Sie die gewünschte Replikationsrichtlinie aus der Dropdown-Liste aus
- Bestätigen Sie Ihre Auswahl
Die Replikation startet automatisch nach der Bestätigung.
Verwaltung von Richtlinien und Replikaten
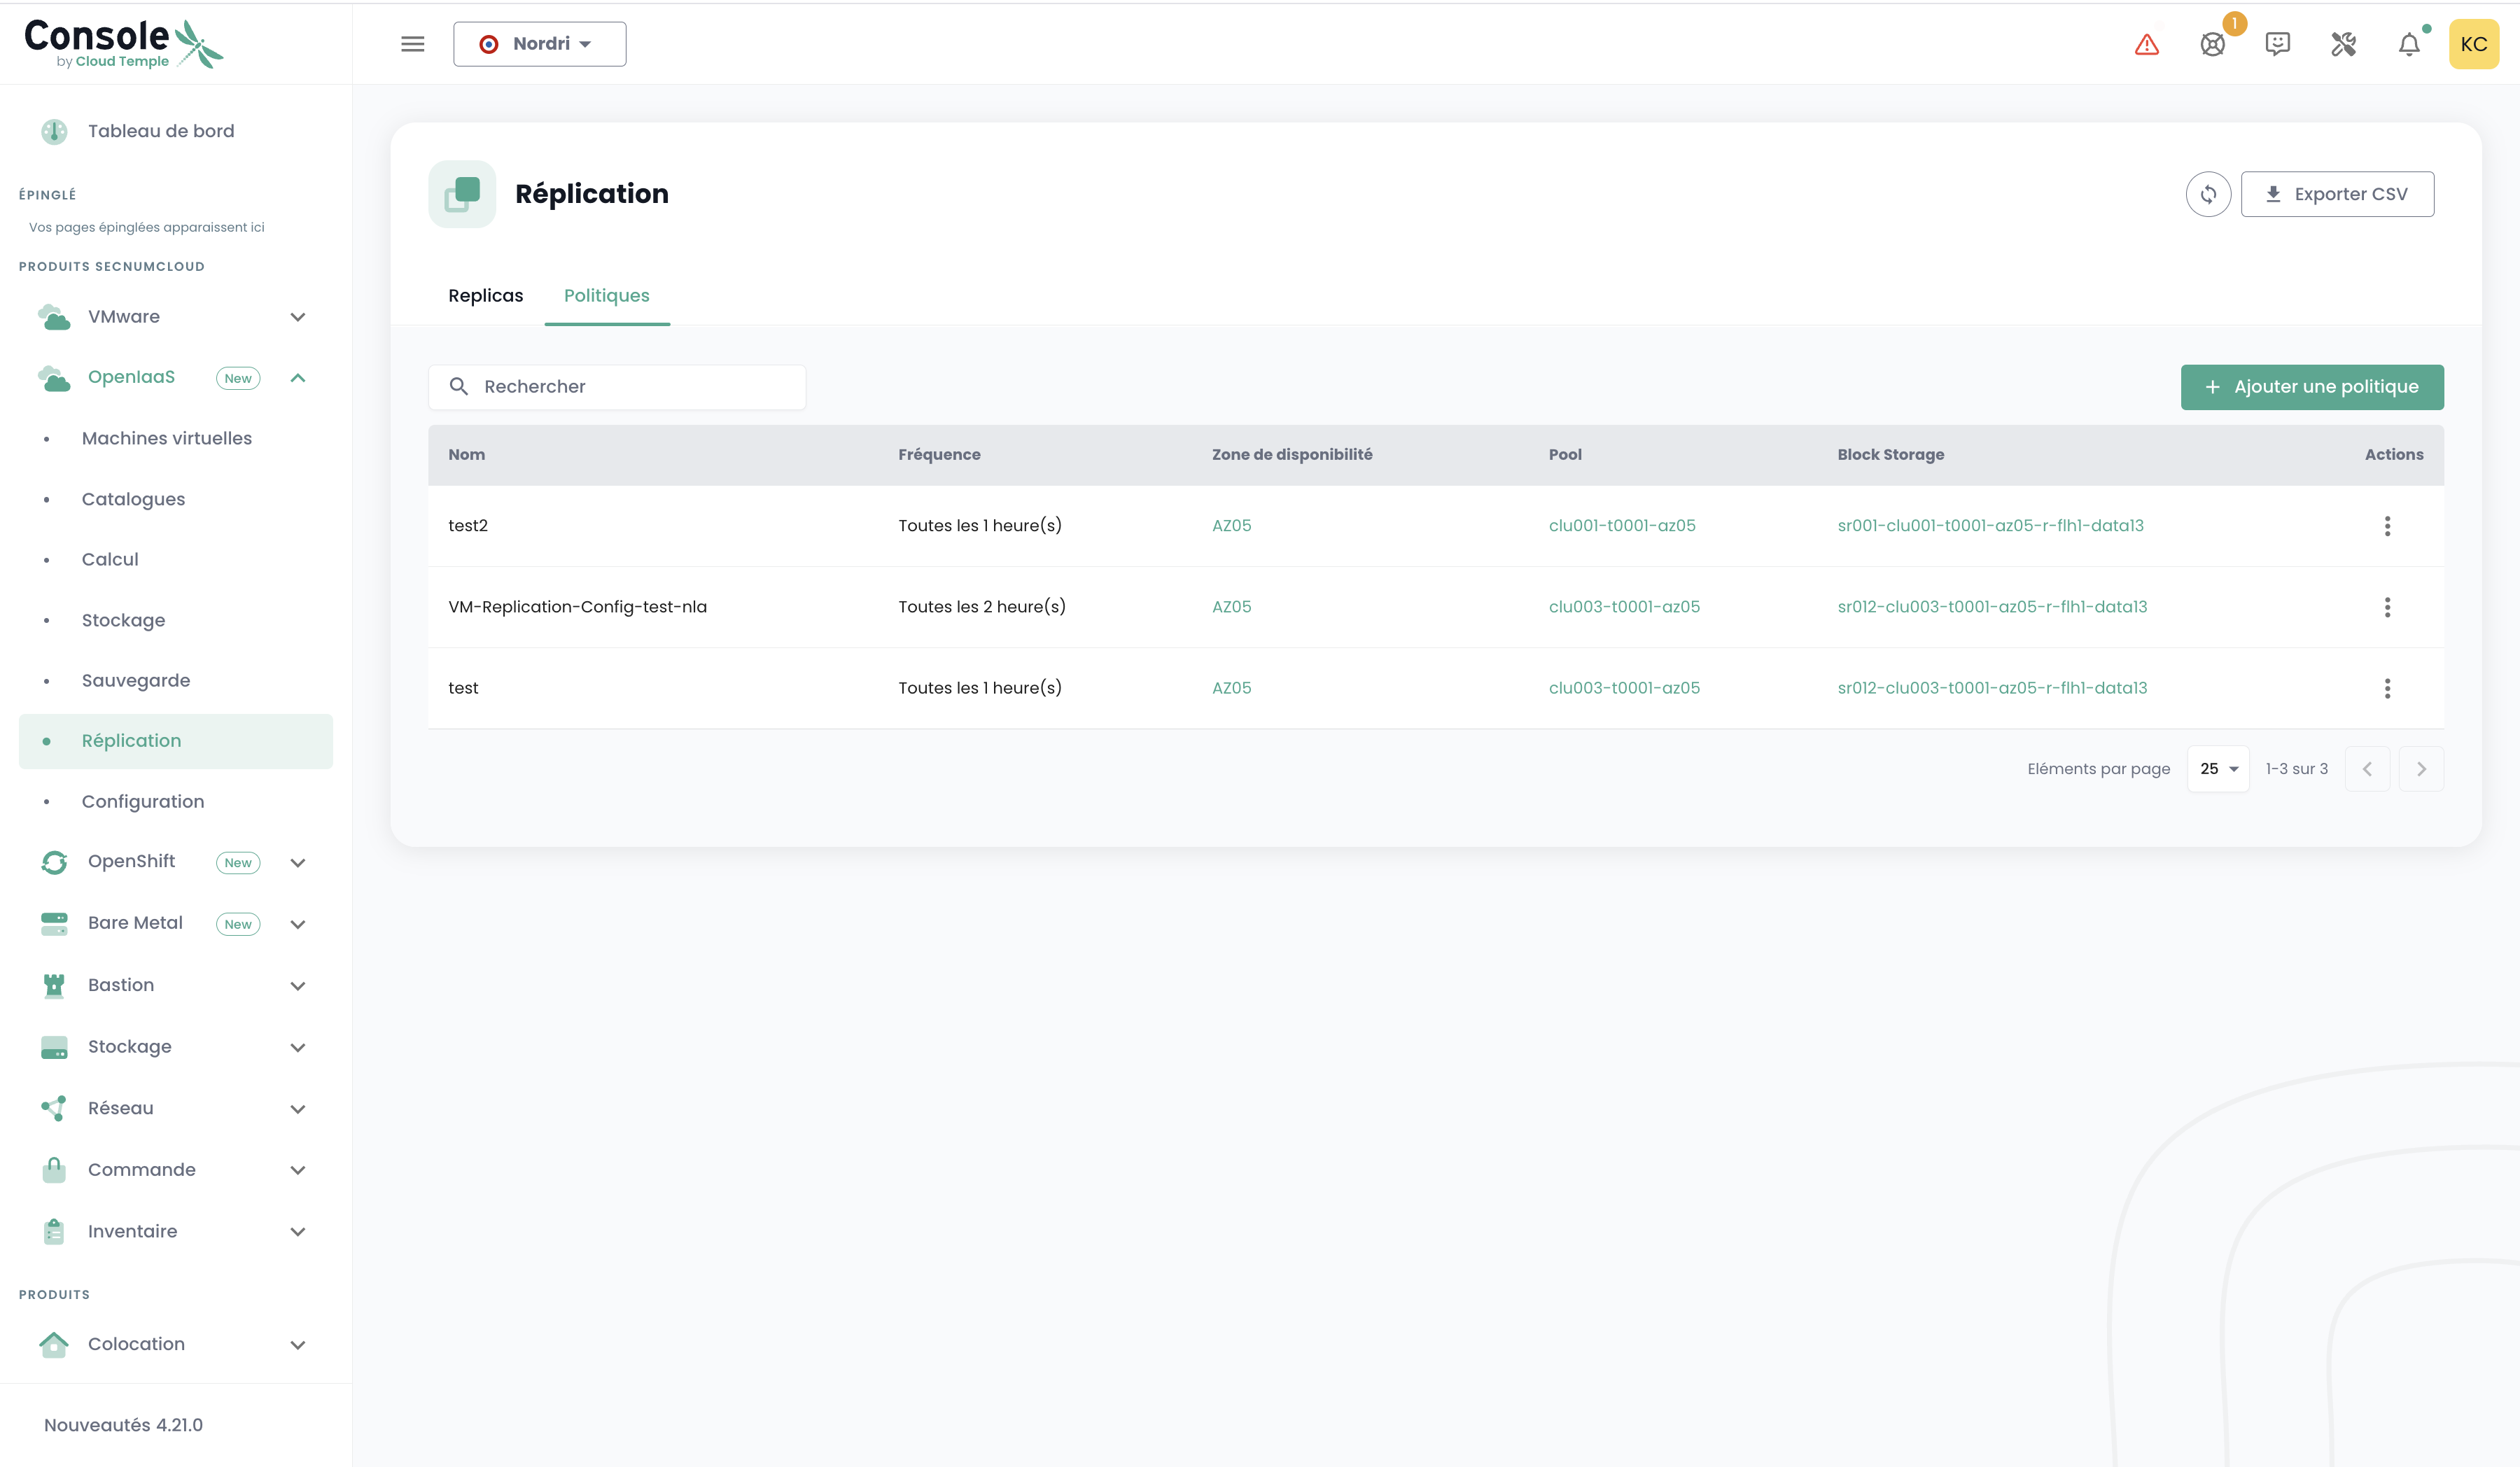
Ansicht der Richtlinien
Der Reiter 'Richtlinien' ermöglicht es Ihnen, alle Ihre Replikationsrichtlinien anzuzeigen:
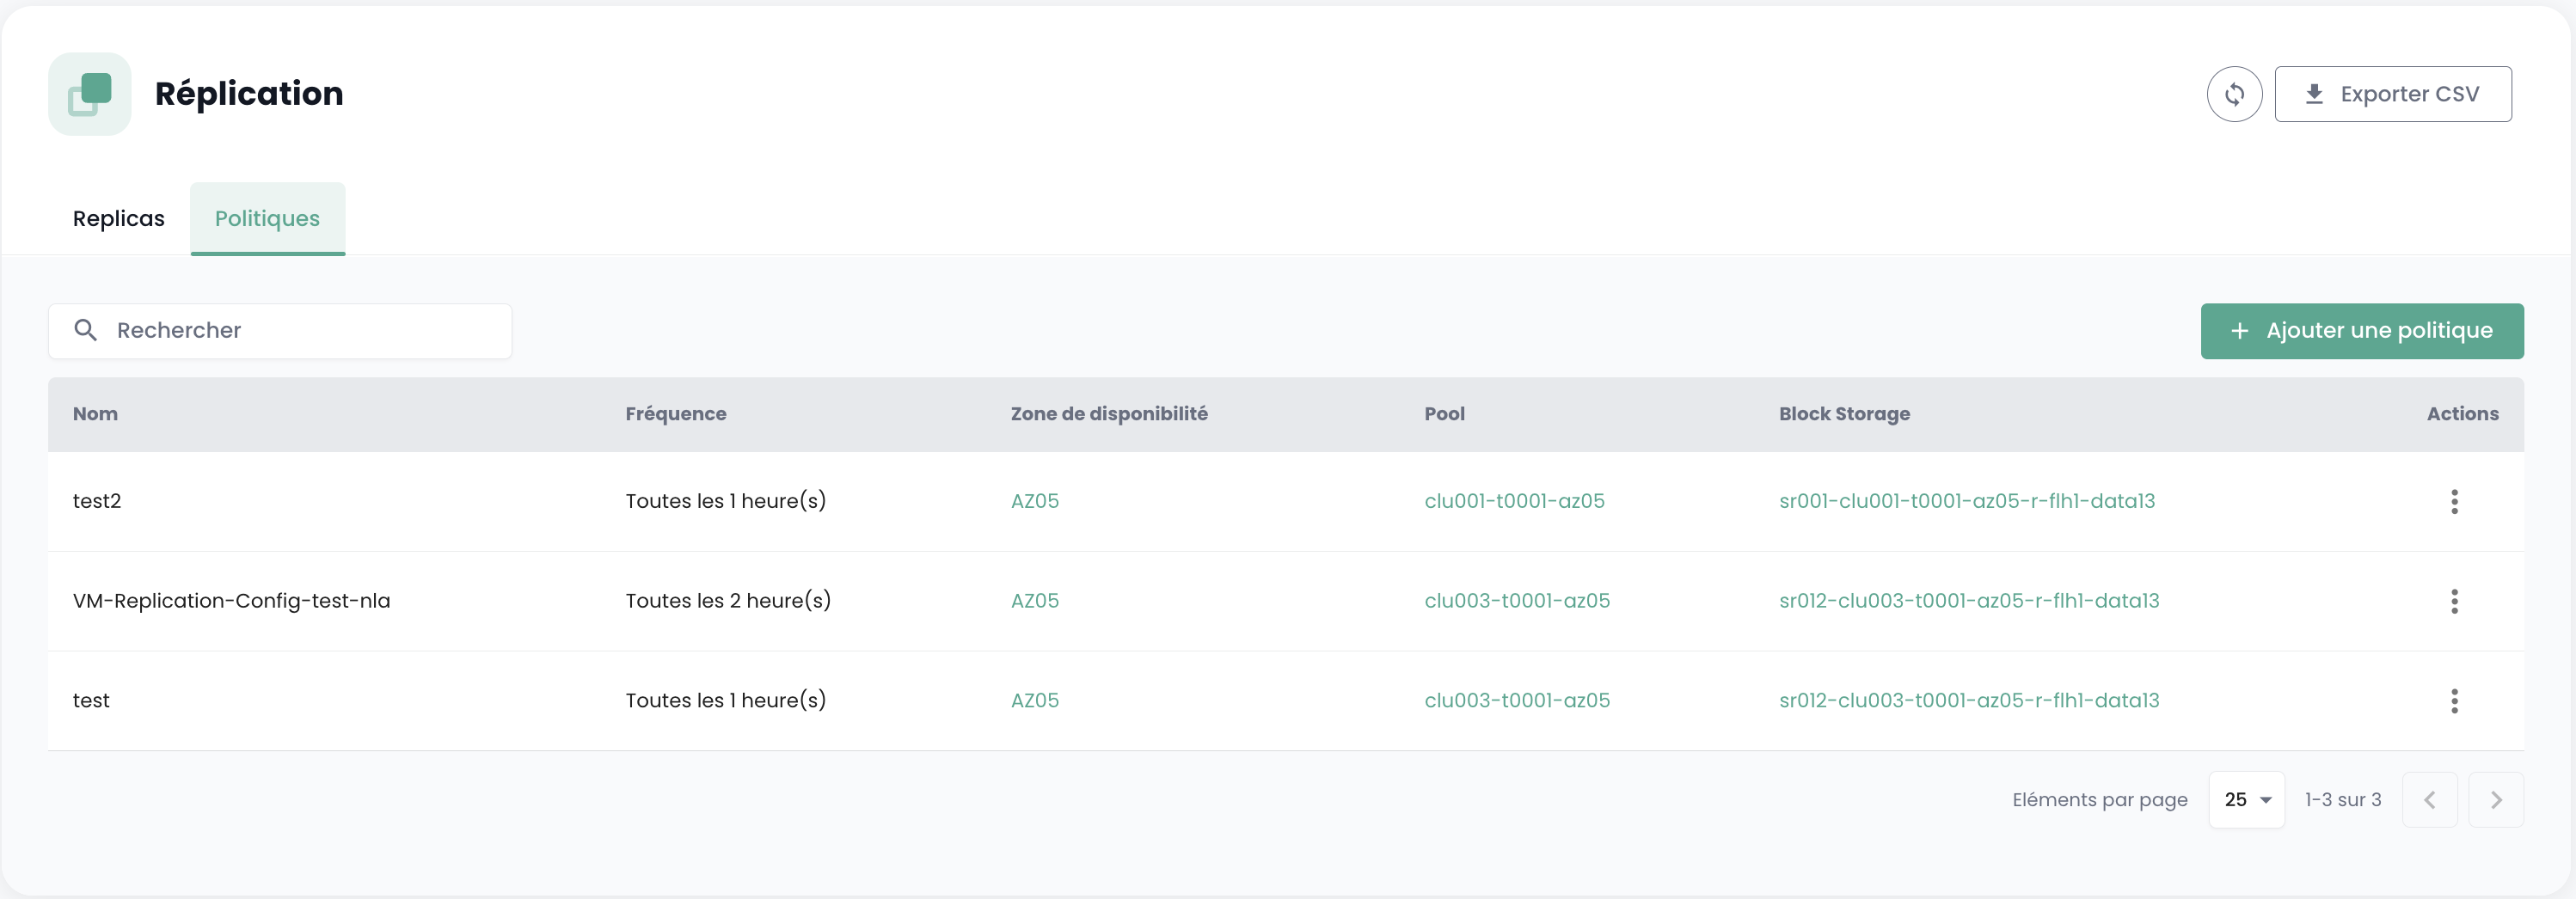
Für jede Richtlinie stehen Ihnen die folgenden Informationen zur Verfügung:
- Der Name
- Die Replikationshäufigkeit
- Die Ziel-Verfügbarkeitszone
- Der zugeordnete Pool
- Der verwendete Block Storage
Verfügbare Aktionen umfassen:
- Details jeder Richtlinie anzeigen
- Einstellungen bearbeiten
- Nicht genutzte Richtlinien löschen
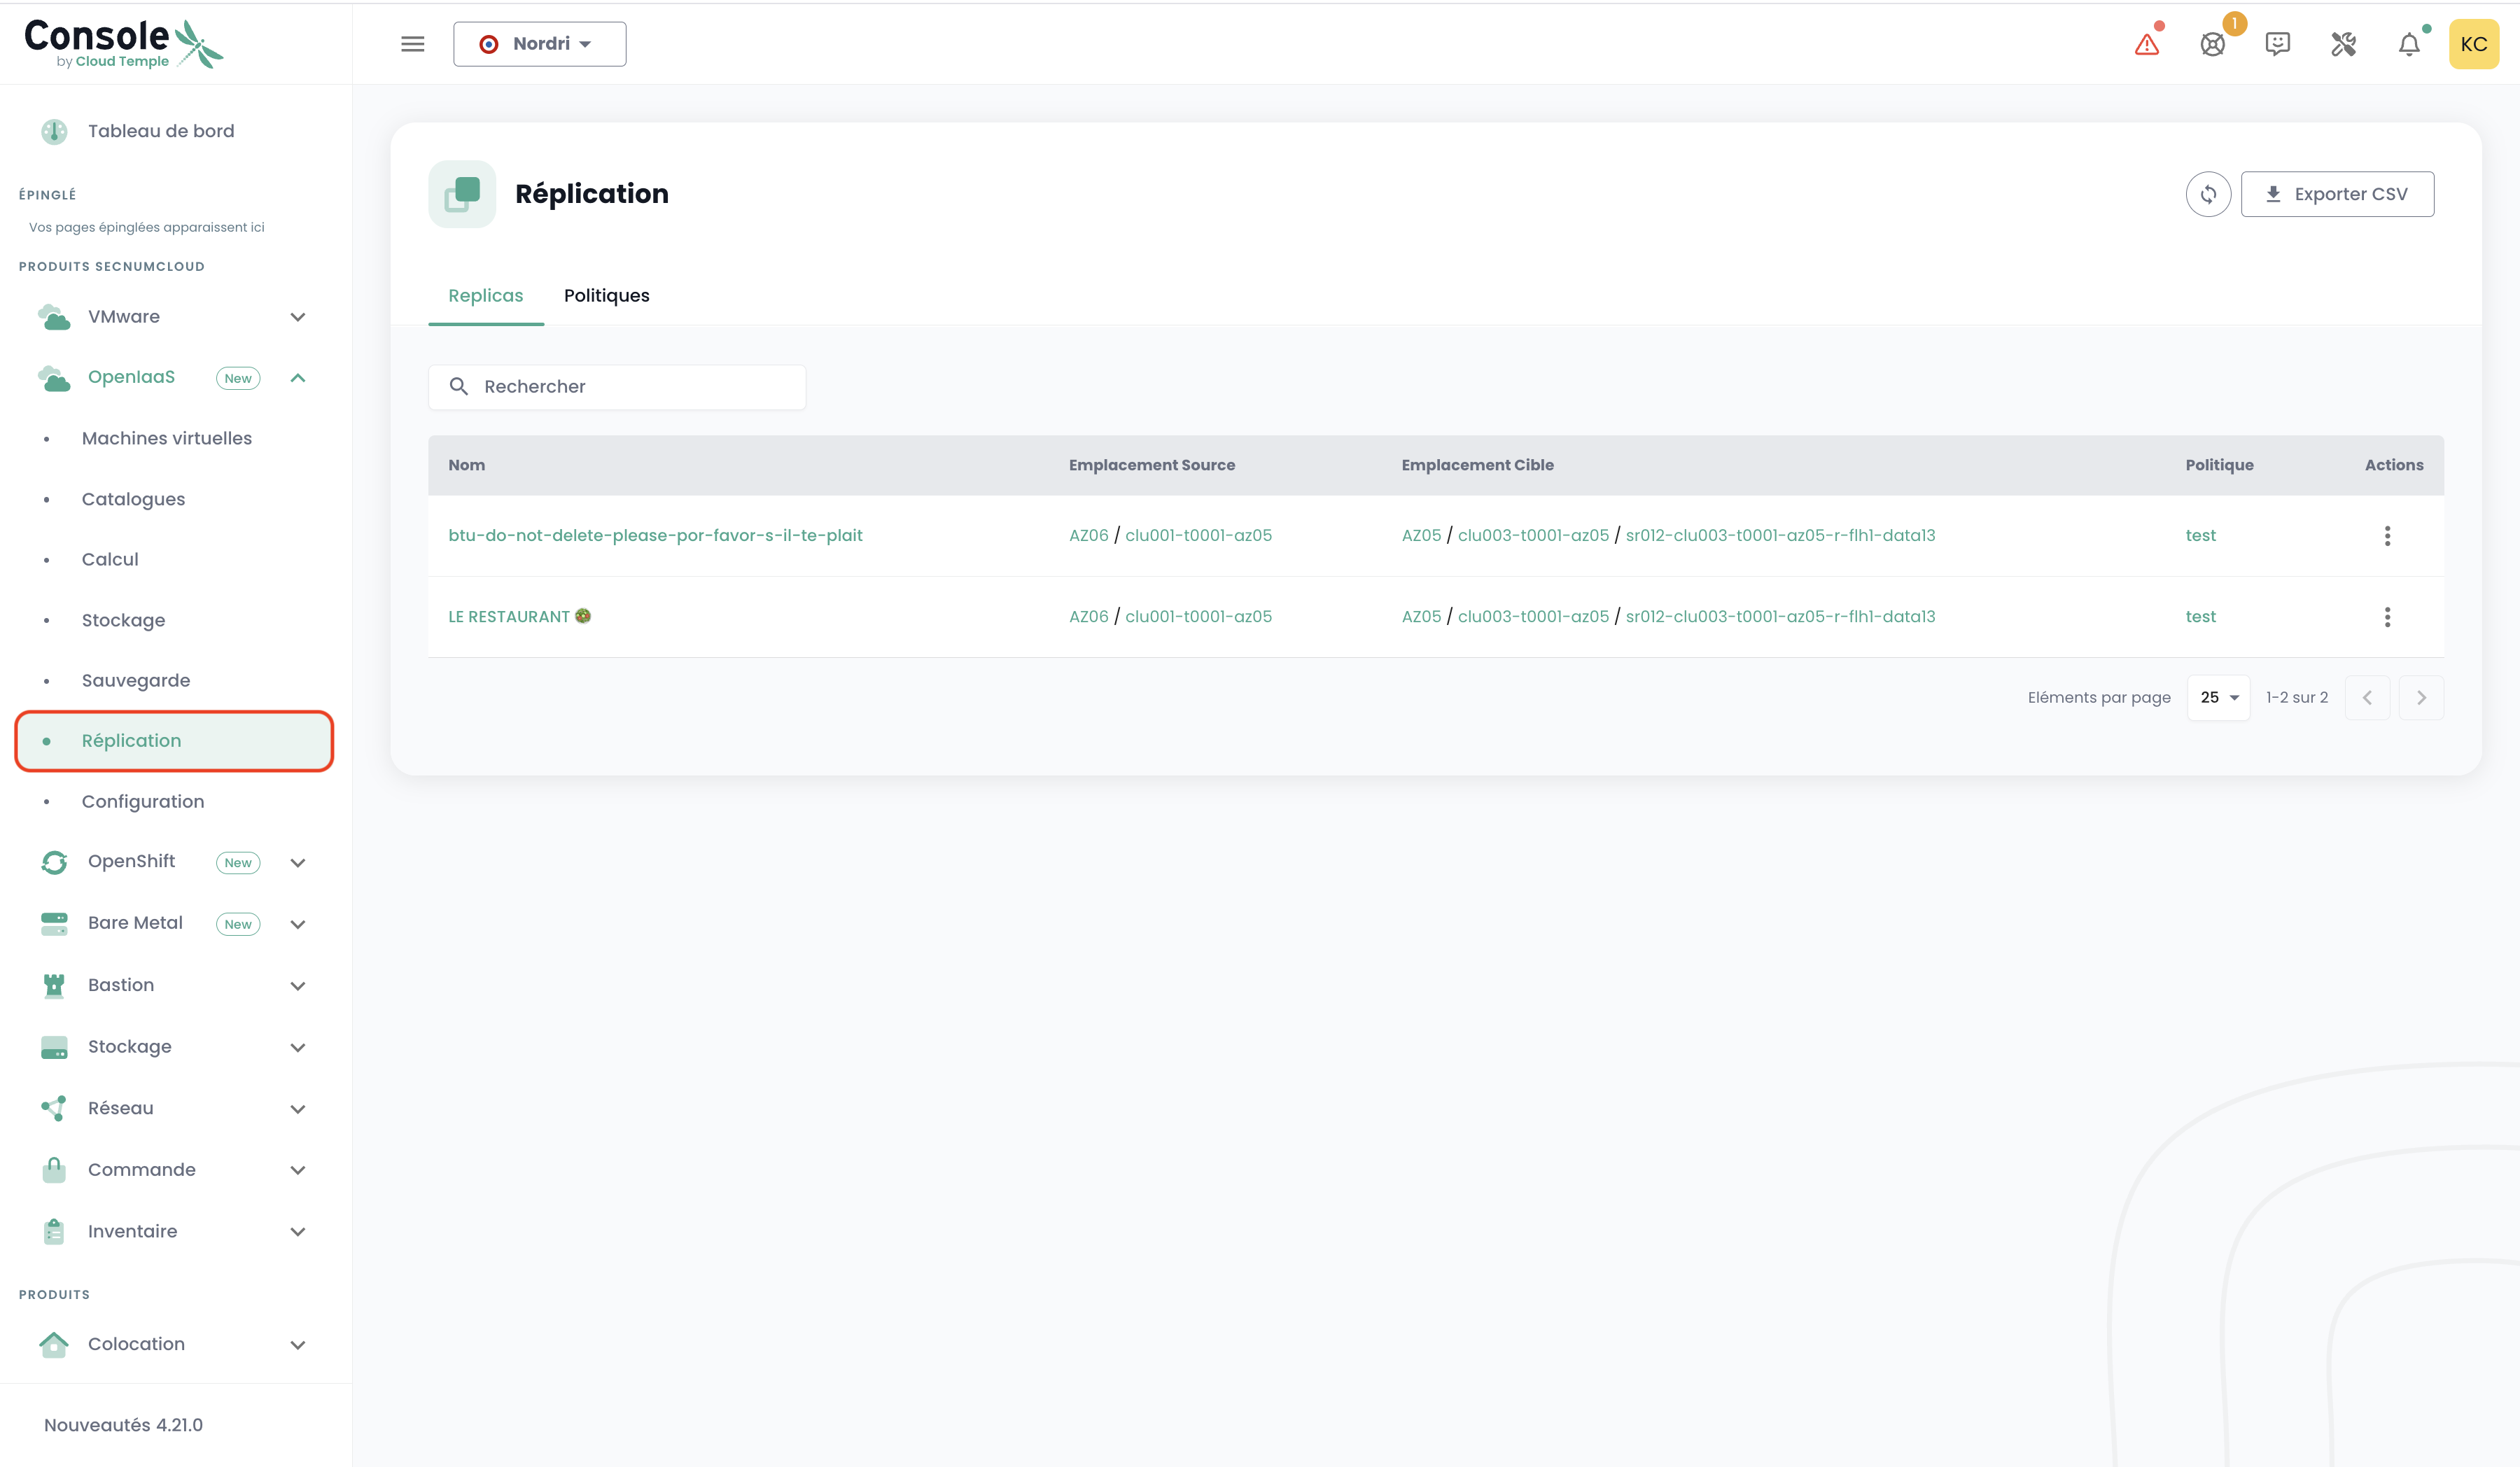
Replikate-Ansicht
Die Registerkarte 'Replikate' zeigt alle virtuellen Maschinen an, die gerade repliziert werden:
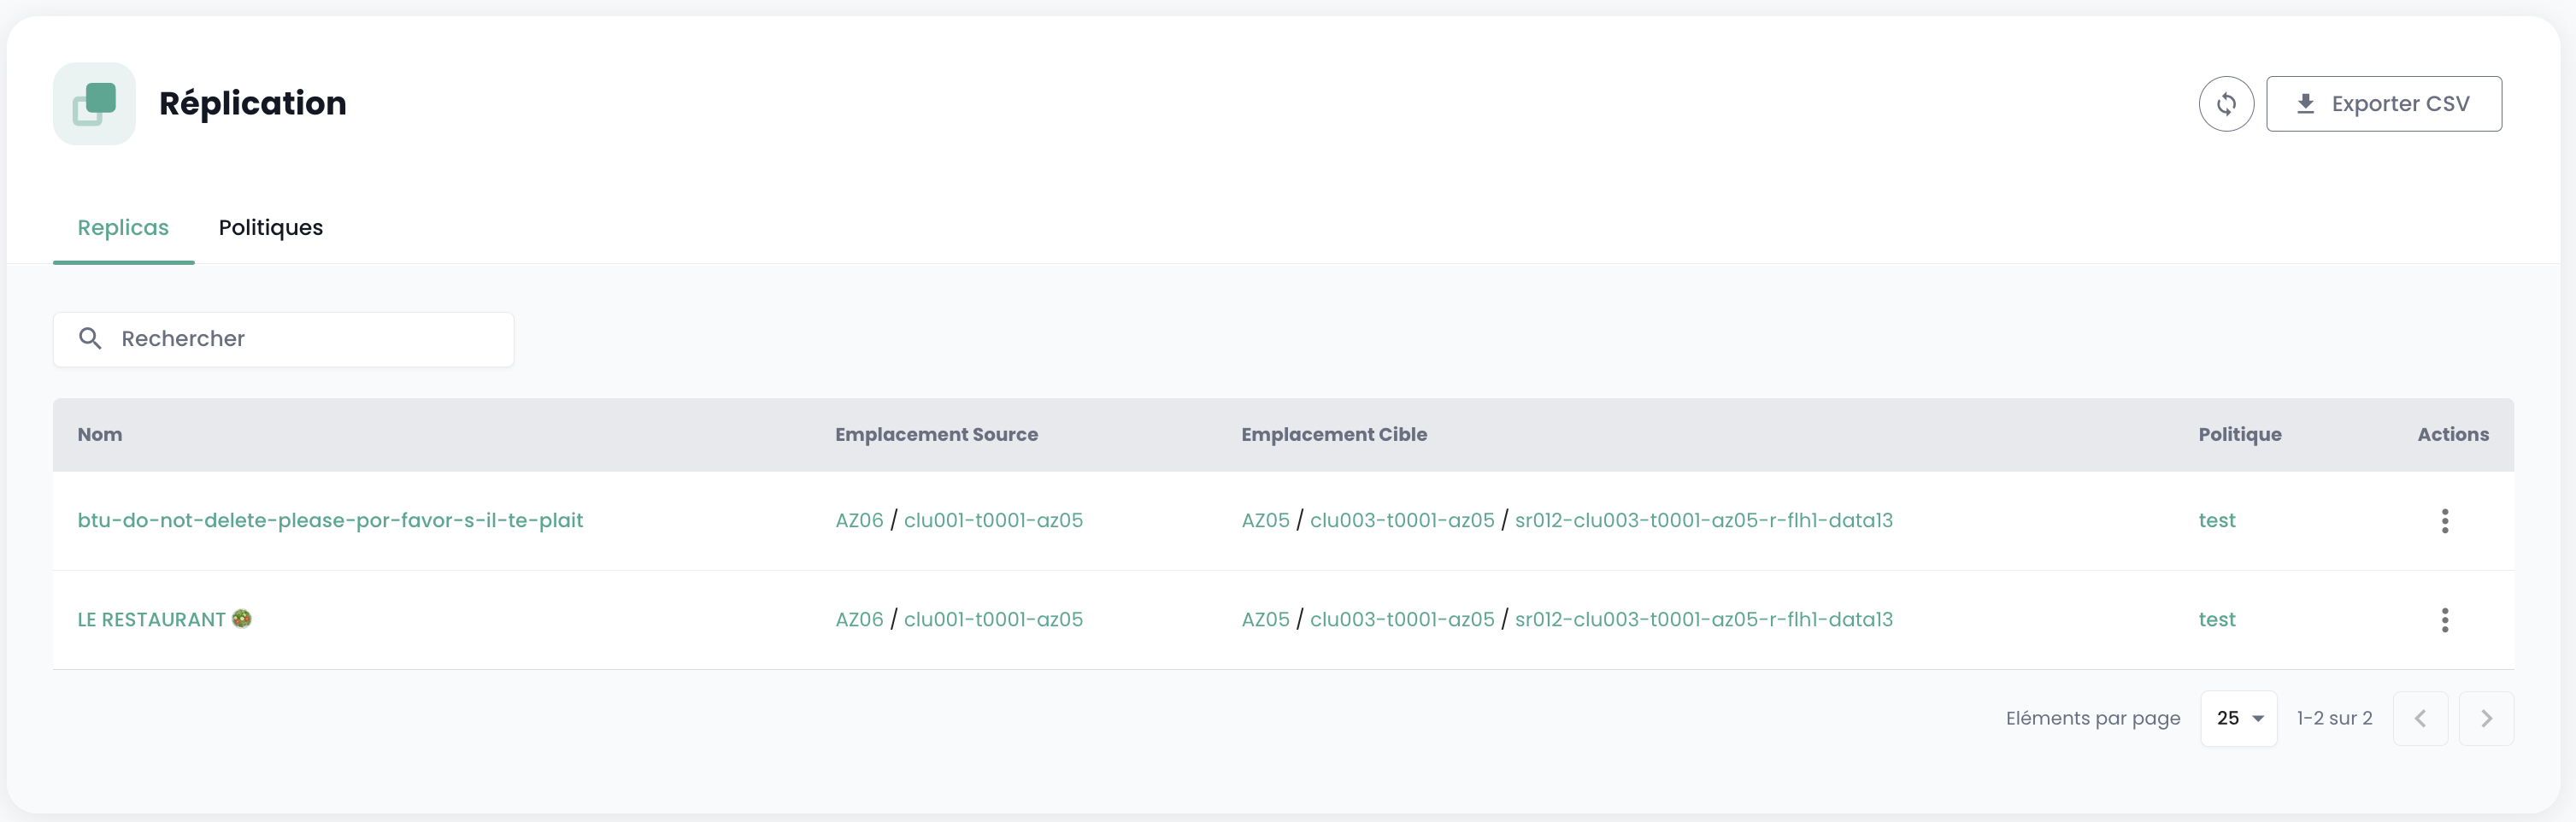
Sie können einsehen:
- Der Name der replizierten virtuellen Maschinen
- Der Quell- und Zielstandort
- Die zugehörige Replikationsrichtlinie
Verfügbare Aktionen umfassen:
- Export der Daten im CSV-Format
- Anzeigen der Replikationsdetails
- Verwaltung der Replikate nach Richtlinie